How to setup Arkscan Printer Proxy
⬇ Download the installer Windows 10 / 11 · 64-bit
Arkscan Print Proxy is a small Windows app that receives your label jobs, resizes them to match your printer (for example 203 dpi labels onto a 300 dpi printer), and sends them on to your Arkscan printer over USB or the network.
Before you start
- A PC running Windows 10 or 11 (64-bit).
- An Arkscan printer connected by USB, or reachable on your network by IP.
- The labeling or shipping software you print from.
Install & set up
- Install the app
Run the downloaded ArkscanPrintProxy-Setup-1.0.0.exe and follow the wizard. Approve the Windows security prompt, read and Accept the license agreement, then finish. A shortcut is added to your Start menu.
Note: because the app isn't code-signed yet, Windows may show “unknown publisher.” Click More info → Run anyway to continue.
- Open it and accept the agreement
Launch Arkscan Print Proxy. The first time, scroll to the bottom of the license agreement and click Accept. You’ll only see this once.
- Choose your printer
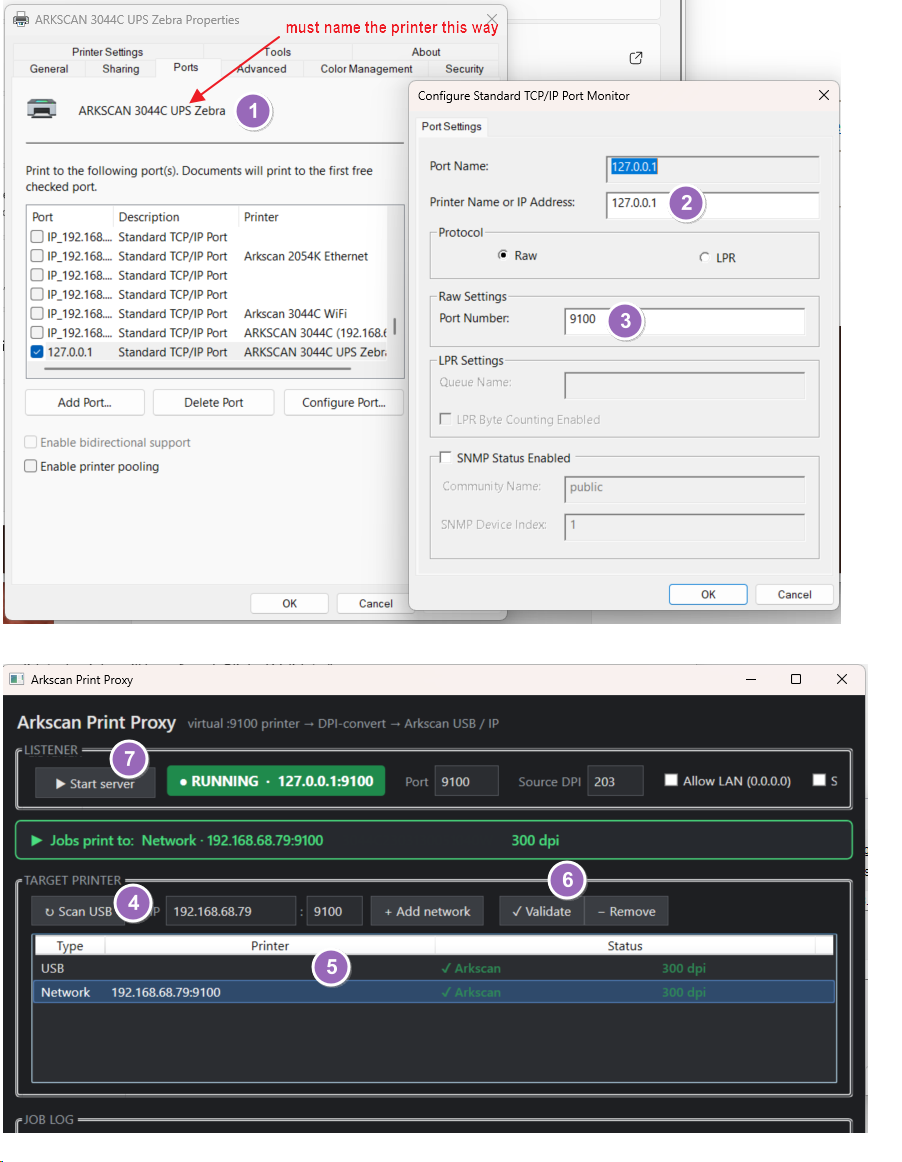
USB: click Scan USB. Your printer appears and is checked automatically, showing ✓ Arkscan with its serial and dpi.
Network (Ethernet / Wi-Fi): type the printer’s IP in the IP box, click + Add network, then ✓ Validate.
The green “Jobs print to:” banner always shows which printer will receive your labels.
- Set the source resolution
Set Source DPI to the resolution your labels are designed at — usually 203. The app reads your printer’s resolution and converts each job only when it differs, so 203 dpi labels come out full-size on a 300 dpi printer.
- Start the listener
Click Start server. A green ● RUNNING badge confirms it is listening at 127.0.0.1:9100. Optionally tick Share to let other computers print through this PC, and Start on launch to run it automatically.
- Set up the Windows printer (driver)
In Windows, add a printer for your Arkscan model, then open Printer properties → Ports. Add or configure a Standard TCP/IP Port that points at the proxy, with these settings:
Printer Name or IP Address 127.0.0.1
Protocol Raw
Port Number 9100
If printing from UPS.com, the printer must be named exactly ARKSCAN * Zebra — your shipping system looks it up by this name.
Printing from another PC? Use this computer’s network IP in place of 127.0.0.1, and turn on Share in the proxy.
- Print and check
Set your labeling or shipping software to print to the printer you set up above, and send a label. The proxy’s Job Log shows it arrive and go out (CONVERTED → SENT when resized). Confirm the printed label looks right — you’re done.
If something’s not right
My shipping software can’t find the printer Make sure the Windows printer is named the way your shipping system expects (for UPS.com, ARKSCAN * Zebra), and that its port is set to 127.0.0.1, Raw, port 9100.
The printer shows “✗ blocked” Make sure it’s a genuine Arkscan unit. For a network printer, double-check the IP and that it’s powered on and reachable on the same network.
Nothing printed until I closed my test tool That’s normal — the proxy waits for the full job. A real print driver sends and closes on its own, so it prints right away.
I want to print from other computers Tick Share, allow the app when Windows Firewall asks, and point those PCs at this computer’s network IP on port 9100.