Please watch one of the following options to setup the printer's driver for Windows computer:
Option A - Video Instructions :
Instructions to RE-CONNECT your Ethernet/LAN printer to the network due to network configuration change, hardware change, or printer lost connection. These steps are for Windows ONLY - ▶ Please watch video instructions here
Instructions to RE-CONNECT your WiFi printer to the WiFi network due to network configuration change, hardware change, or printer lost connection. These steps are for Windows ONLY - ▶ Please watch video instructions here
Option B - Descriptive Instruction
1. Download & Install :
Click Download Driver Installer for Windows, and save the downloaded file on your computer.
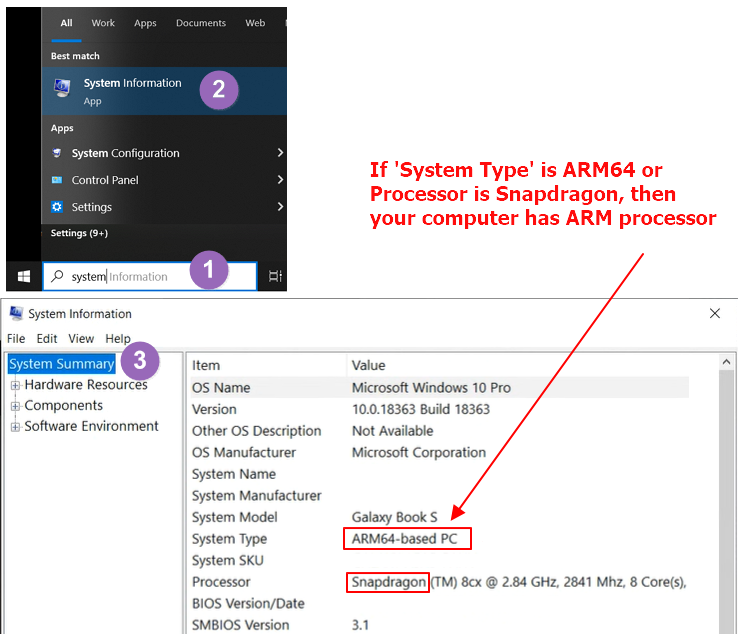
* If your Windows computer is ARM processor (not an Intel Processor), it needs a different printer driver, please Read Me
* Are you printing labels via DESKTOP software of Stamps.com, FedEx, Endicia or Quickbooks? Or the websites Accelerlist.com or ChitChats.com? It needs a different printer driver, please Read Me
2. Install & Setup Driver (choose which connection you would like to print label) :
- Please connect the USB cable between the printer and your computer and turn on the printer.
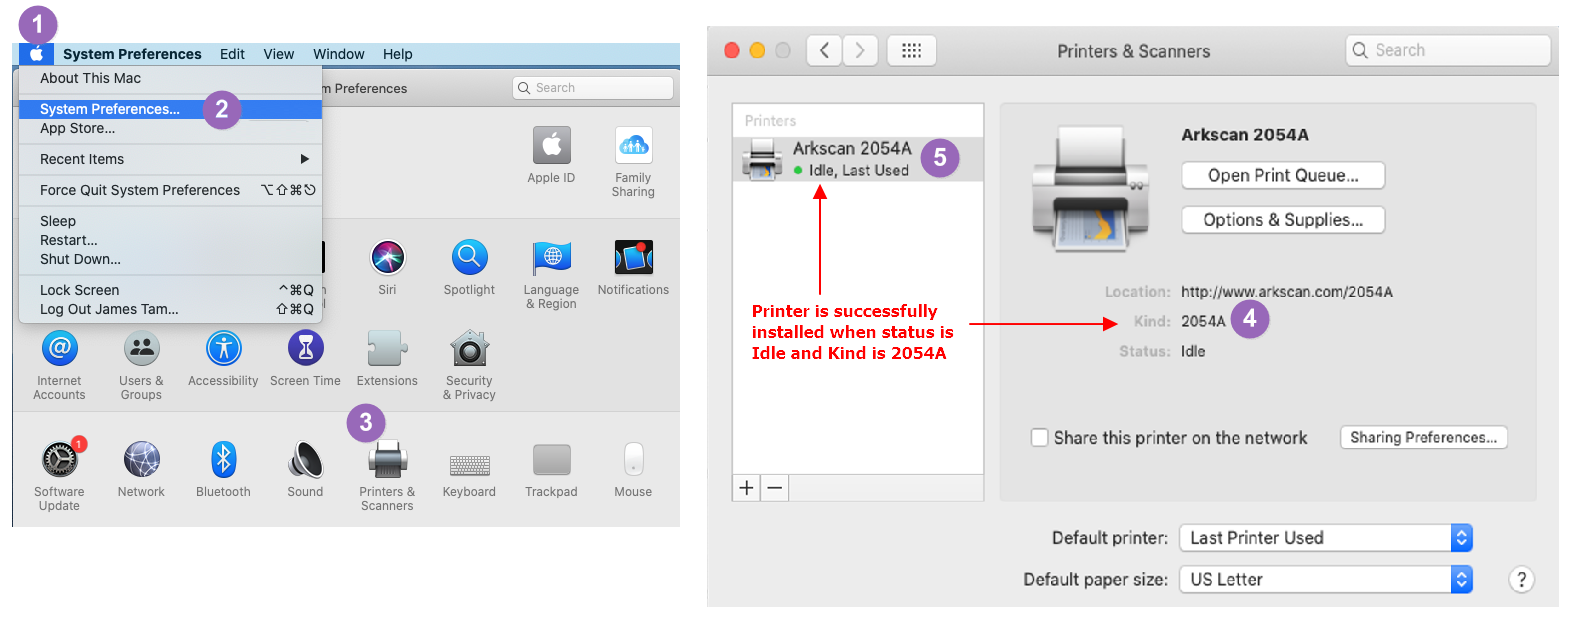
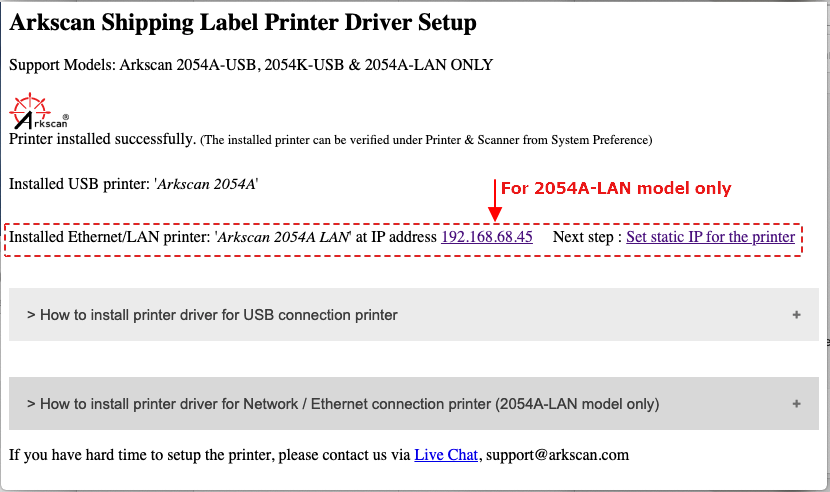
- Double click the downloaded file to run the installer, and then click through the installation process, and you should expect to see the printer name "4BARCODE 4B-2054A" or "Arkscan 2054A" shown under Printer & Scanner.
- Find out which IP address the printer is assigned, there are two methods,
Method #1: Print a configuration page where it shows the printer's IP address.
Method #2: Utilize the Printer Tool to obtain the IP address.
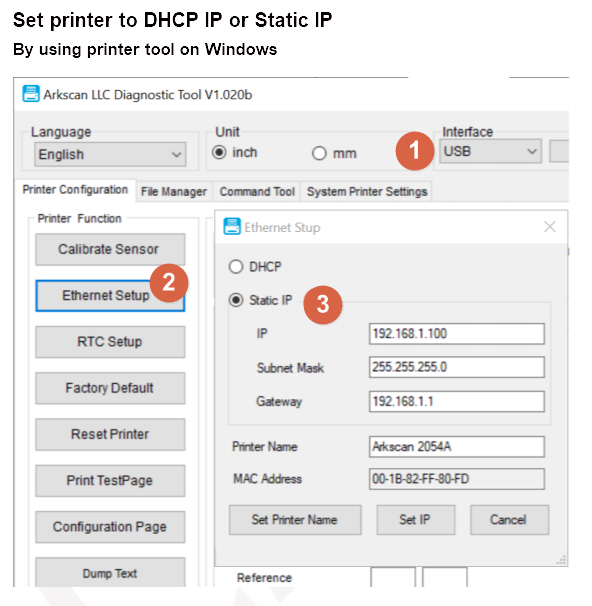
- Set the printer to static IP address instead of the default setting of dynamic (where DHCP = Yes).
- Run the downloaded driver installer, and create an IP port by the IP address obtained above, and assign the IP port to the printer's driver.
If you have a hard time following the above brief steps, please see the detailed Ethernet Printer Setup document.
For WiFi printing setup, use the Printer Tool to help the printer join your network and obtain its IP address (DHCP = Yes), or manually set the printer's IP address (DHCP = No). Then, create an IP port in the printer driver under Printer & Scanner. Please follow the corresponding video above for the setup.
Please follow the steps in the video link above, using the green button "BLUETOOTH Connection - Printer Driver Setup For Windows" to set up the printer
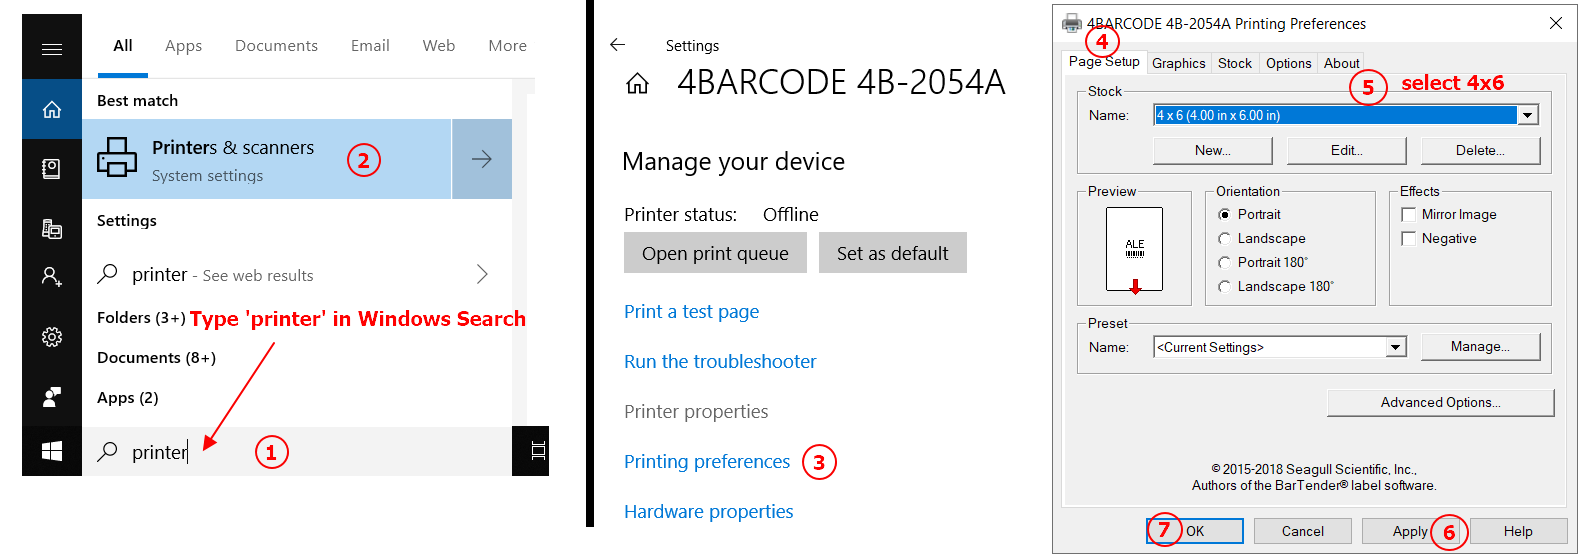
3. Choose stock (label size) :
Go to the Printer & Scanner > select printer name "4BARCODE 4B-2054A" > Manage > Printing Preference > Page Setup > Stock > Name > choose 4x6" from drop down > Apply > OK. See How
Driver Setting on Windows
4. Print a sample label :
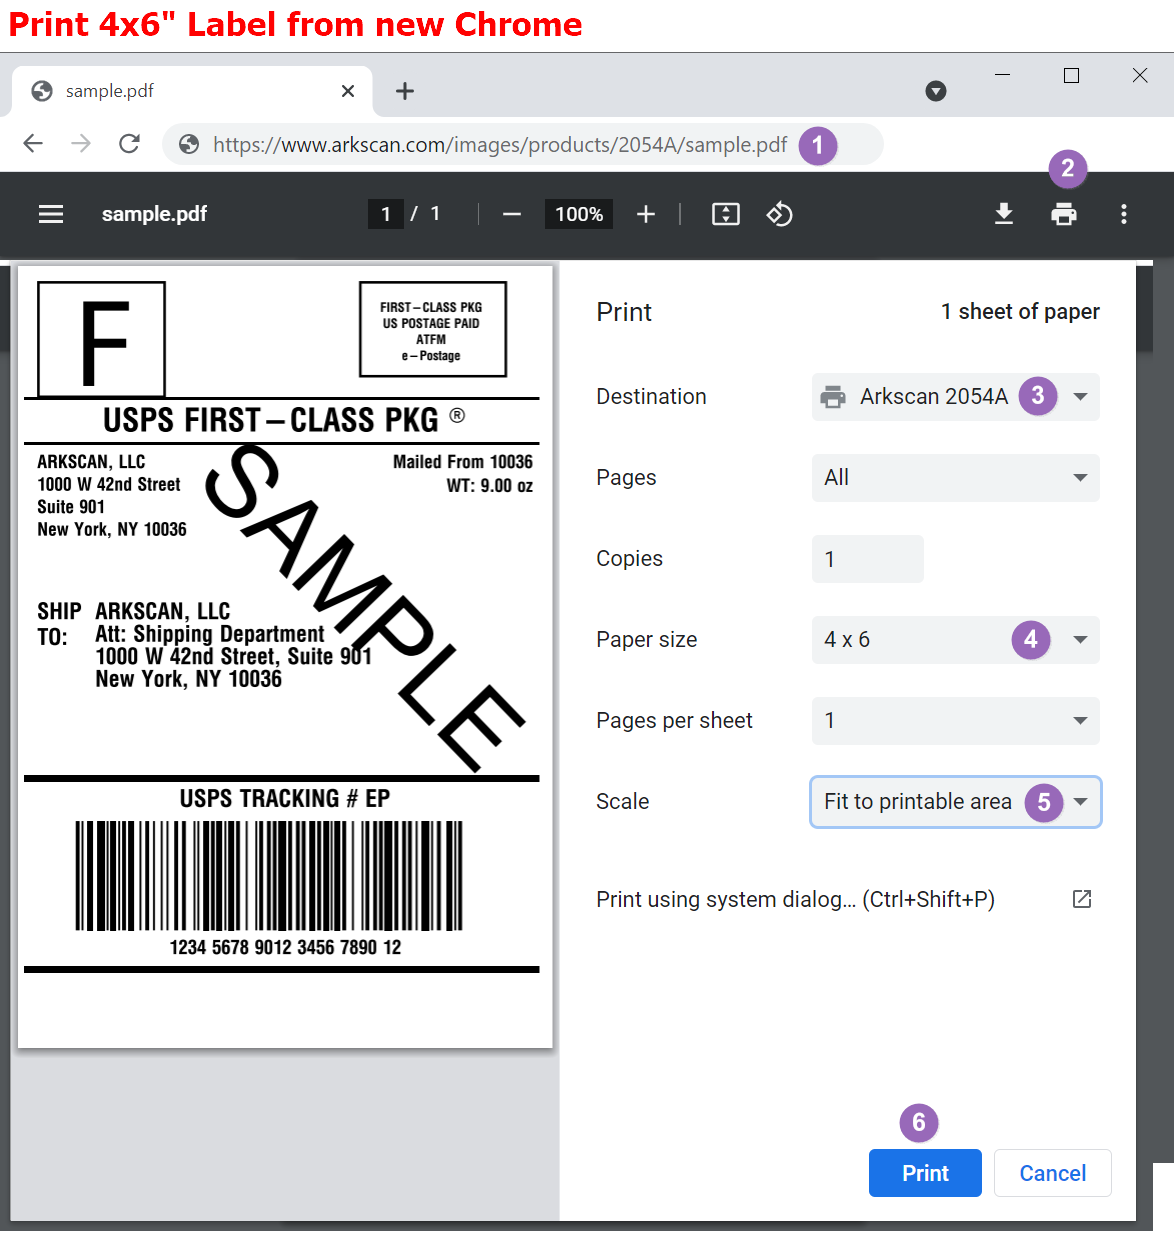
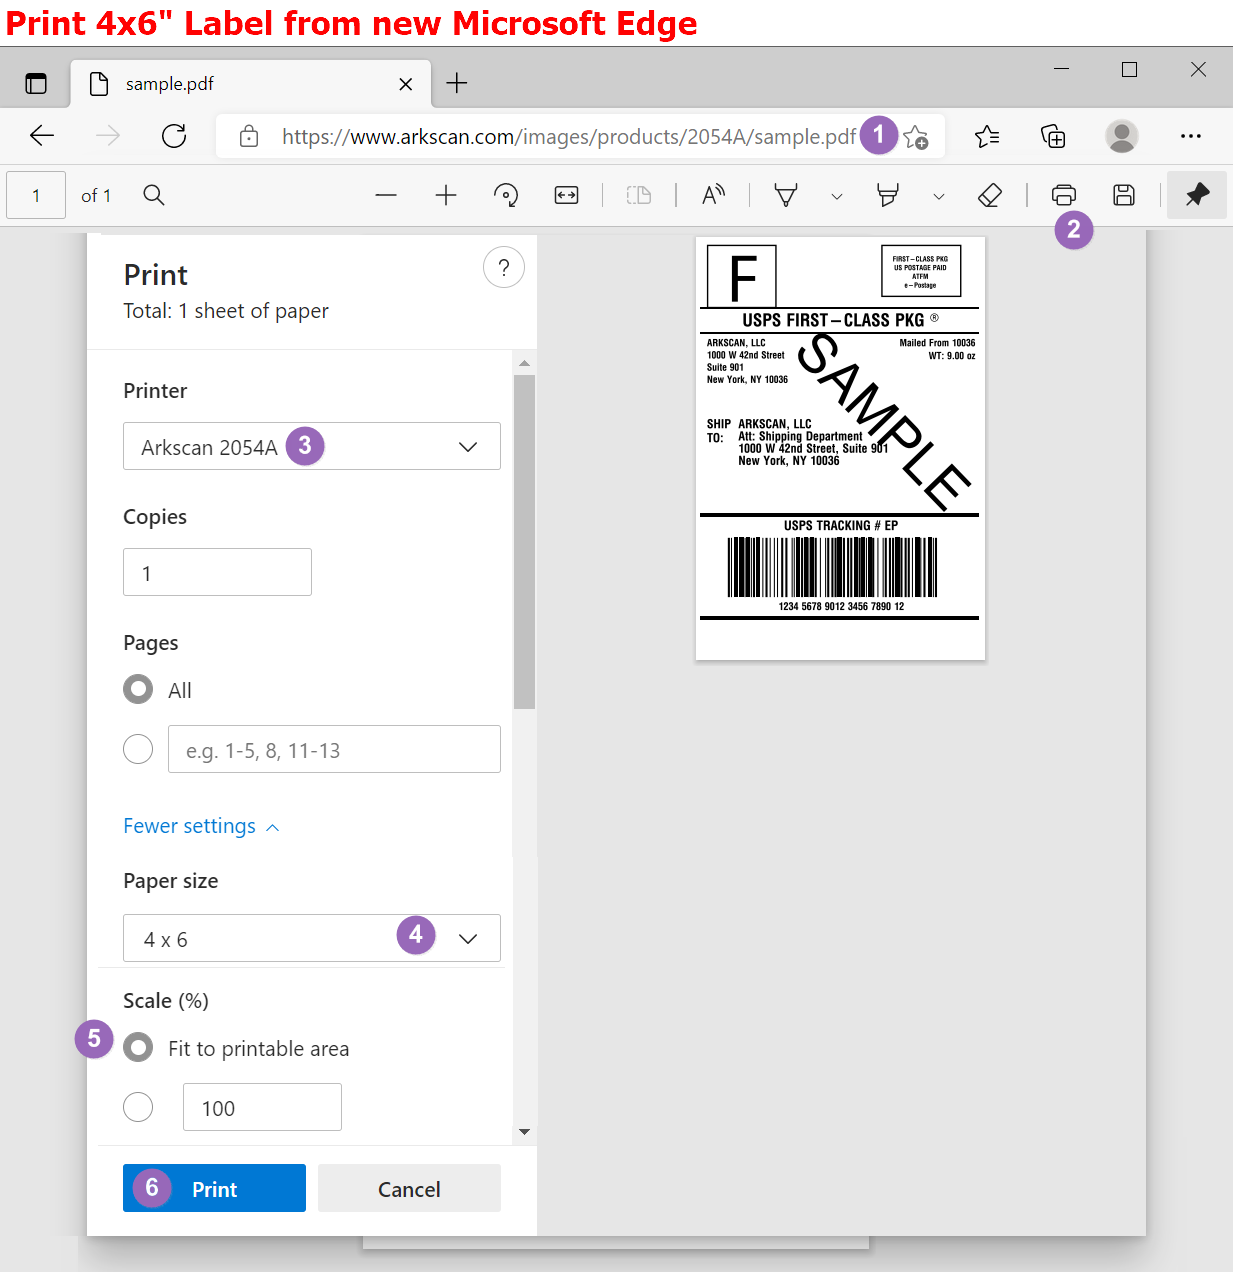
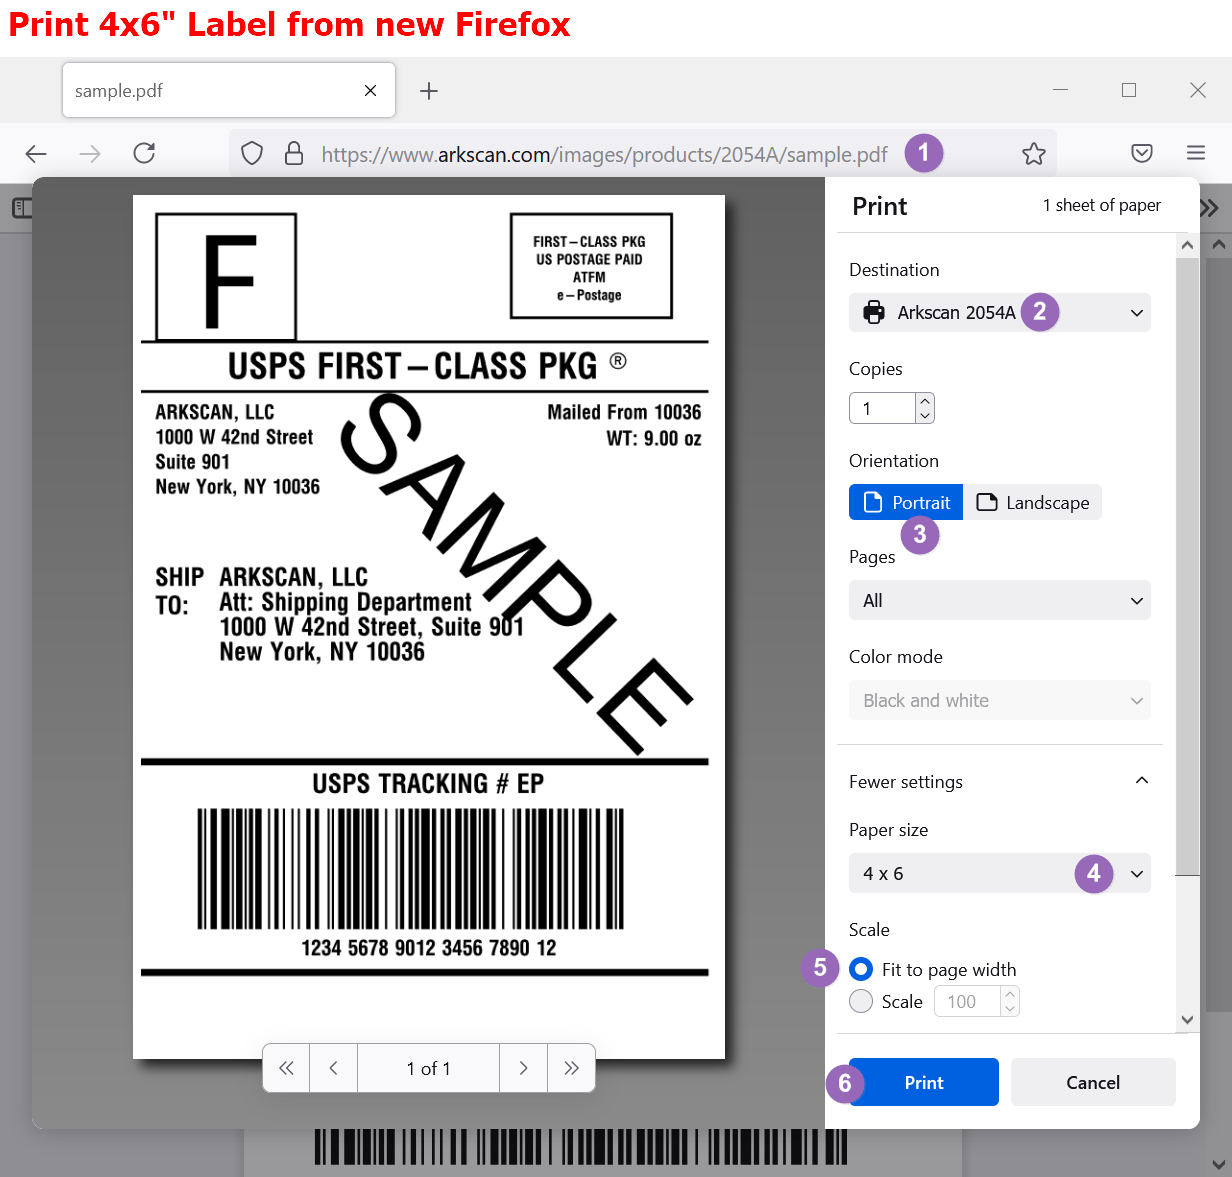
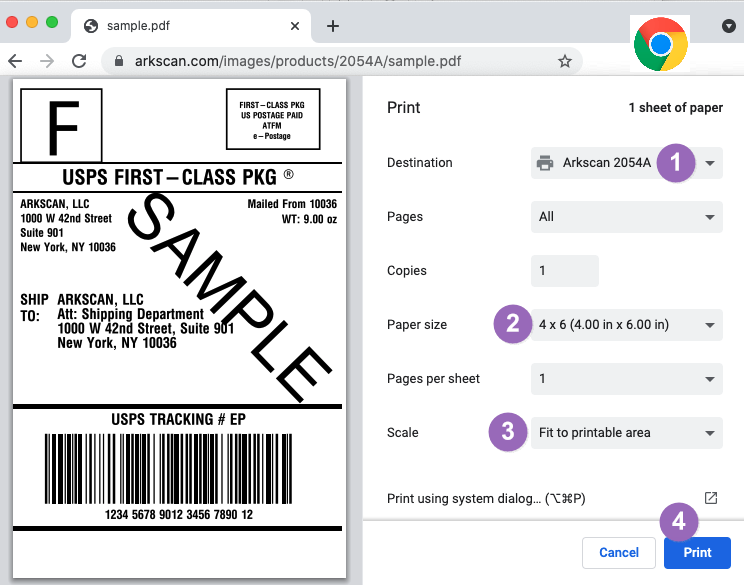
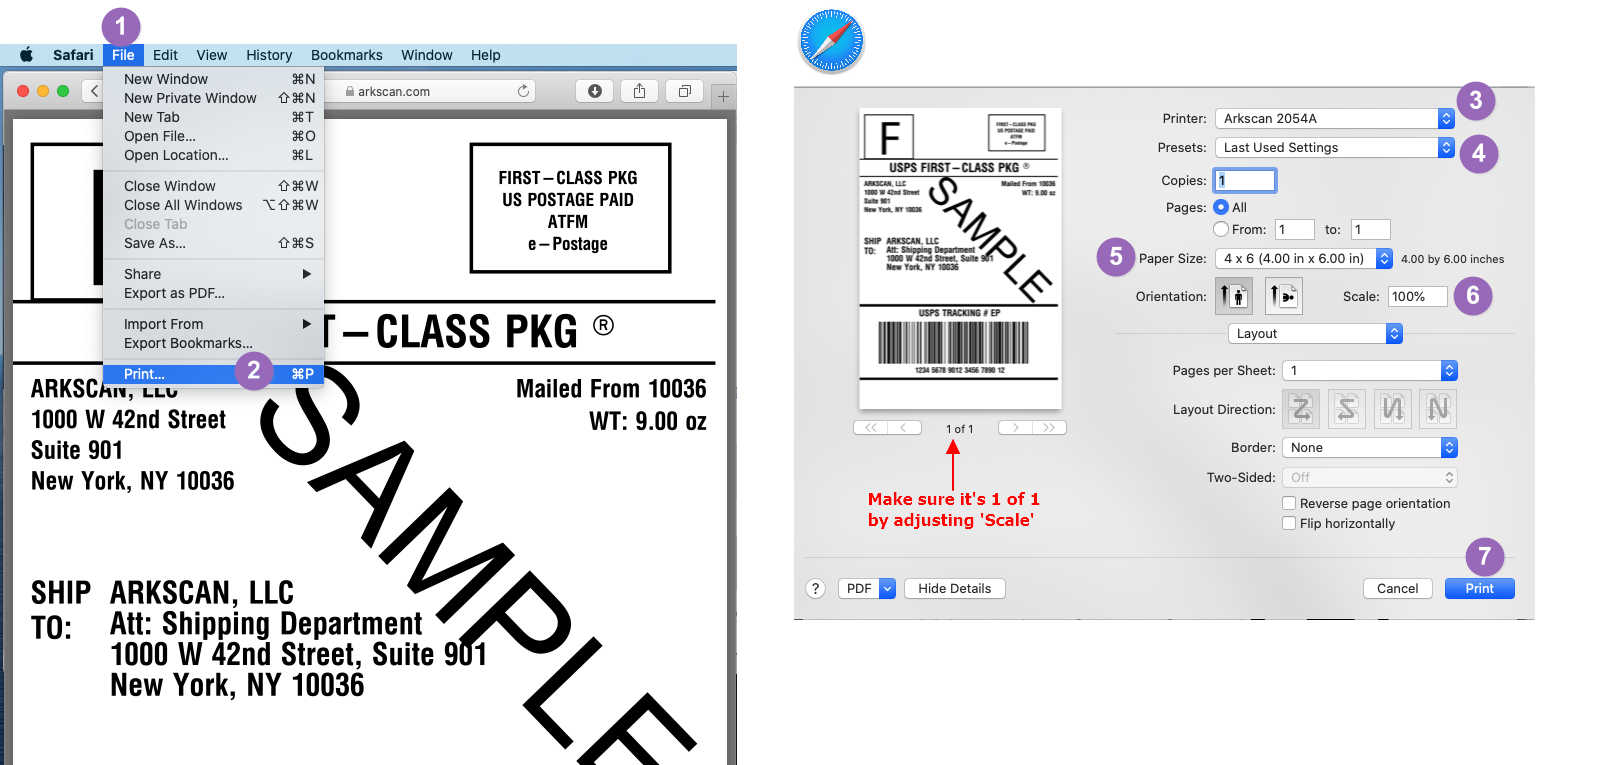
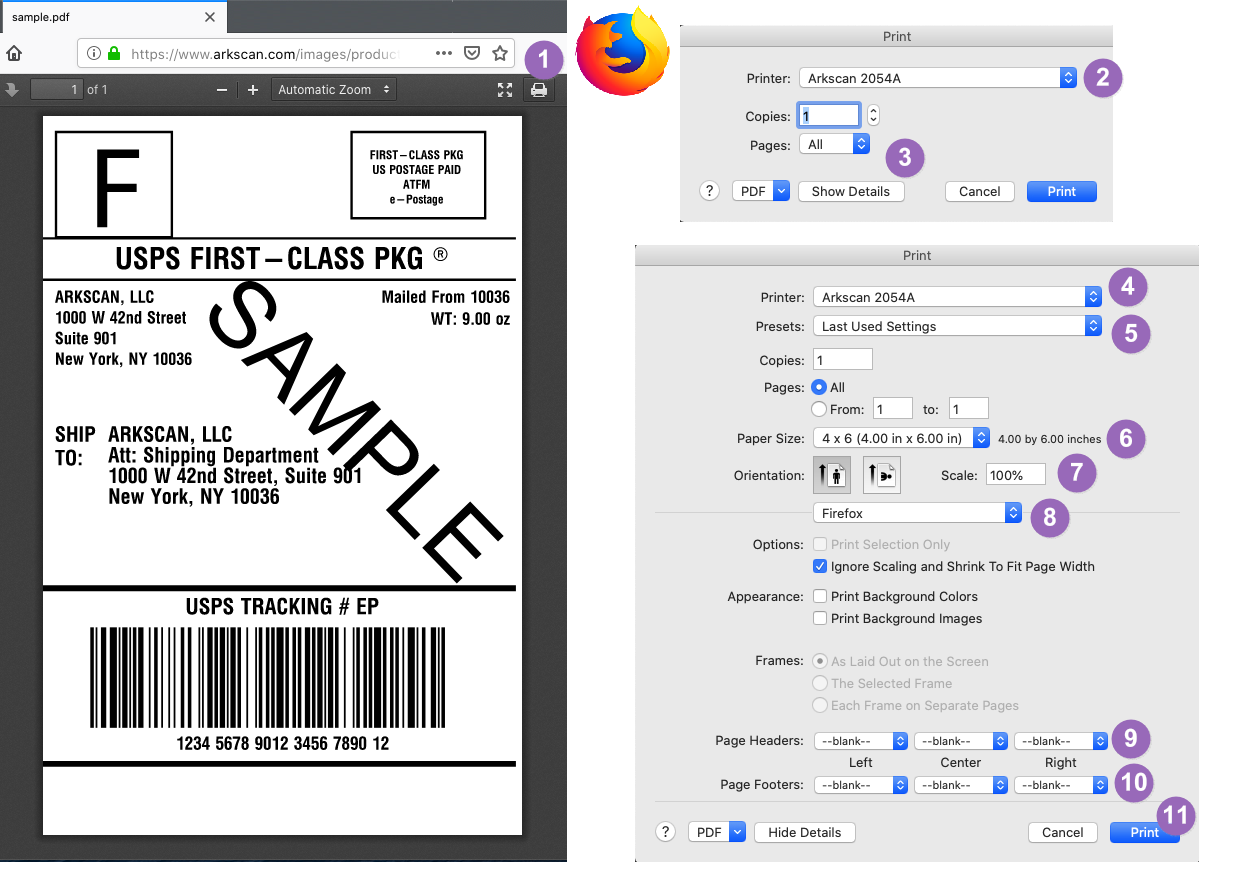
Print this 4x6" sample shipping label to confirm if the printer prints correctly. On the print preview popup, choose Page Size / Paper Size = 4x6", Scale = 'Fit to Printable Area' to print. Settings to print label from Chrome , Microsoft Edge , Firefox(New) , Firefox. Having Issue
NEXT STEP: To print 4x6" shipping label, adjust the layout format on your Printing Platform before printing. For other label sizes, using BarTender label creation software, or other options, please see the instructions on our Printer Platform page.
Having other issues: Please visit the FAQ page for additional assistance
Set static IP address by one of the following
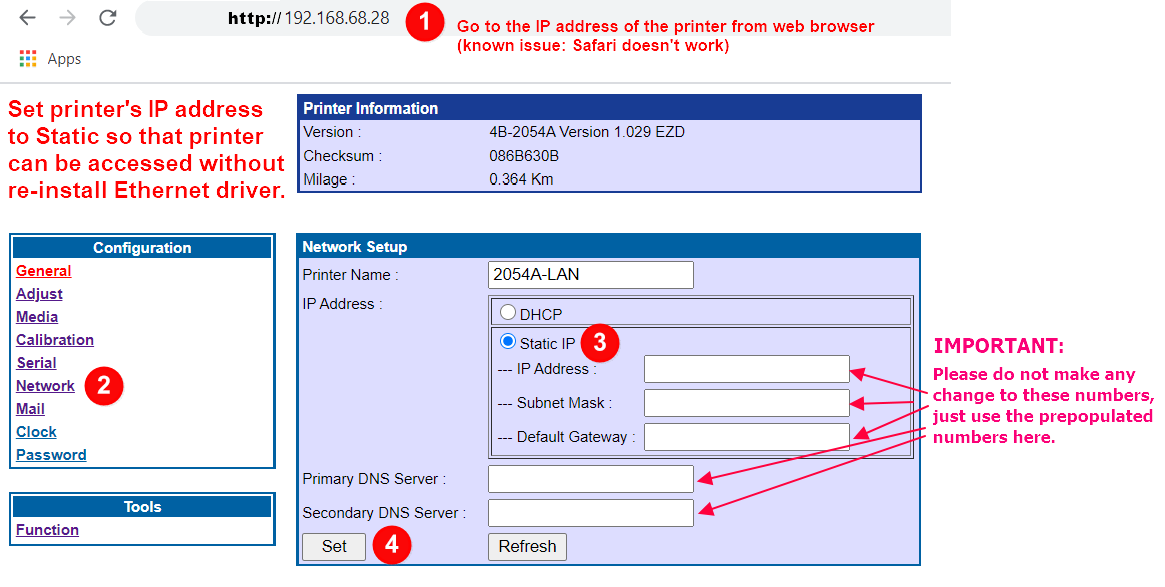
Method #2: Access the printer's web interface by the printer's IP address:
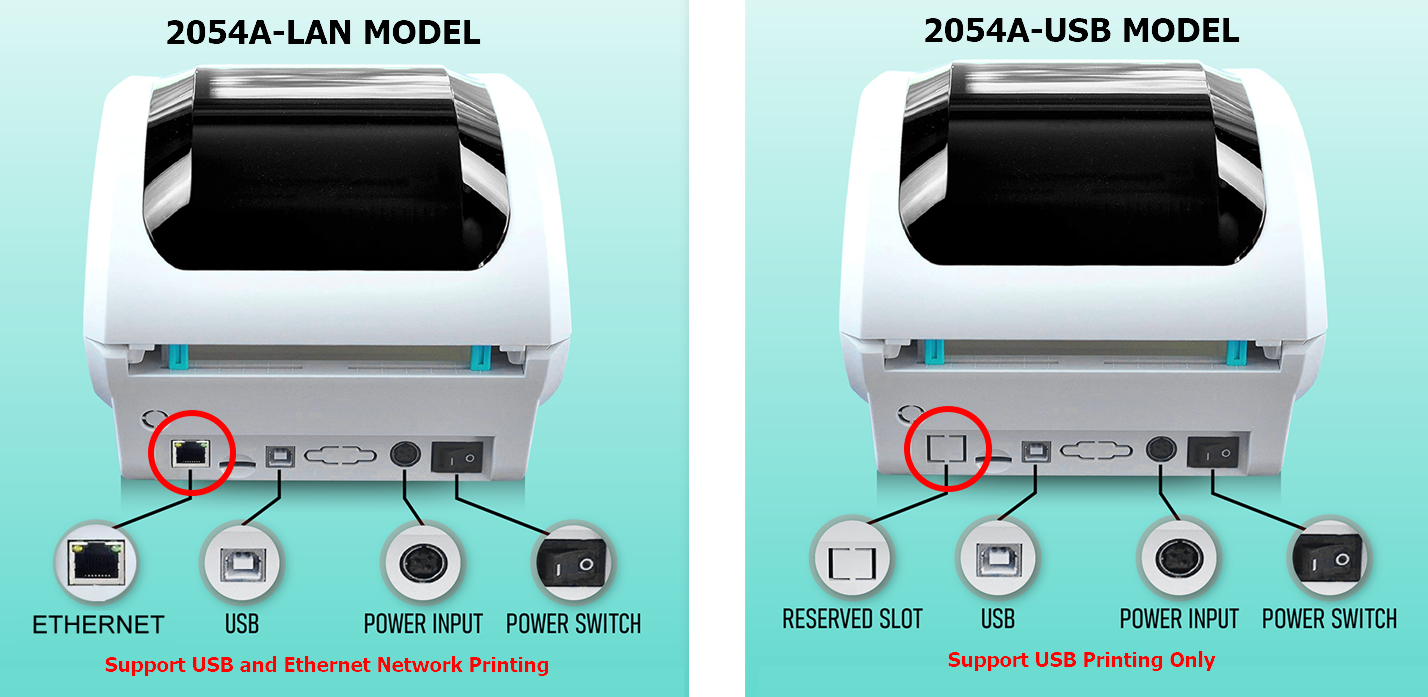
Setup printer to print label via Ethernet / Network connection
Install Printer Driver for Windows with ARM Processor
Acer Spin 7
ASUS NovaGo TP370QL
HP Envy X2 (2018)
Lenovo 10w
Lenovo Miix 630
Lenovo ThinkPad X13s
Lenovo Yoga 5G
Lenovo Miix 630
Lenovo Yoga 5G
Lenovo Yoga C630 WOS
Microsoft Surface Pro X SQ1
Microsoft Surface Pro X SQ2
Microsoft Surface Pro 9 5G
Samsung Galaxy Book2
Samsung Galaxy Book Go
Samsung Galaxy Book2 Go
If your computer is not listed above, you can follow below to verify if your computer has an ARM processor :
Enlarge Picture
Click download ARM printer driver for Windows, then double click the downloaded file to run the installer, and click through the installation process,
Setup Zebra Compatible Driver on Windows
Driver Compatibility:
The Zebra driver is required for the printer to work with these specific desktop software on Windows:* Stamps.com Desktop Software
(this doesn't include going to stamps.com website to print a label)
* FedEx Ship Manager Desktop Software
(this doesn't include going to fedex.com website to print a label)
* Endicia® DAZzle Desktop Software
(this doesn't include going to Endicia.com website to print a label)
* QuickBooks Enterprise Desktop Software
If you do not know or use the above software, then we suggest you install the Windows Standard printer driver.
Advanced Information:
Both the Standard driver and Zebra compatible driver work the same except for the following desktop software:1. If you want to support the above DESKTOP software, you must use Zebra compatible driver.
2. If you want to use Bartender software (to design and create your own label content), you must use the Windows Standard driver.
3. You can have both drivers installed at the same time, but it is not recommended, because both drivers share the same USB port and it hides one of the drivers under the Printer & Scanner, it is not obvious seeing it to update the driver's settings
Installation & Setup:
Install the Zebra printer driver by following the instructions below, or by watching this driver setup video on Youtube.- Click this link to download Zebra Compatible printer driver for Windows, then after the download is complete, double-click the downloaded file to run the installer.
- When prompted to choose a Zebra model, using your Arkscan model choose the following Zebra model:
2054A, 2054K, 2054N printers - choose model 'Zebra LP2844'
2054K-AP (Auto-Peel) printer - choose model 'Zebra Z4M Plus (203dpi)'
3044C printer - choose model 'Zebra Z4M Plus (300dpi)'
- When prompted to select which USB port to assign the printer during the installation. Select one of the available USB ports, usually USB0001 or labeled 4BARCODE; if you are unsure which port to select, or there are multiple port options available, please see the image below on where to find the exact port using the 'Device Manager'.
NOTE: Do NOT manually create a USB port! If the computer can detect the printer, there will automatically be a USB port listed. Below is an example of which USB port # to select.
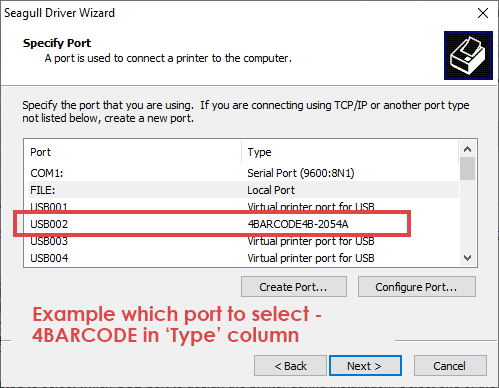
Enlarge Picture
If you have more than one available USB port or are not sure which one to select, you can use the Device Manager to find out which port should be assigned to this printer:
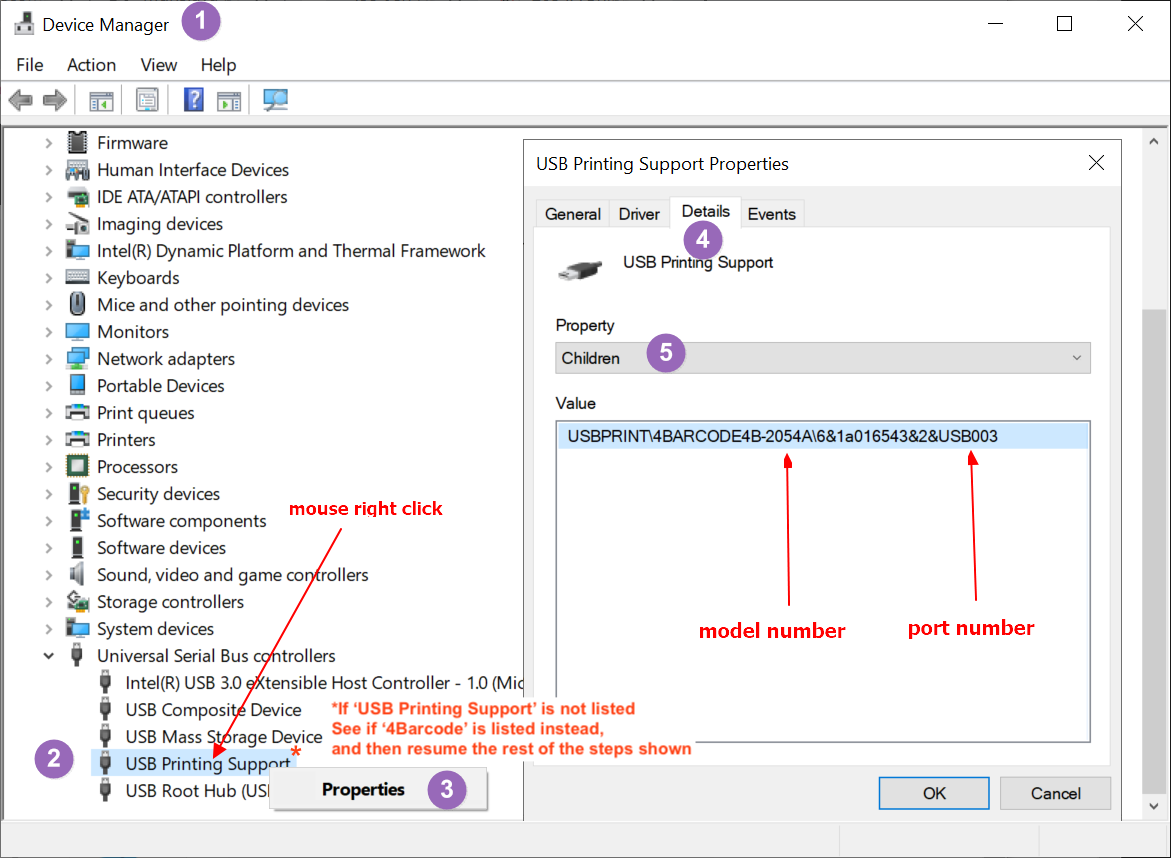
Enlarge Picture
Settings to print 4x6" label from Chrome
Settings to print 4x6" label from Microsoft Edge
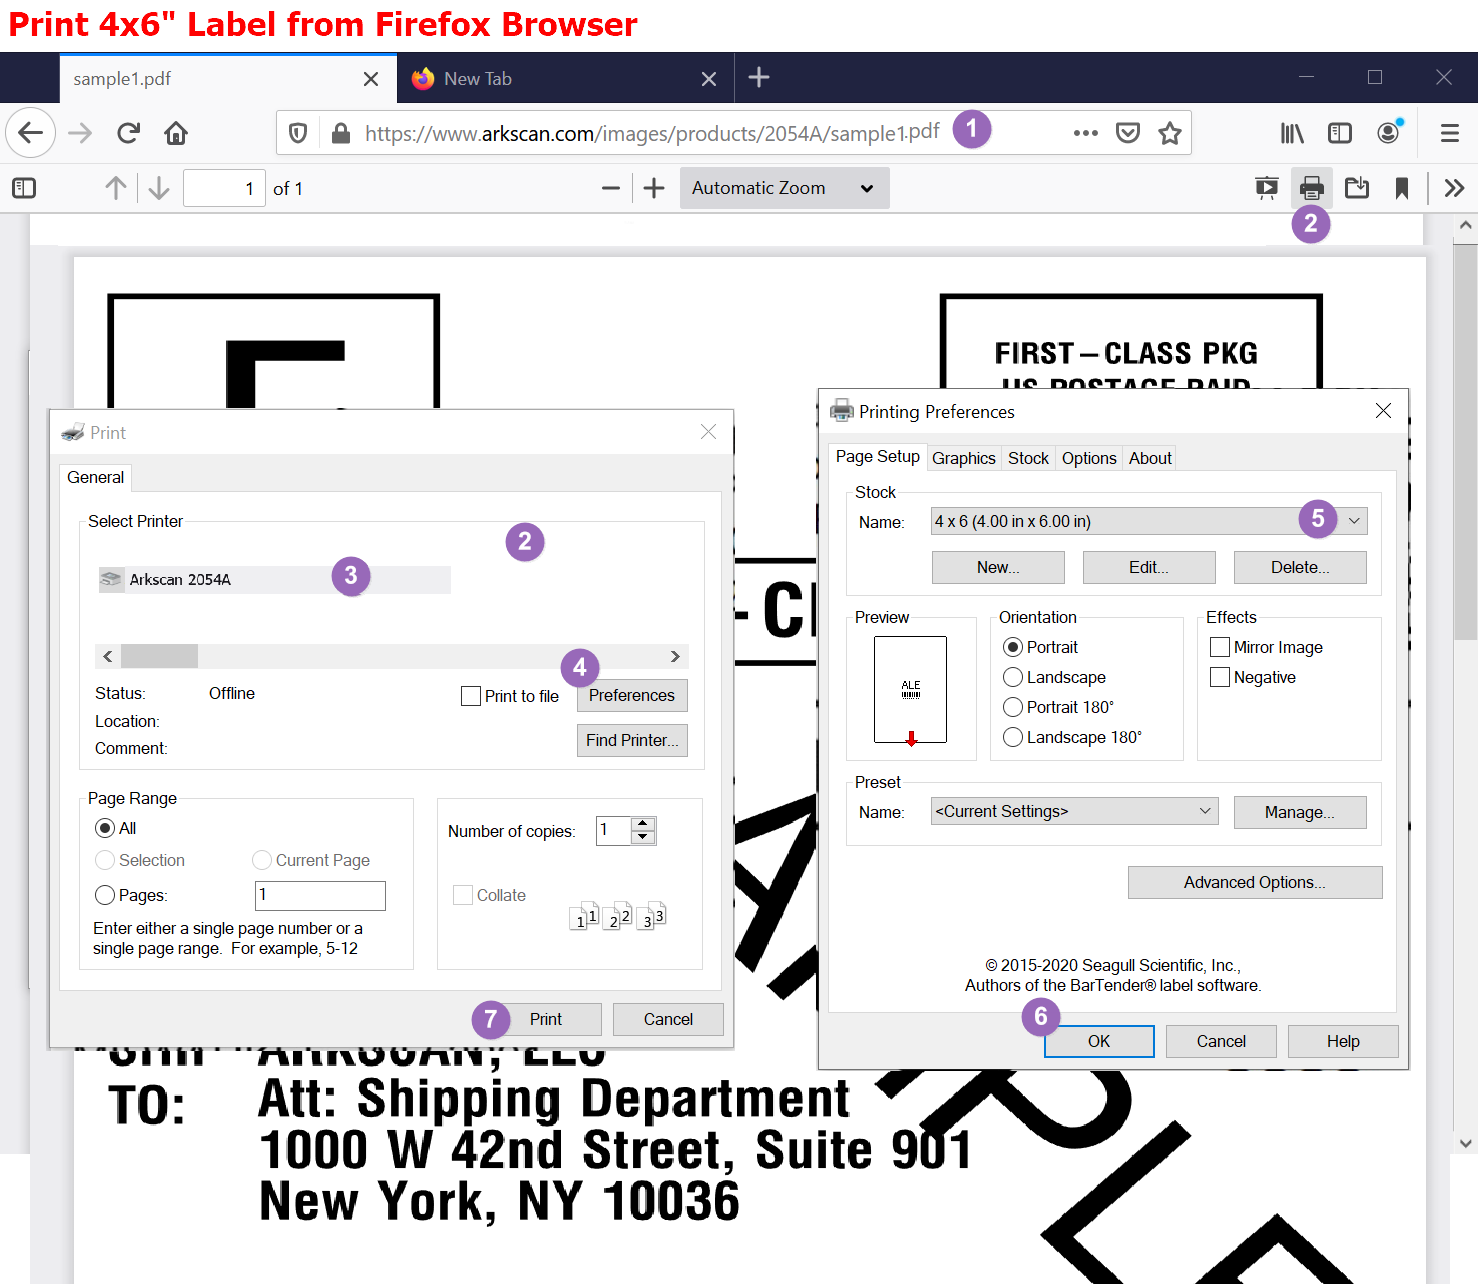
Settings to print 4x6" label from Firefox
Settings to print 4x6" label from Firefox (previous version)


PROMOTIONS
(For New Customers)