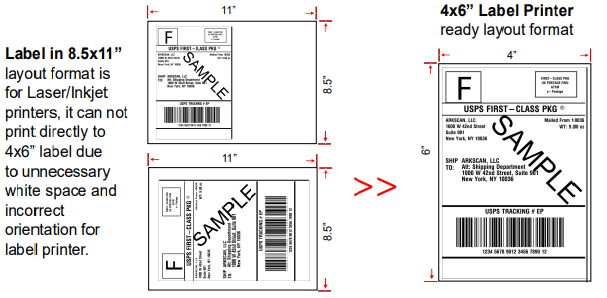
This is most likely caused by printing an 8.5x11” Laser/Inkjet printer layout label instead of 4x6” layout label. Each platform's website or software usually has settings that can be changed to fix this. Please see our 'Platforms' page to see which settings need to be changed.
- Make sure to run the label calibration. Label calibration is a process to train the label printers' understanding of the label’s characteristics. We highly suggest that you run calibration when a new roll of labels is loaded, which can prevent label alignment issues. To learn how to perform printer calibration, visit our 'Calibration' page.
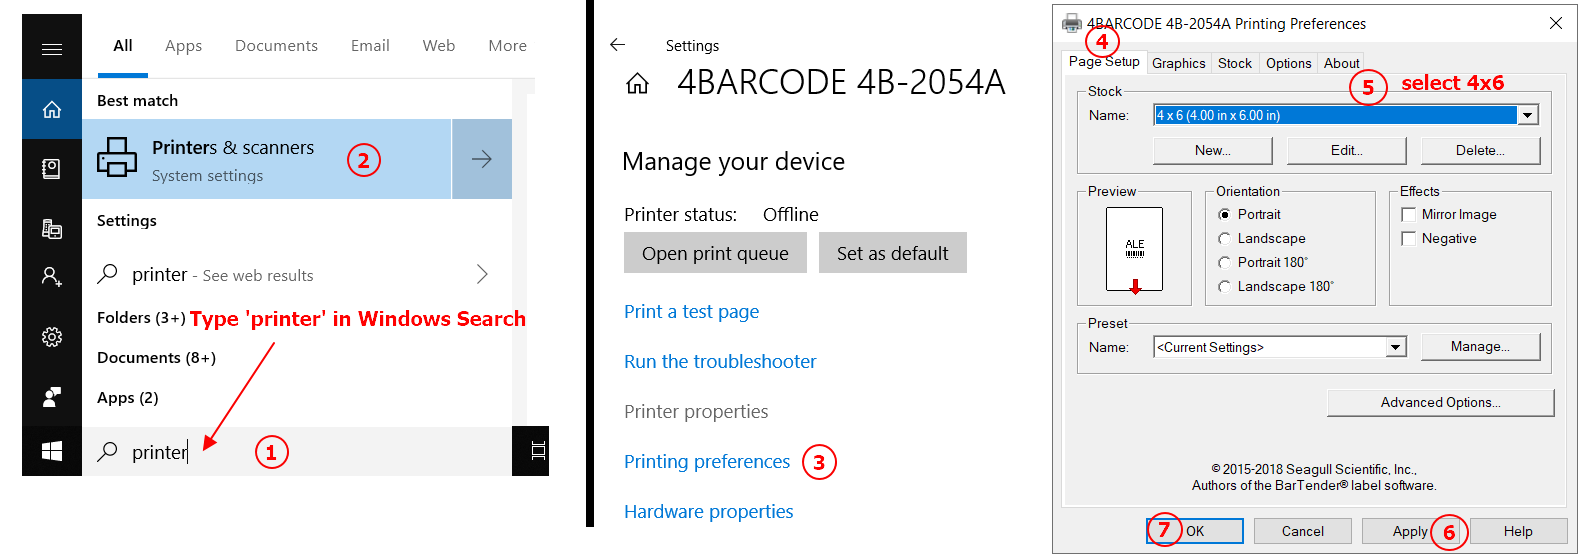
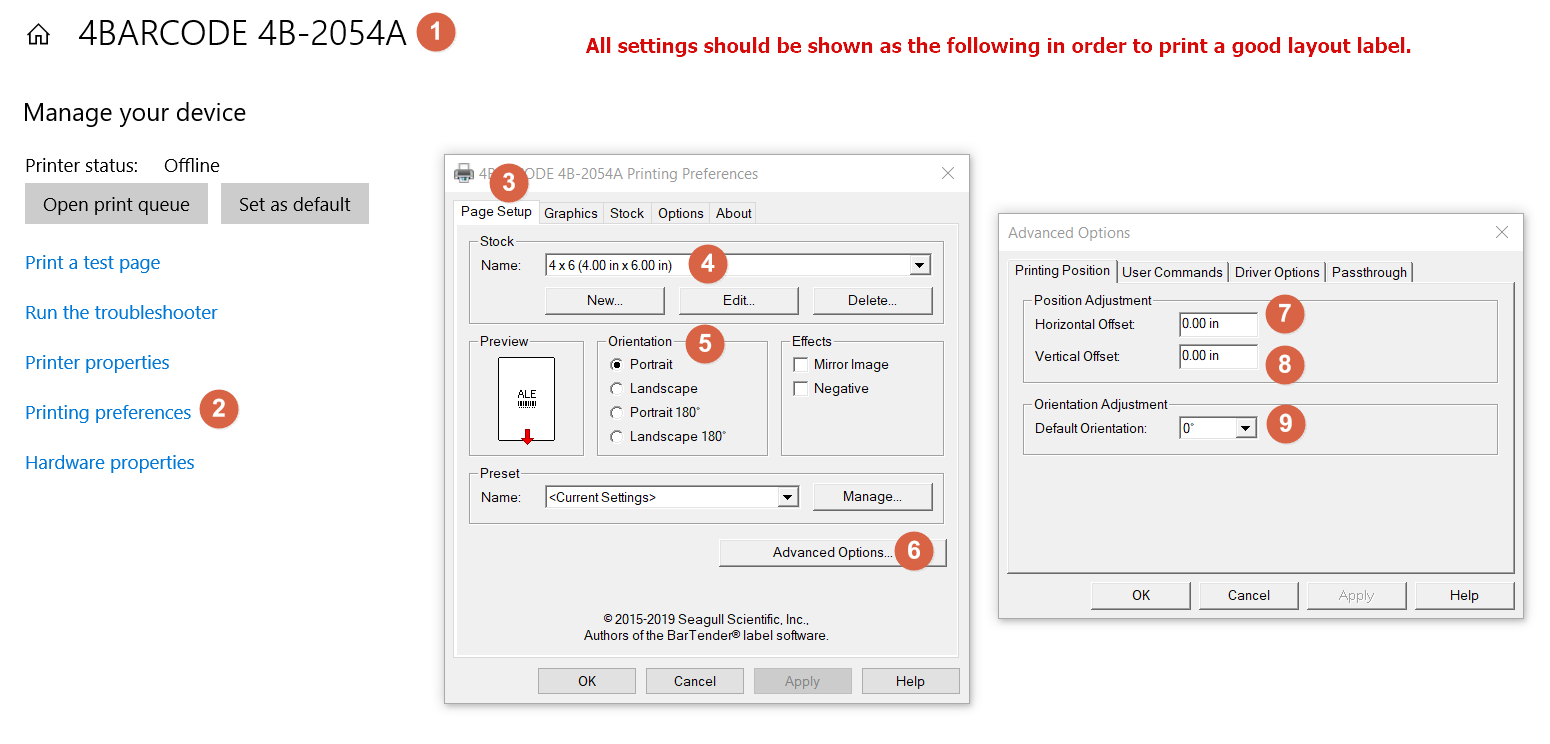
- If your computer is Windows, please see the image below on how to ‘choose the stock/name’. Stock/name can be automatically reset due to renaming the printer driver’s name, or by driver reset due to Windows’ system
Printer Cleaning Steps
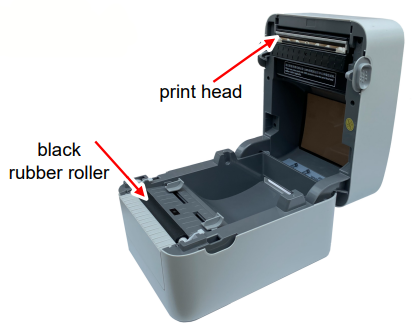
| 1. Turn off the printer, remove the power cord, and open the printer's cover. 2. Wait 30 seconds for the print head to cool down. 3. Use an alcohol wipe, cotton ball, or soft cloth dipped with alcohol and rub across the print head back and forth a few times. 4. Also, clean the black roller with alcohol, and remove any debris that may be wrapped around the rubber roller. 5. Print the sample label from the Arkscan website, and test if the printing quality has improved. |
 |
It could be one of the following:
A. Your label is not a Direct Thermal label, instead, your label is a Thermal Transfer label, check your product description to verify that.
B. The label is loaded up-side-down, please make sure the sticker side of the label is facing up, and the back sheet side is facing down.
C. For Windows computers, you probably set the offset of the printing area out of the label’s boundary. To fix the issue, go to the printer’s driver, then navigate to Printing Preference > Page Setup > Advance Options > Printing Position > Horizontal Offset & Vertical Offset, both offsets should be 0.00.
If you believe you have done all three of the above right, you can run a self-test page: press and hold down the feed button until beeps twice or flashes purple, it will print a setting page. (the press & hold down time is about 4 seconds)
If you have a USB label printer and the printer failed to connect, the computer can not find the printer, the computer does not recognize the printer, or the printer gives a printing error. Please follow the steps listed below, or select one of the videos below to help diagnose the connection iss that you are having:
1. Check if the printer is powered on and has a blue LED light on top of the printer.
2. Make sure the USB cable is plugged into the PC’s USB port w/ black color port, not blue colored port.
3. Make sure the USB cable connection is good, we suggest unplugging both sides of the USB cable and then plugging it back into the printer and computer.
4. Please use Arkscan’s original USB cable to connect, and avoid using USB converters or USB extension hubs since not all USB extension hubs support USB printers. If your computer only has a USB-C connector, we recommend using our USB-C to USB adapter. You can purchase it by visiting this link.
Also, please watch our videos that discuss other possible reasons this can occur and their solutions:
Platforms such as USPS.com does not offer the option to generate a 4x6 shipping label. Their site will only generate a label for an 8.5x11 sheet of paper. This will still work with your label printer but will require a few extra steps to make it print properly:
- Save or download the 8.5x11 PDF to your computer
- Utilize Adobe Reader DC to crop the label to size and print to your 4x6 label
- Adobe Reader DC is free, and can be downloaded at this link: get.adobe.com/reader
Please watch the following video for instructions on how to crop your label with Adobe Reader:
NOTE: If your version of Adobe does not match the video - Adobe has released an update with a different layout for some users. The steps are the same as the video, but the 'Snapshot' is in a new location. Click this link for the image where to find the new location.

Restarting the computer usually helps; or reinstall the printer‘s driver, it should fix the issue. The printer is ready to print job when the printer’s status is idle
Please watch our video on installing the Mac driver for more information:
Amazon only generates its FBA, FNSKU, and ASIN tags for 8.5x11" paper. If you want to print to a smaller tag, such as a 2.25x1.25", it will require a few more extra steps to make it print properly:
- Save or download the Amazon 8.5x11 PDF to your computer
- Utilize Adobe Reader DC to crop the label to size and print to your 2.25x1.25" label (or whichever size you are using)
- Adobe Reader is free and can be downloaded at this link: get.adobe.com/reader
Please watch the following video for instructions on how to crop your label with Adobe Reader:
To print an Amazon FBA, FNSKU, or ASIN tag you will need to create a custom paper size that matches the label or tag you are printing onto. Doing this allows the custom paper size to show up as an option when it is time to print. Please choose one of the videos below to see how to do this on a Window or Mac:
First, you need to create your label’s template which defines your paper label’s width and height, for example - 2.25" x 1.25". Doing this allows the custom paper size to show up as an option when it is time to print. Please choose one of the videos below to see how to do this on a Window or Mac:
Second, you can use any software that can edit content and create document in the page layout that matches your template’s size, like 2.25x1.25”. Please visit our 'Platform' page, and have a look at the Custom drop-down menu to see suggested programs.
This issue was seen in the following scenarios:
A. If the label was not properly calibrated, or it could not be calibrated. Labels with pre-printed dark color logo, text, or an image across the middle on the BACK, are not fully compatible with Arkscan printer. These need a special way to run calibration. Labels like this are usually seen in Dymo compatible labels, our printer supports Zebra compatible labels, where the back of the label is blank white and it is a lot easier to work with. Labels with black marks or writing are supported, but it needs an extra step to set it up. Please contact us for assistance in getting this type of label set up.
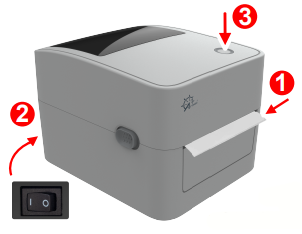
Step-by-Step How to Run Calibration:
| 1. Load labels with sticker-side facing up, and about 1/2" inch of label outside of the printer. 2. Switch ON the printer using the switch in the back. The LED should now be lit up blue 3. Press and hold down the button on top of the printer, wait for about 2-seconds, and then release the button when the printer beeps or is flashing red. |
 |
Visit the 'Calibration' page for information on to perform a proper printer calibration.
B. The power adapter is not the original came-with power adapter, this third-party power adapter may not have the same level of power capacity to finish the printing. It quits halfway, it is unsafe to use third-party power adapter.
A few things to consider when purchasing new labels for your Arkscan printer:
1. The most important thing to look for when purchasing labels is that they are described as "Direct Thermal". This means that the label is capable of responding to the print head heating element that heats up and leaves the markings on the labels as they print.
2. In general, there are no particular brands to look for when choosing a label. The easiest labels to work with are listed as Arkscan and Zebra compatible. Dymo printers and Arkscan printers utilize different label sensing technology, Arkscan printers support most of Dymo compatible labels, and a small amount of these labels were not made under the specification of Zebra / Arkscan. To make life easier, Dymo-compatible labels are NOT recommended
3. Ideally, the back of the paper label should NOT have dark pre-printed logo, text, or lines. UPS & FedEx labels have pre-printed text on the back of the paper but they are in a very light color, so they are fine.
4. Labels can be in rolls that load into the printer or fanfold labels can be loaded through the slot in the back of the printer. The printer supports label rolls with a 1" core. If you have a larger core or a roll that is more than 6" in diameter, we have an external label holder that will support these larger rolls.
To install the latest version of printer firmware onto your printer:
- Download the Mac driver installer .PKG file
- Double-click the .PKG file to open and run the installer
- The installer will check if your printer needs a firmware update and it will perform the firmware update for you automatically if it needs it
1. Download the Configuration Tools (Diagnostic Tools) for Windows, unzip its contents onto your computer, then run the Diagnostic Tool.exe file in the folder. NOTE: A prompt about needing additional .NET Framework files might need to be downloaded and installed if it's not already on your computer.These files are need to run the Configuration tool.
2. Contact us (www.arkscan.com/livechat or
3. Follow the steps below to update the firmware.
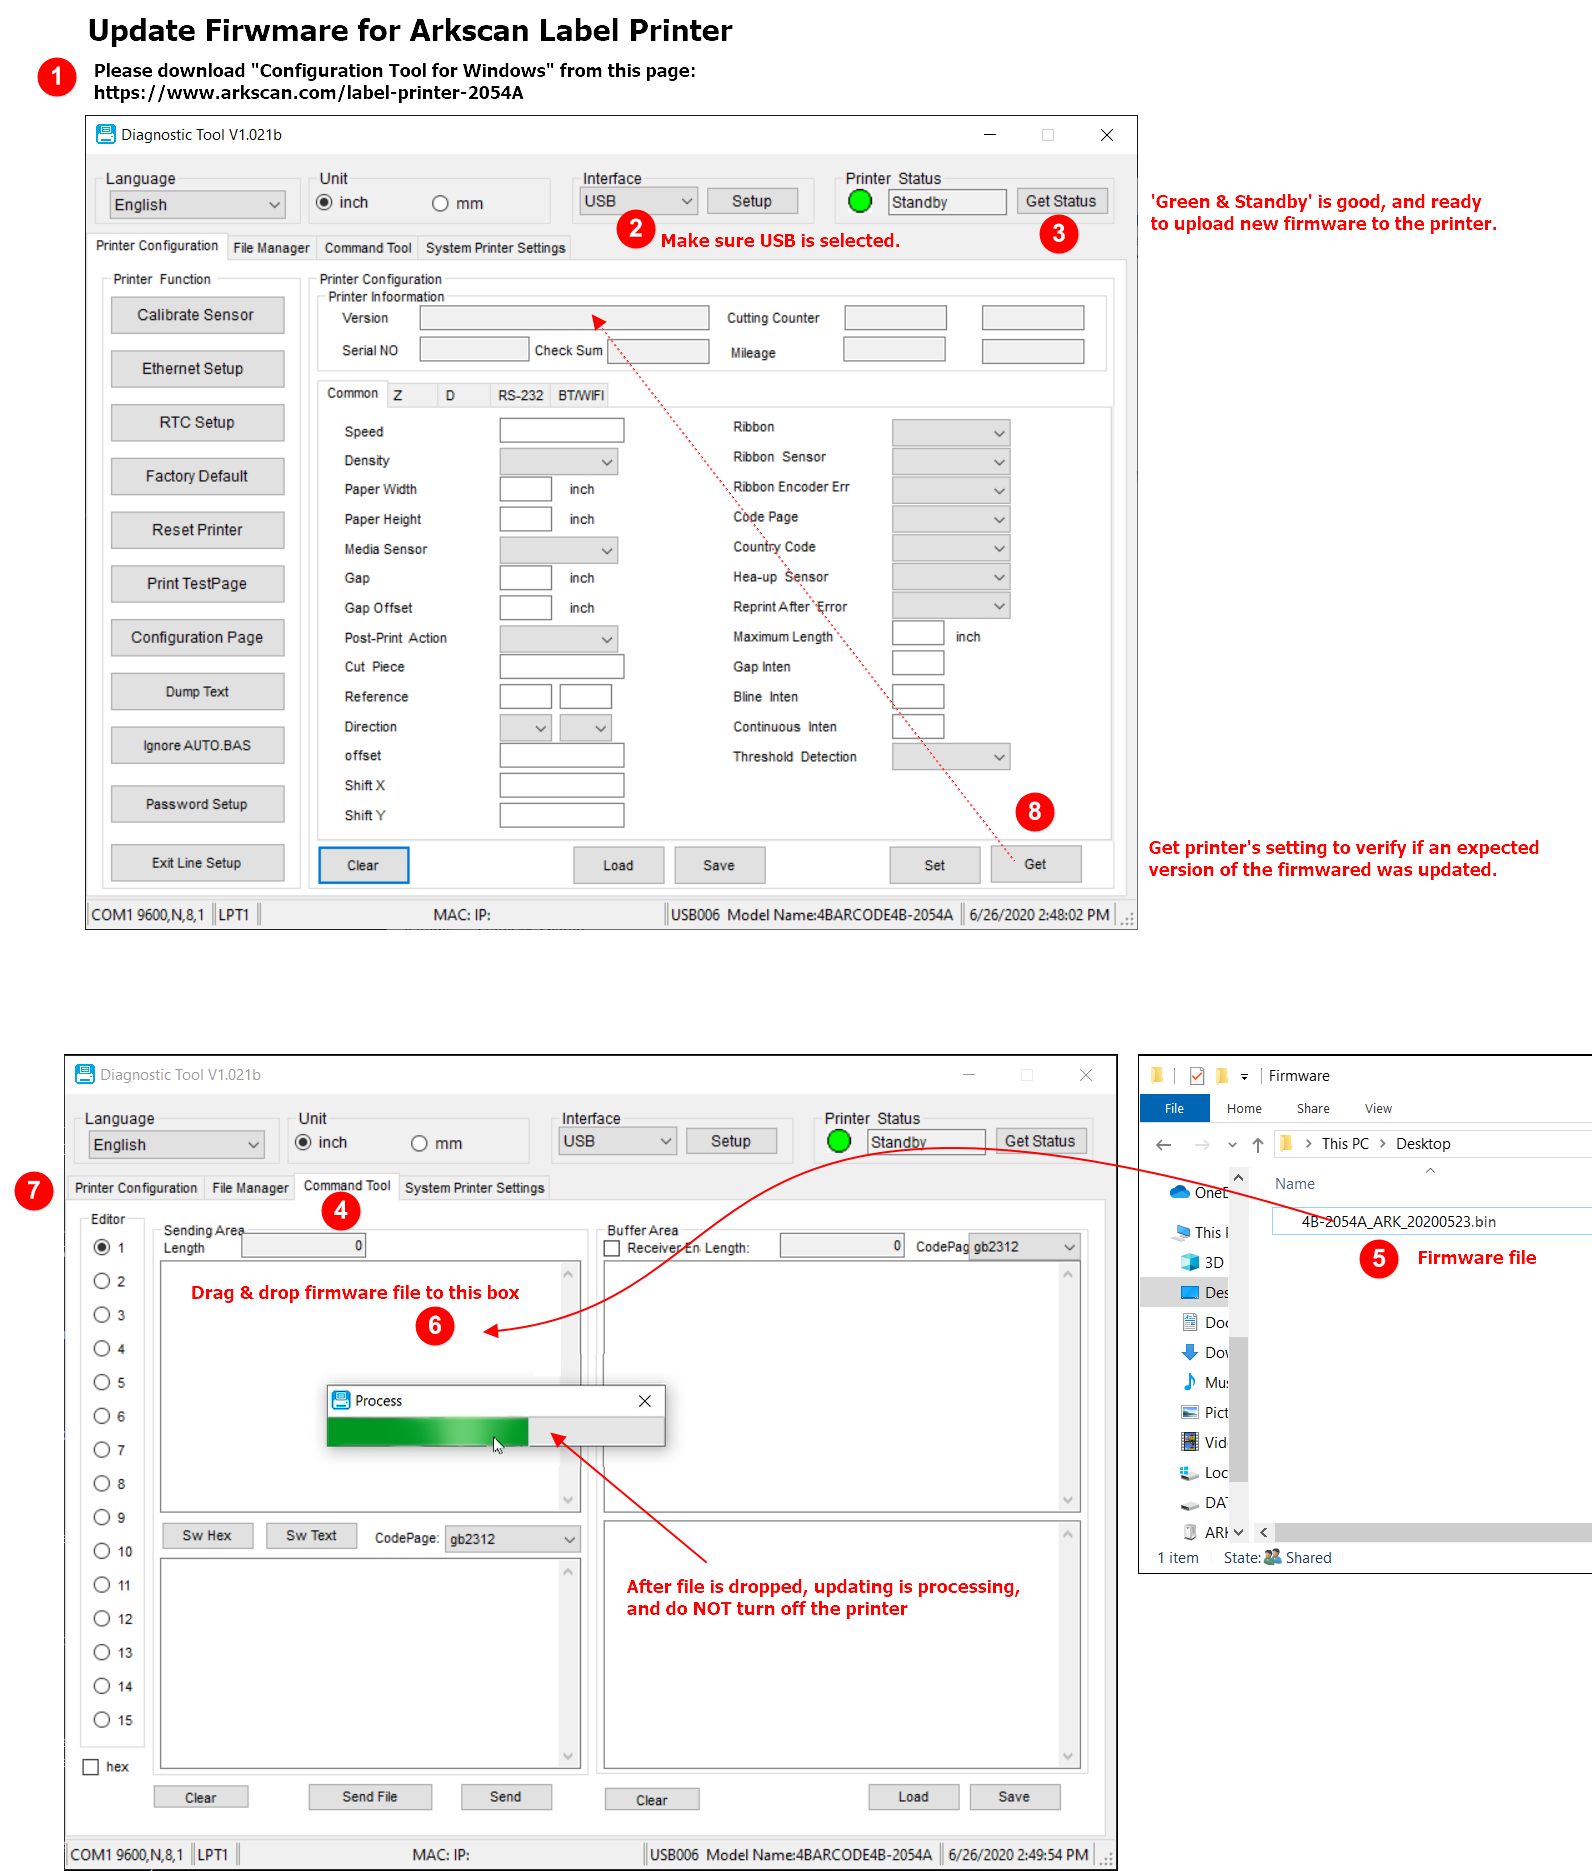
PLEASE RED THIS FIRST: These steps and the attached firmware are only for printers experiencing the issue described above. Do not update your printer with the firmware below unless the printer is pulling the label backward into the printer and causing a jam.
1. This issue is most likely caused by an incorrect firmware version installed on your printer. Please verify if your printer's serial number starts with any of the following:
NOTE: The serial number can be found on the bottom side of the printer, below the barcode.
2054A2009
2054A2012
2054A2101
2054A2102
2054A2104
If your printer matches any of these serial #'s, you can use the firmware file link below to fix this issue. To update the firmware:
2. Download the firmware version that fixes this issue
3. Refer to FAQ #13 - "Update firmware by using Windows", to perform a firmware update
Method #1 - Using Command File
First, download the Configuration Tool (Diagnostic Tools) for Windows, unzip its contents onto your computer, then run the Diagnostic Tool.exe file in the folder.
NOTE: You must unpack the contents of the .zip to run the program properly. If the application language is not English, the program is not unpacked from the .zip properly.
Second, download the Flexible-Darkness command (to be used in steps 5-6 in the image instructions.) Right-click this link, and select 'Save Link As' to download the Flexible-Darkness.BIN file
Third, follow the instructions in the images below:
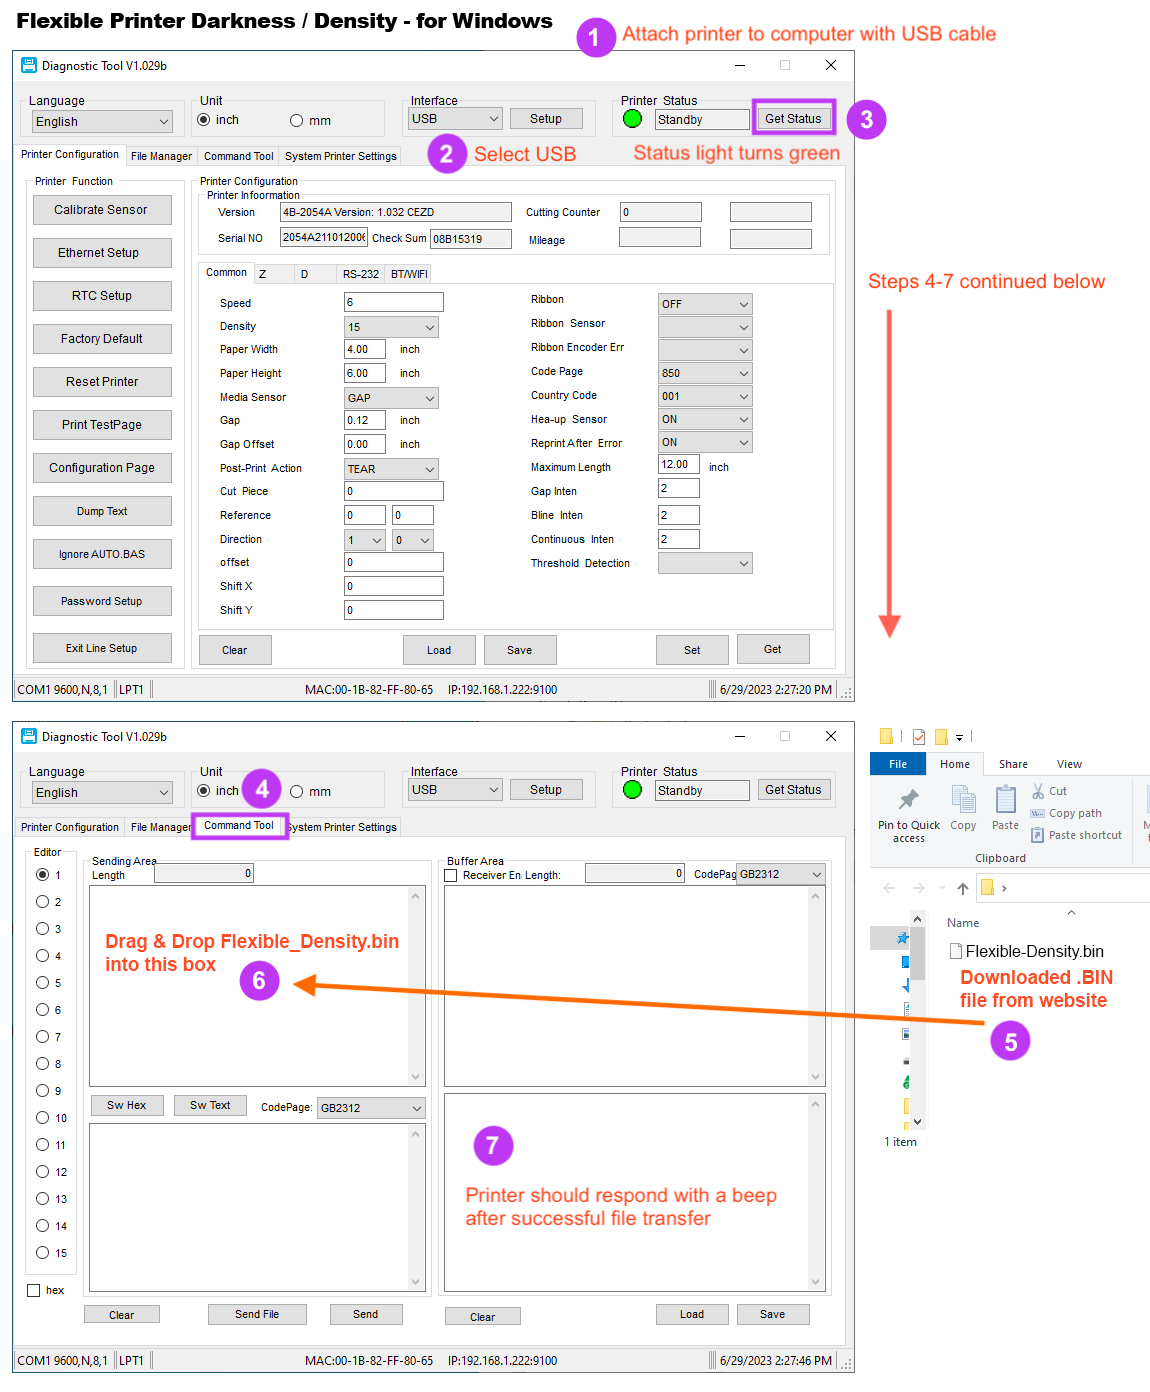
Lastly, you can now use the Diagnostic Tool to change the Density/Darkness of the label printout. Please see the image below on how to complete these steps using the Diagnostic Tool.
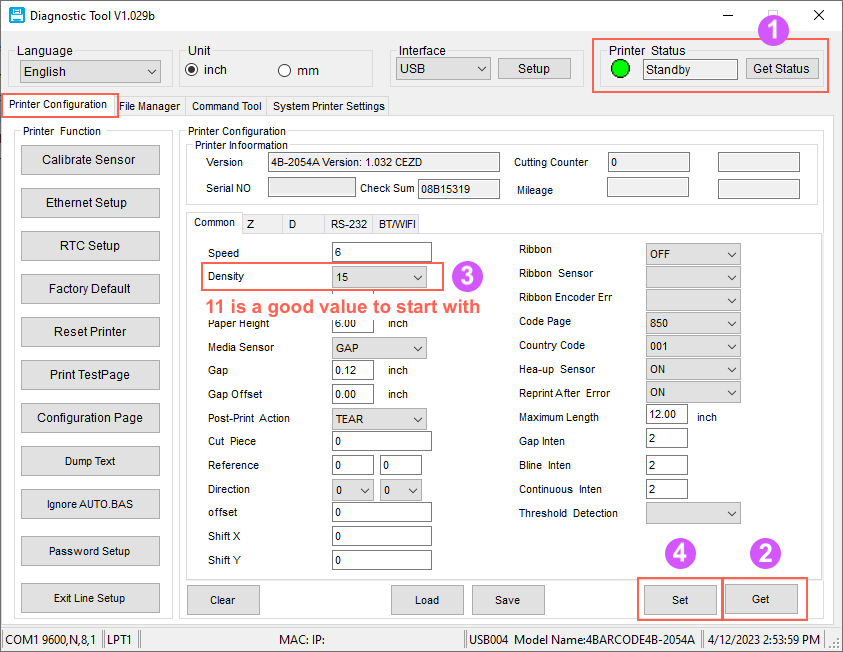
You can now adjust the density/darkness until it meets your needs!
Method #2 - Using Written Command
If you are to able to download the Flexible-Bin.bin file above, or want to make the change without downloading the file. Please follow the steps below:
First, download the Configuration Tool (Diagnostic Tools) for Windows, unzip its contents onto your computer, then run the Diagnostic Tool.exe file in the folder.
NOTE: You must unpack the contents of the .zip to run the program properly. If the application language is not English, the program is not unpacked from the .zip properly.
Second, copy and paste the following command into the Diagnostic Tool, as shown below:
LIMIT DENSITY 0
SOUND 5, 500
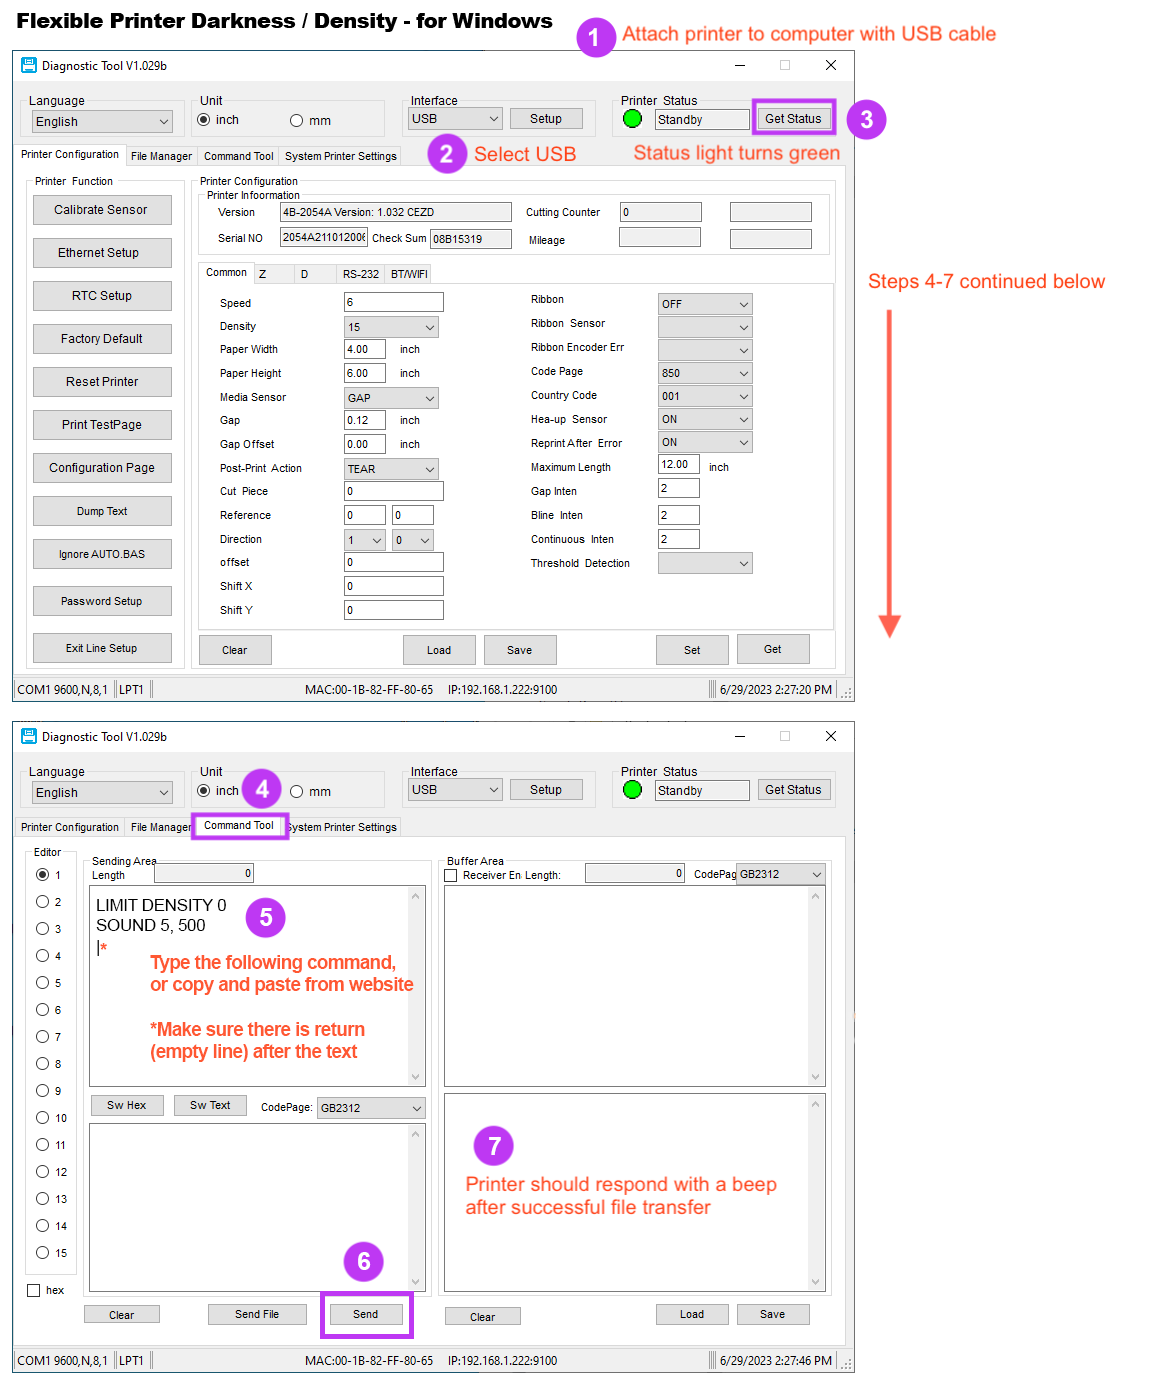
Lastly, you can now use the Diagnostic Tool to change the Density/Darkness of the label printout. Please see the image below on how to complete these steps using the Diagnostic Tool.

You can now adjust the density/darkness until it meets your needs!
If you have any questions or issues, please contact Arkscan Support at www.arkscan.com/livechat or email
Method #1 - Using Command File
1- After the printer is installed, there is a folder titled "Arkscan-Printer" created on the desktop. Locate this folder:
NOTE: If the folder cannot be located, please download and run the driver installer again. There will be a prompt asking to place files on the desktop, select 'Yes'.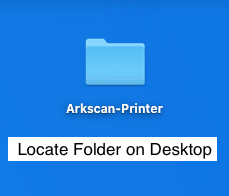
2- Open the folder and expand the contents within it. Inside the 'Tools' folder, you will find various .command files that can be used for the printer.
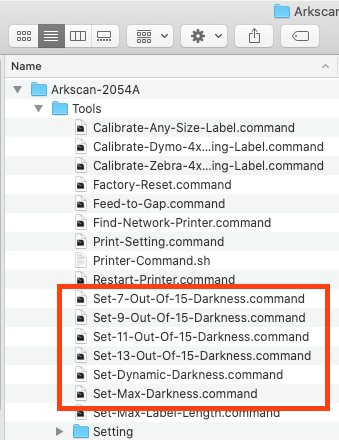
3- Double click on one of the Darkness levels to adjust the amount of darkness/density applied to the label. Running the file will open the Terminal, and execute the command:
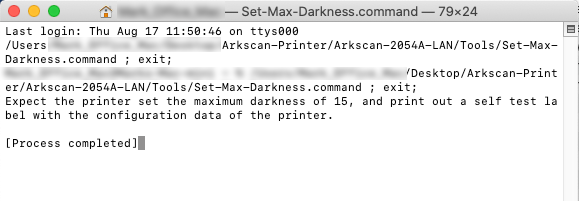
4- You should receive a 'Process Completed' message, and the printer will print a Configuration Page. You can verify on the Configuration Page that the setting was applied by looking at the 'DENSITY: ' line.
NOTE: If the printer did not print a Configuration page after running the command, likely, the command did not work. Please try again, or the steps in Method #2 below.
Please adjust the Density until it meets your needs!
If you have any questions or issues, please contact Arkscan Support at www.arkscan.com/livechat or email us at
Method #2 - Command Prompt with Web Tool
If you are unable to make the method above work. Please follow the steps below to use our Online Web Tool to manually make the density change.
NOTE: Using the Chrome web browser is required for these steps to work
1- Join the printer to the Web Tool, and copy and paste the following command into the 'Command' box:
LIMIT DENSITY 0
DENSITY 11
SOUND 5, 500
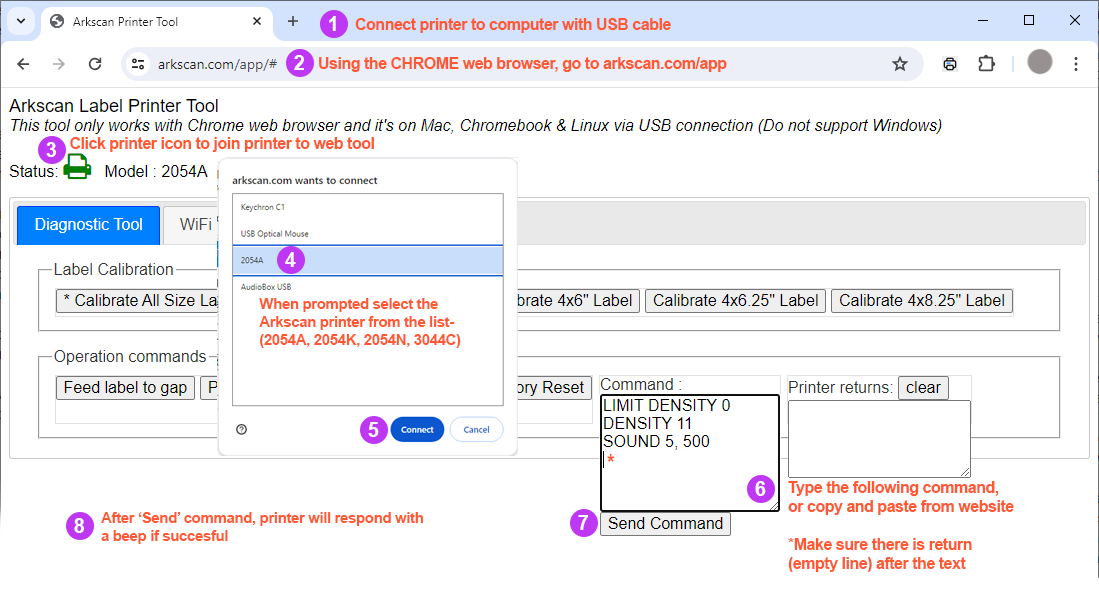
2- To verify that the command was received, print a Configuration Page. Check that the 'DENSITY' line matches the value in the command sent.
3- If you need to make further adjustments to the density, change the value at the end of DENSITY in the command. The lower the number the lower the density. Please adjust the Density until it meets your needs!
If you have any questions or issues, please contact Arkscan Support at www.arkscan.com/livechat or email us at

