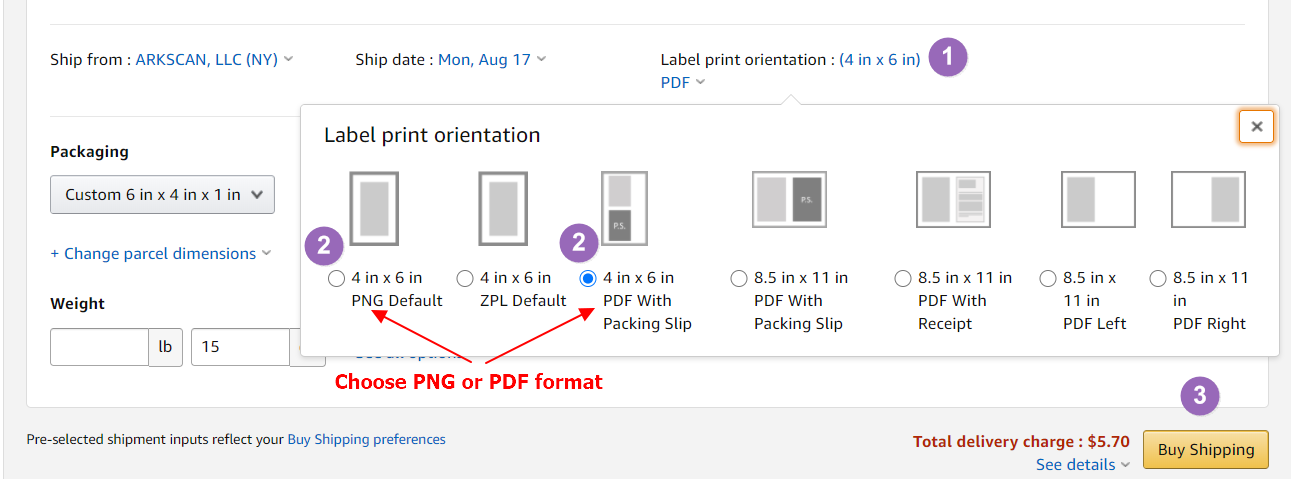
There are 3 different options available (PNG, PDF, or ZPL) to print the shipping label for Merchant Fulfillment Order. Please watch the video that meets you need, or you can follow the instructional image below:
To print an Amazon FBA, FNSKU, or ASIN tag you will need to create a custom paper size that matches the label or tag you are printing onto. Doing this allows the custom paper size to show up as an option when it is time to print. Please choose one of the videos below to see how to do this on a Window or Mac:
Amazon only generates its FBA, FNSKU, and ASIN tags for 8.5x11" paper. If you want to print to a smaller tag, such as a 2.25x1.25", it will require a few more extra steps to make it print properly:
- Save or download the Amazon 8.5x11 PDF to your computer
- Utilize Adobe Reader DC to crop the label to size and print to your 2.25x1.25" label (or whichever size you are using)
- Adobe Reader is free and can be downloaded at this link: get.adobe.com/reader
Please watch the following video for instructions on how to crop your label with Adobe Reader:
Amazon Print Connect software is one of three ways to print from your Amazon Seller Account but is not required. However, when Print Connect is installed it can expedite the printing process. Please see the video link below for instructions on how to setup Print Connect:
An alternative to using Print Connect is to set up your Amazon Seller Central account to print using ZPL. For instructions on how to use ZPL, please scroll down to the bottom of this page and click on the "ZPL File" tab.
Windows Users:
NOTE: Printing from Accelerlist.com requires the use of our Zebra Printer Driver to print properly, they also require that you install their AccelerPrint software. More information can be found using the link below.
Please see Accelerlist's setup instructions for installing and printing from their website. When selecting your printer type, please choose 'Zebra': https://accelerlist.helpjuice.com/144600-accelerprint/installing-accelerprint
In your account settings, look for printer or page layout settings. Change the page layout to a 4x6" shipping label. When printing choose 4x6 as your paper size, and for Scale choose either "Fit to Printable Area" or 100% (or until it fits the page). These settings vary by web browser and software.
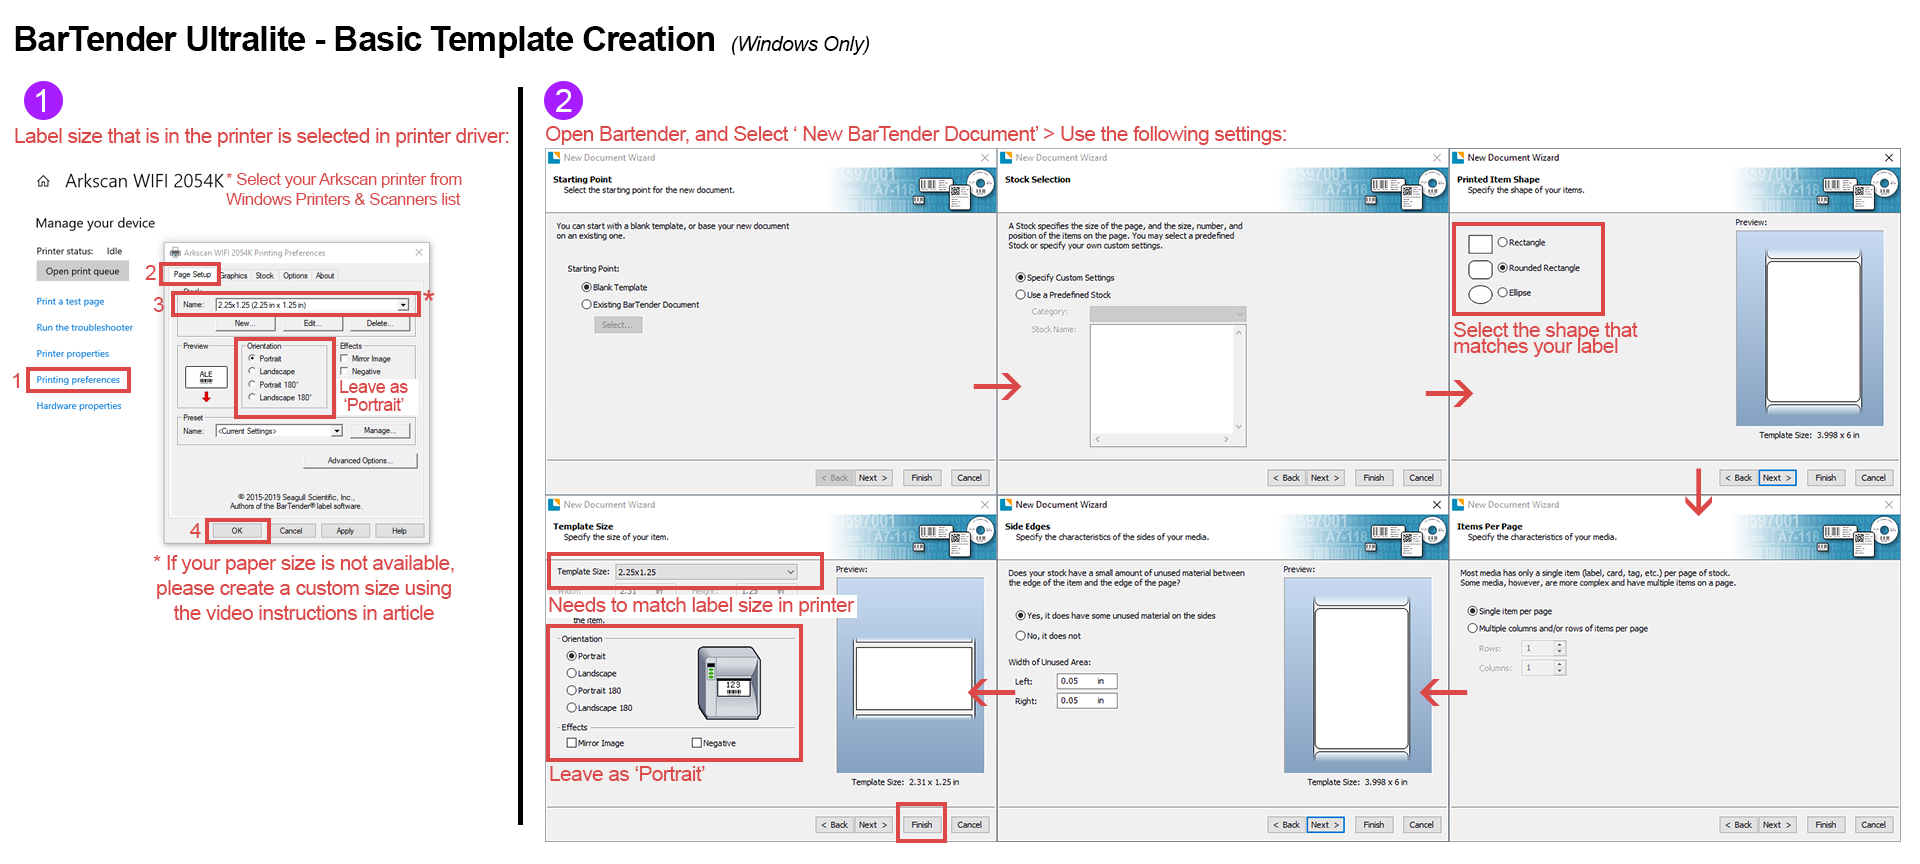
Please Note: Before you get started using BarTender, you will need to create a custom label size within the Windows printer driver for your label. This is necessary to create a template within in the software, and also allows the custom size to be listed as a paper size when you print. Please see the videos below for more instructions on how to do this:
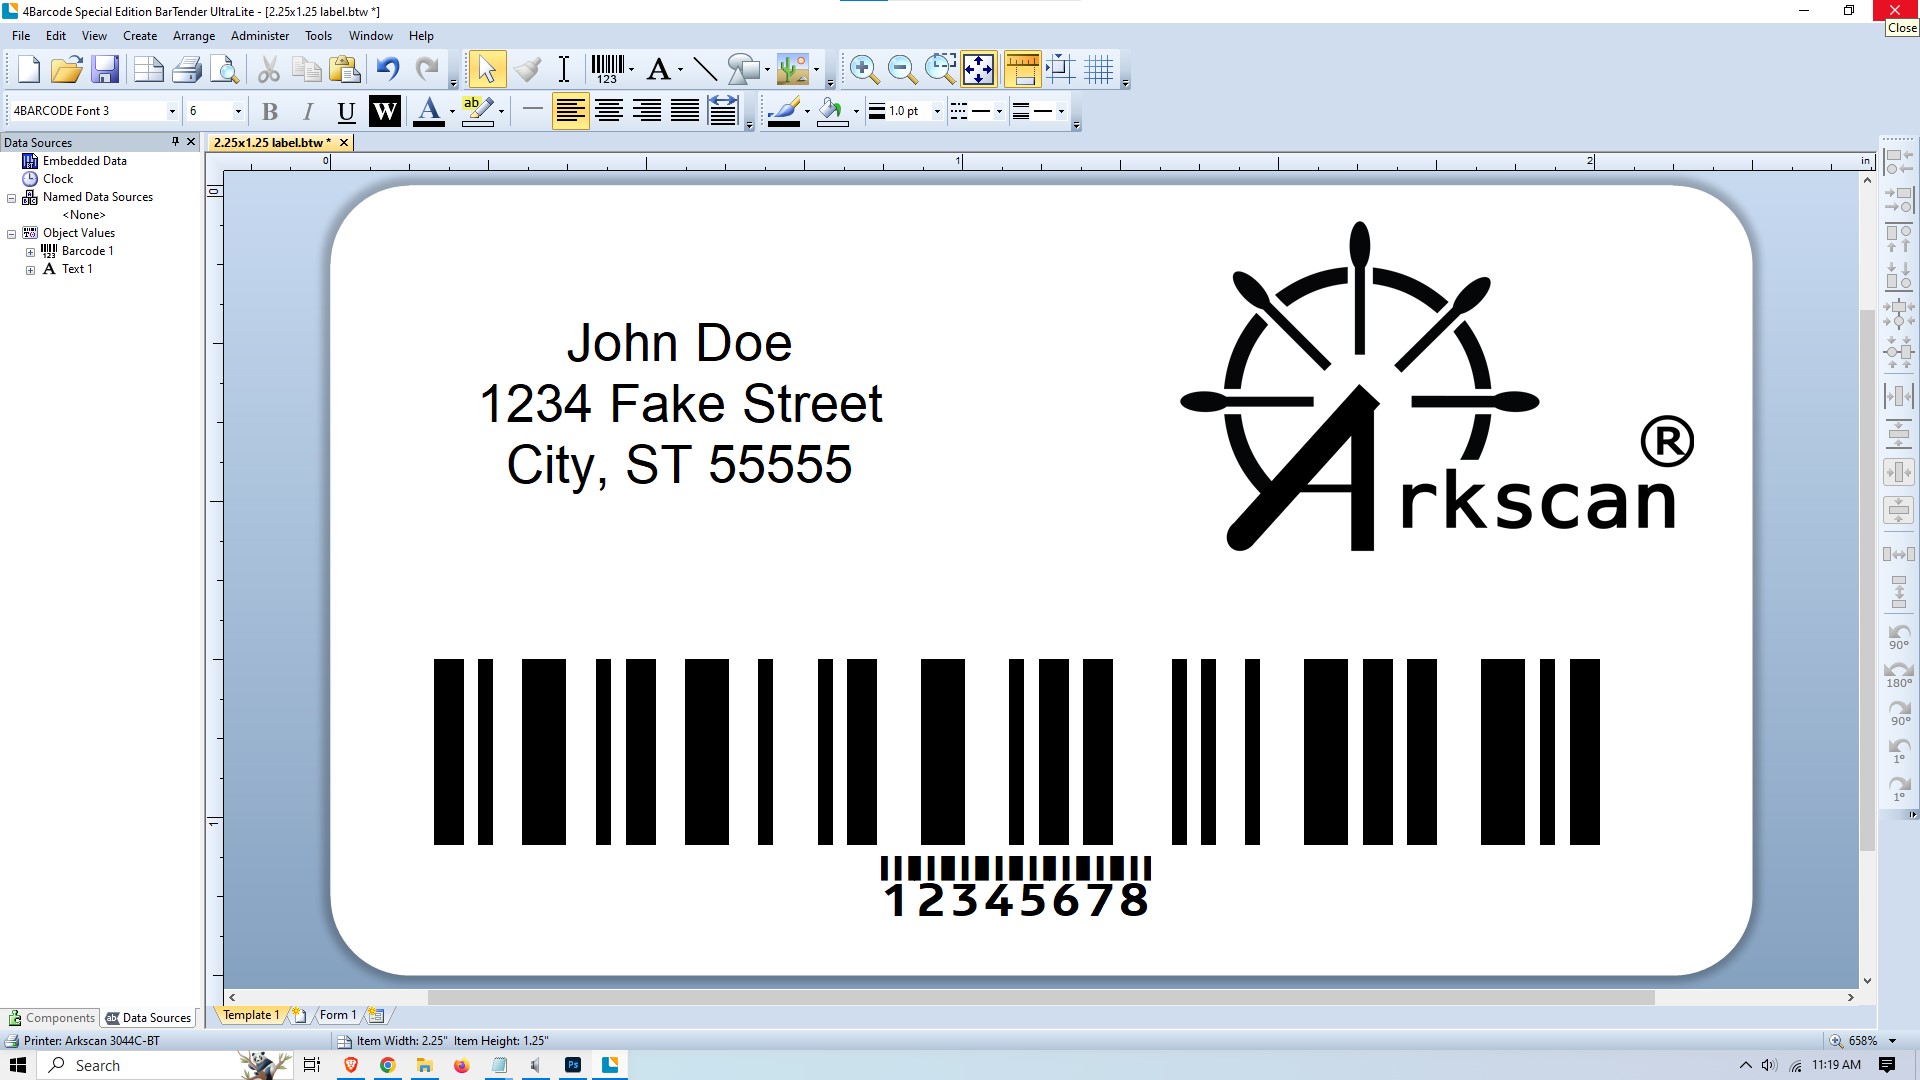
Our most recommended method for creating personalized labels is through BarTender UltraLite. This software enables you to create, design, and print labels, including product labels featuring a unique serial number, name tags, product logos, and more.
- When installing the program, please select BarTender Ultralite Edition. UltraLite is available for free. Selecting other versions during setup initiates a trial, after which a subscription fee applies.
You do NOT use this software to create/print a shipping label. Shipping labels need to be obtained through a shipping platform such as UPS, FedEx, Shippo, PirateShip, or other shipping providers.
1 - CLICK HERE to: download the free BarTender Ultralite software
2 - Run the downloaded installation wizard to install the application3- Create a new BarTender Document:
After the BarTender software is downloaded and installed, please follow the steps below to create a new document/template:
 Click Image to Enlarge Instructions
PLEASE NOTE:
- This software is offered for Windows only. For Mac users, please see our instructions on how to Create Your Own Label
- When installing the program, please select BarTender Ultralite Edition. UltraLite is a free version available for our customers. Any other version selected during setup will be a Trial period.
Please see ChitChats setup instructions for installing and printing from their website:
https://support.chitchats.com/en/support/solutions/articles/47000426909
NOTE: For Windows Users - ChitChats.com requires the use of our Zebra Printer Driver to print properly, they also require that you install the Qz Tray printer software. More information can be found using the link above.
To begin with, you need to create a custom label size in your operating system. This will ensure that the label size is available as a paper size when you go to print it. Please refer to the instructional videos below for more information on how to complete this process:
There are several options available to create, design, and print custom labels. Please refer to the documentation below to learn more about some of the options:
Option #1 - BarTender UltraLite Edition (Windows Only):
Our most recommended method for creating personalized labels is through BarTender UltraLite. This software enables you to create, design, and print labels, including product labels featuring a unique serial number, name tags, product logos, and more.
- When installing the program, please select BarTender Ultralite Edition. UltraLite is available for free. Selecting other versions during setup initiates a trial, after which a subscription fee applies.
You do NOT use this software to create/print a shipping label. Shipping labels need to be obtained through a shipping platform such as UPS, FedEx, Shippo, PirateShip, or other shipping providers.
1 - CLICK HERE to: download the free BarTender Ultralite software
2 - Run the downloaded installation wizard to install the application3- Create a new BarTender Document:
After the BarTender software is downloaded and installed, please follow the steps below to create a new document/template:
Click Image to Enlarge Instructions
PLEASE NOTE:
- This software is offered for Windows only. For Mac users, please see our instructions on how to Create Your Own Label
- When installing the program, please select BarTender Ultralite Edition. UltraLite is a free version available for our customers. Any other version selected during setup will be a Trial period.
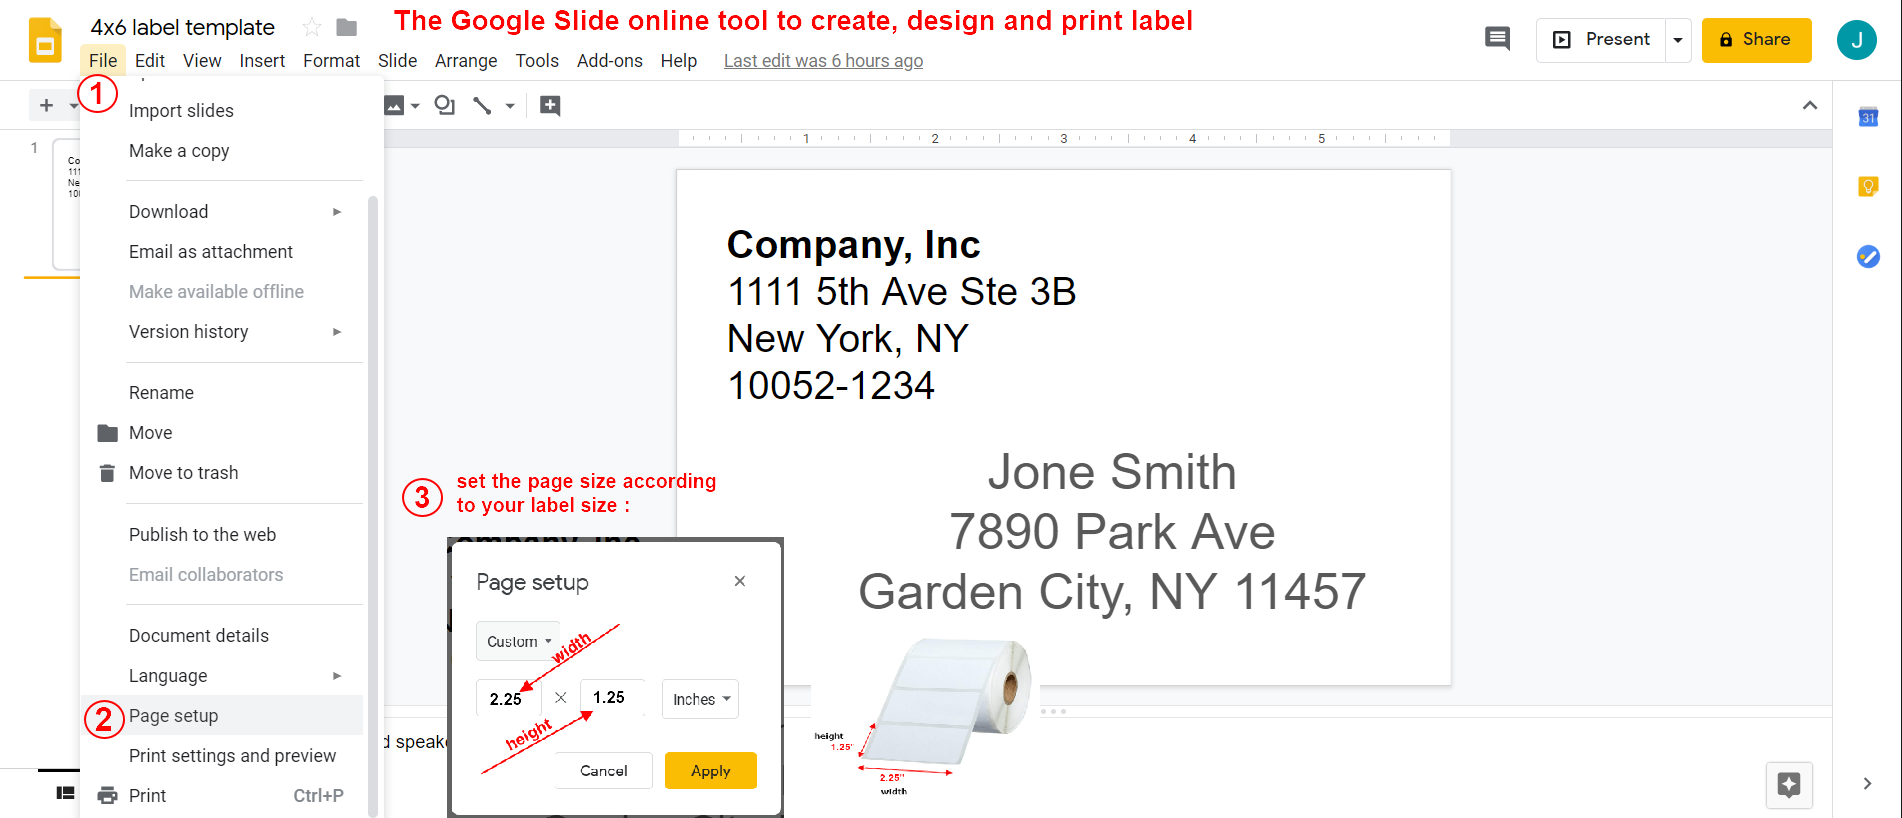
Option #2 - Google Slides:
Google Slides is a free and user-friendly tool that you can use to create and design labels. This method is compatible with Windows, Mac, Chromebook, and Linux operating systems. To get started, all you need is a Google account. For step-by-step instructions, please refer to the instructional image provided below.
NOTE: These instructions are for creating a template for a 2.25"x1.25" label. If you are using a different size label in your printer, when you get to step 3, you will use the dimensions of the label you are using instead of the example numbers given in the instructions.
Option # 3 - Microsoft Word:
NOTE:
-These instructions explain how to set up a 4"x6" paper size. If you are using a different label size on your printer, please note that in steps 9 and 10, you need to use the dimensions of the label you are using instead of the example numbers provided in the instructions.
-If your label is smaller, i.e. 2.25"x1.25", the margins will need to be smaller in steps 4-5, such as 0.05".
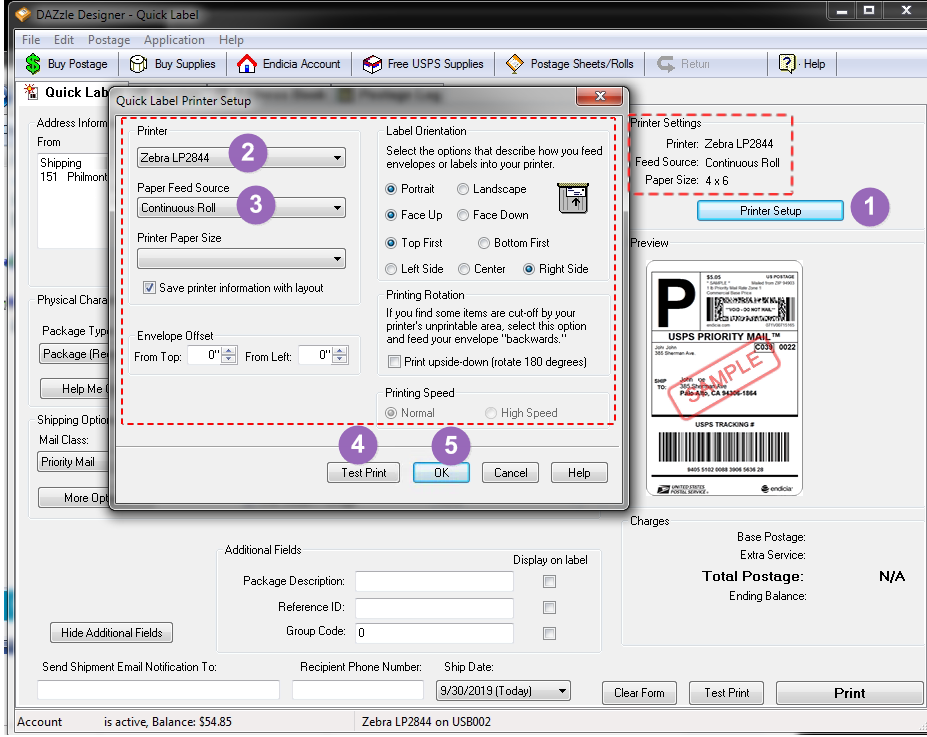
Before you are able to print from DaZzle, you will need to make some changes to the program settings. Please see the image instructions below:
Please Note: The Endicia DaZzle desktop software REQUIRES the use of the Zebra print driver. You can find the Zebra driver at this link: www.arkscan.com/driver
Depop does not offer the option to generate a 4x6 shipping label. Their site will only generate a label for an 8.5x11 sheet of paper. This will still work with your label printer but will require a few extra steps to make it print properly:
- Save or download the 8.5x11 PDF to your computer
- Utilize Adobe Reader to crop the label to size and print to your 4x6 label
- Adobe Reader is free and can be downloaded at this link: get.adobe.com/reader
Please watch the following video for instructions on how to crop your label with Adobe Reader:
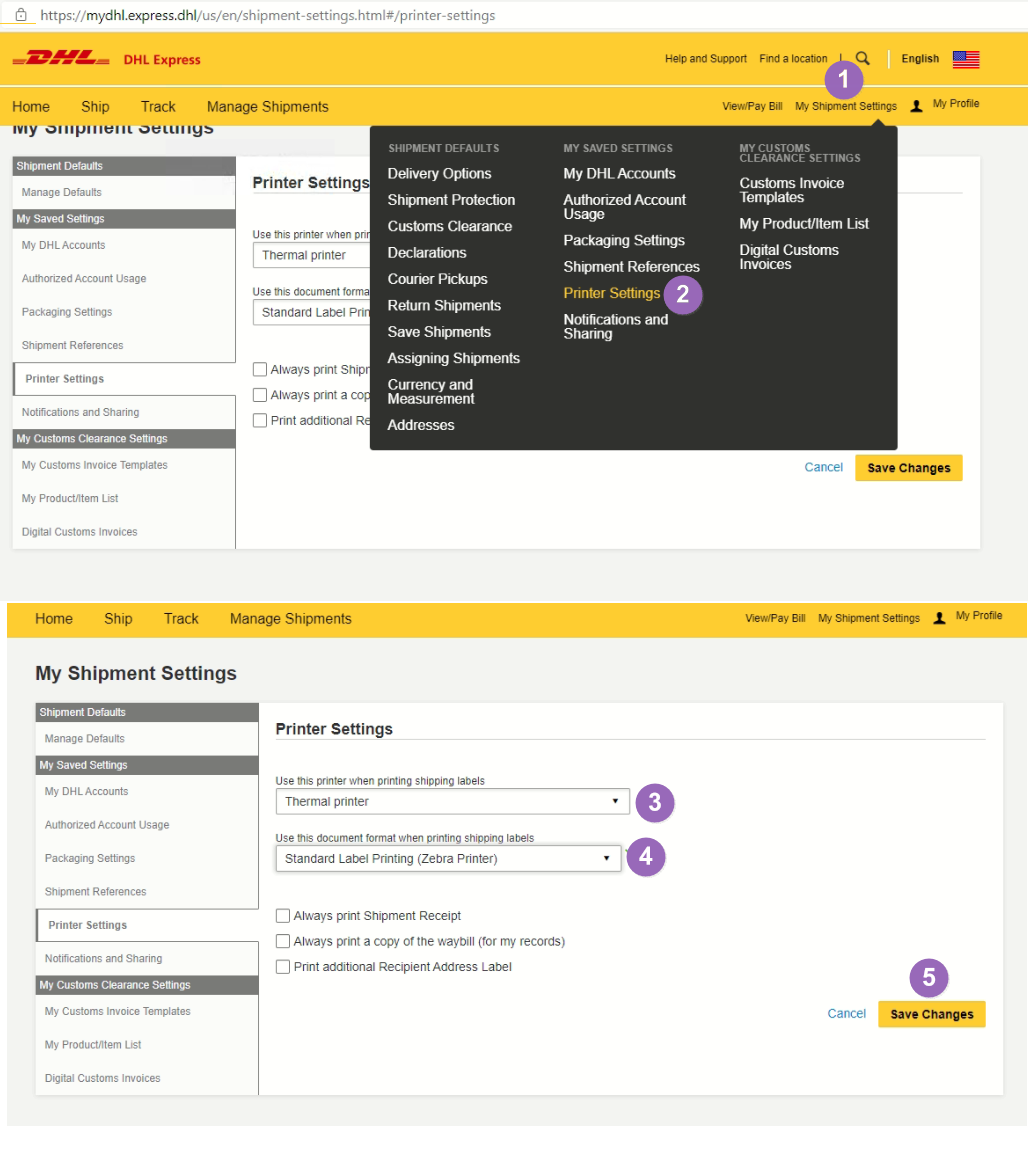
Enable DHL.com to create 4x6" shipping label:
To print a a 4x6 shipping label from the DHL website, please see the instructional image below on what settings need to be changed in your DHL account:
Enable easypost to create 4x6" shipping label:
On easypost.com, go to setting page, and set the label's layout format to 4x6" instead of the default 8.5x11". You have to create (need to PAY a new label) a new label to see it take effect, since the previous created 8.5x11" Laser / Inkjet layout label can be directly printed to the 4x6" label printer.
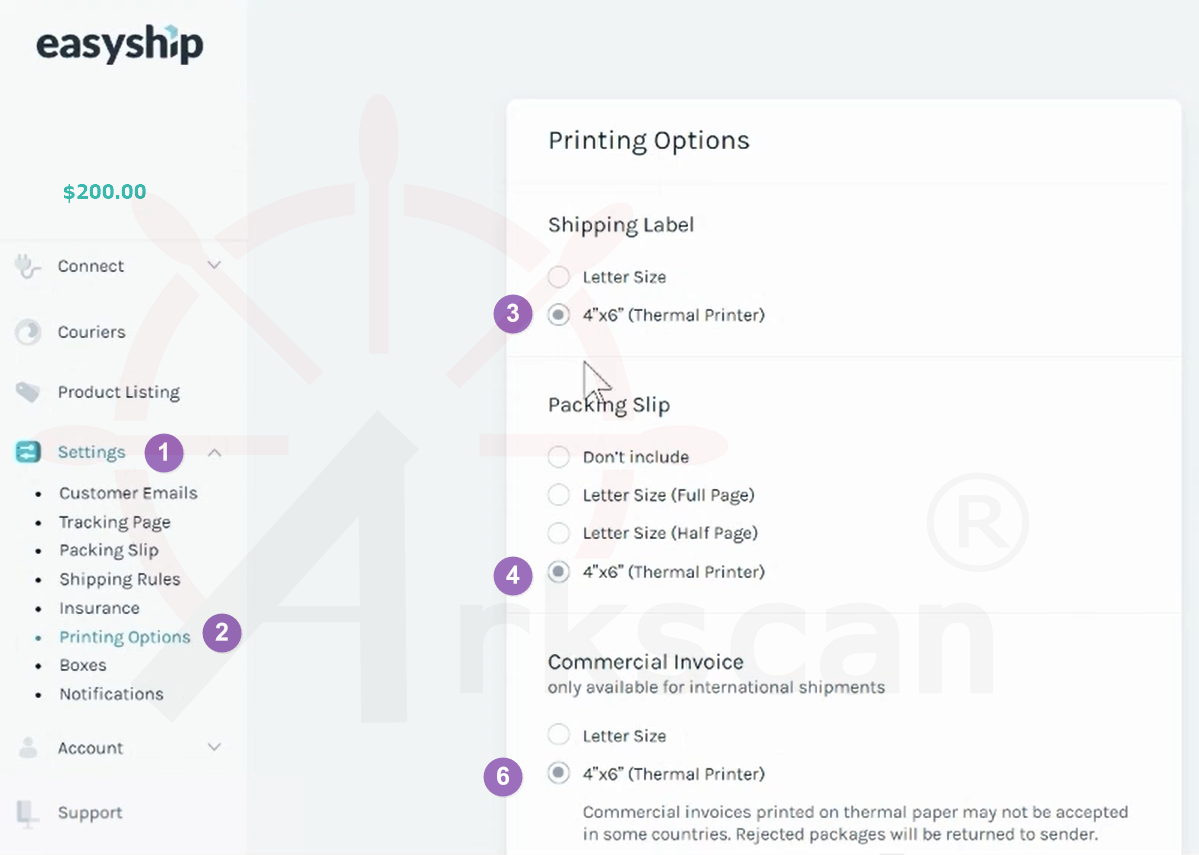
Enable Easyship to create a 4x6 shipping label:
To print a a 4x6 shipping label from the EasyShip website, please see the instructional image below on what settings need to be changed in your EasyShip account account:
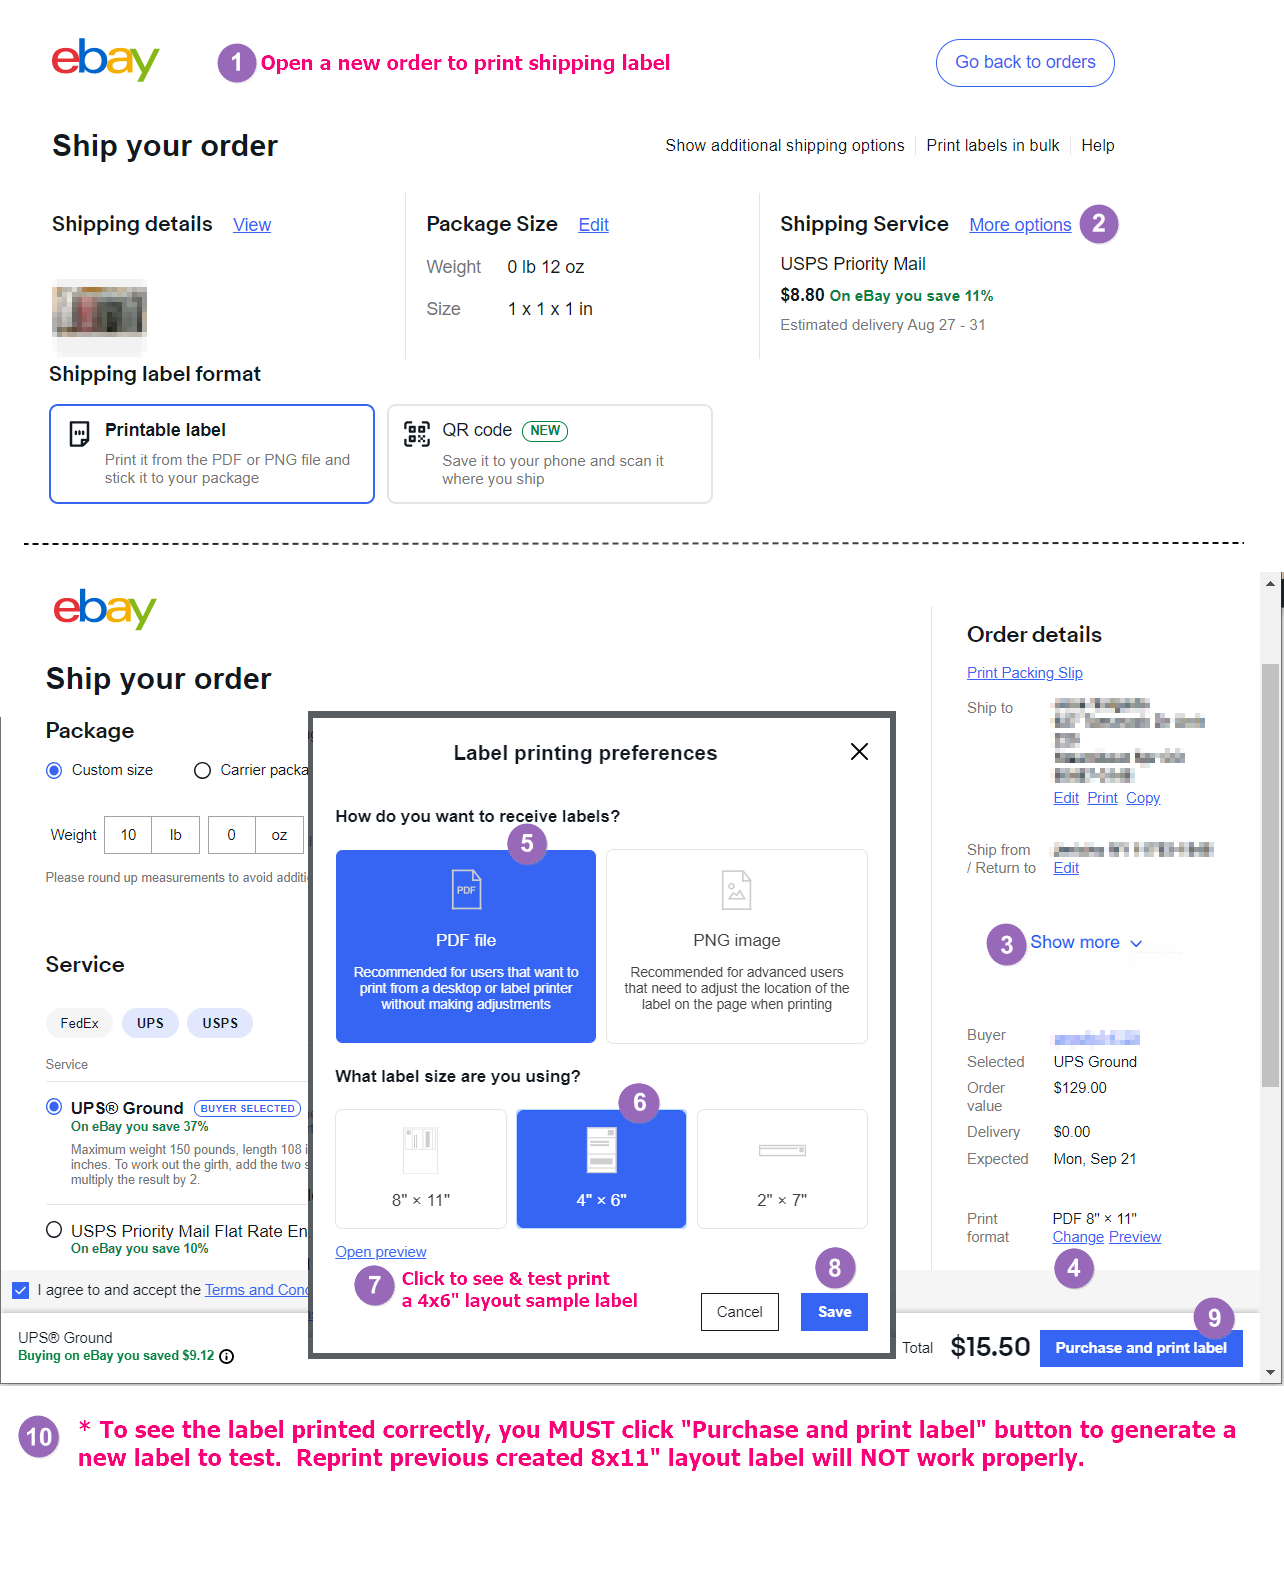
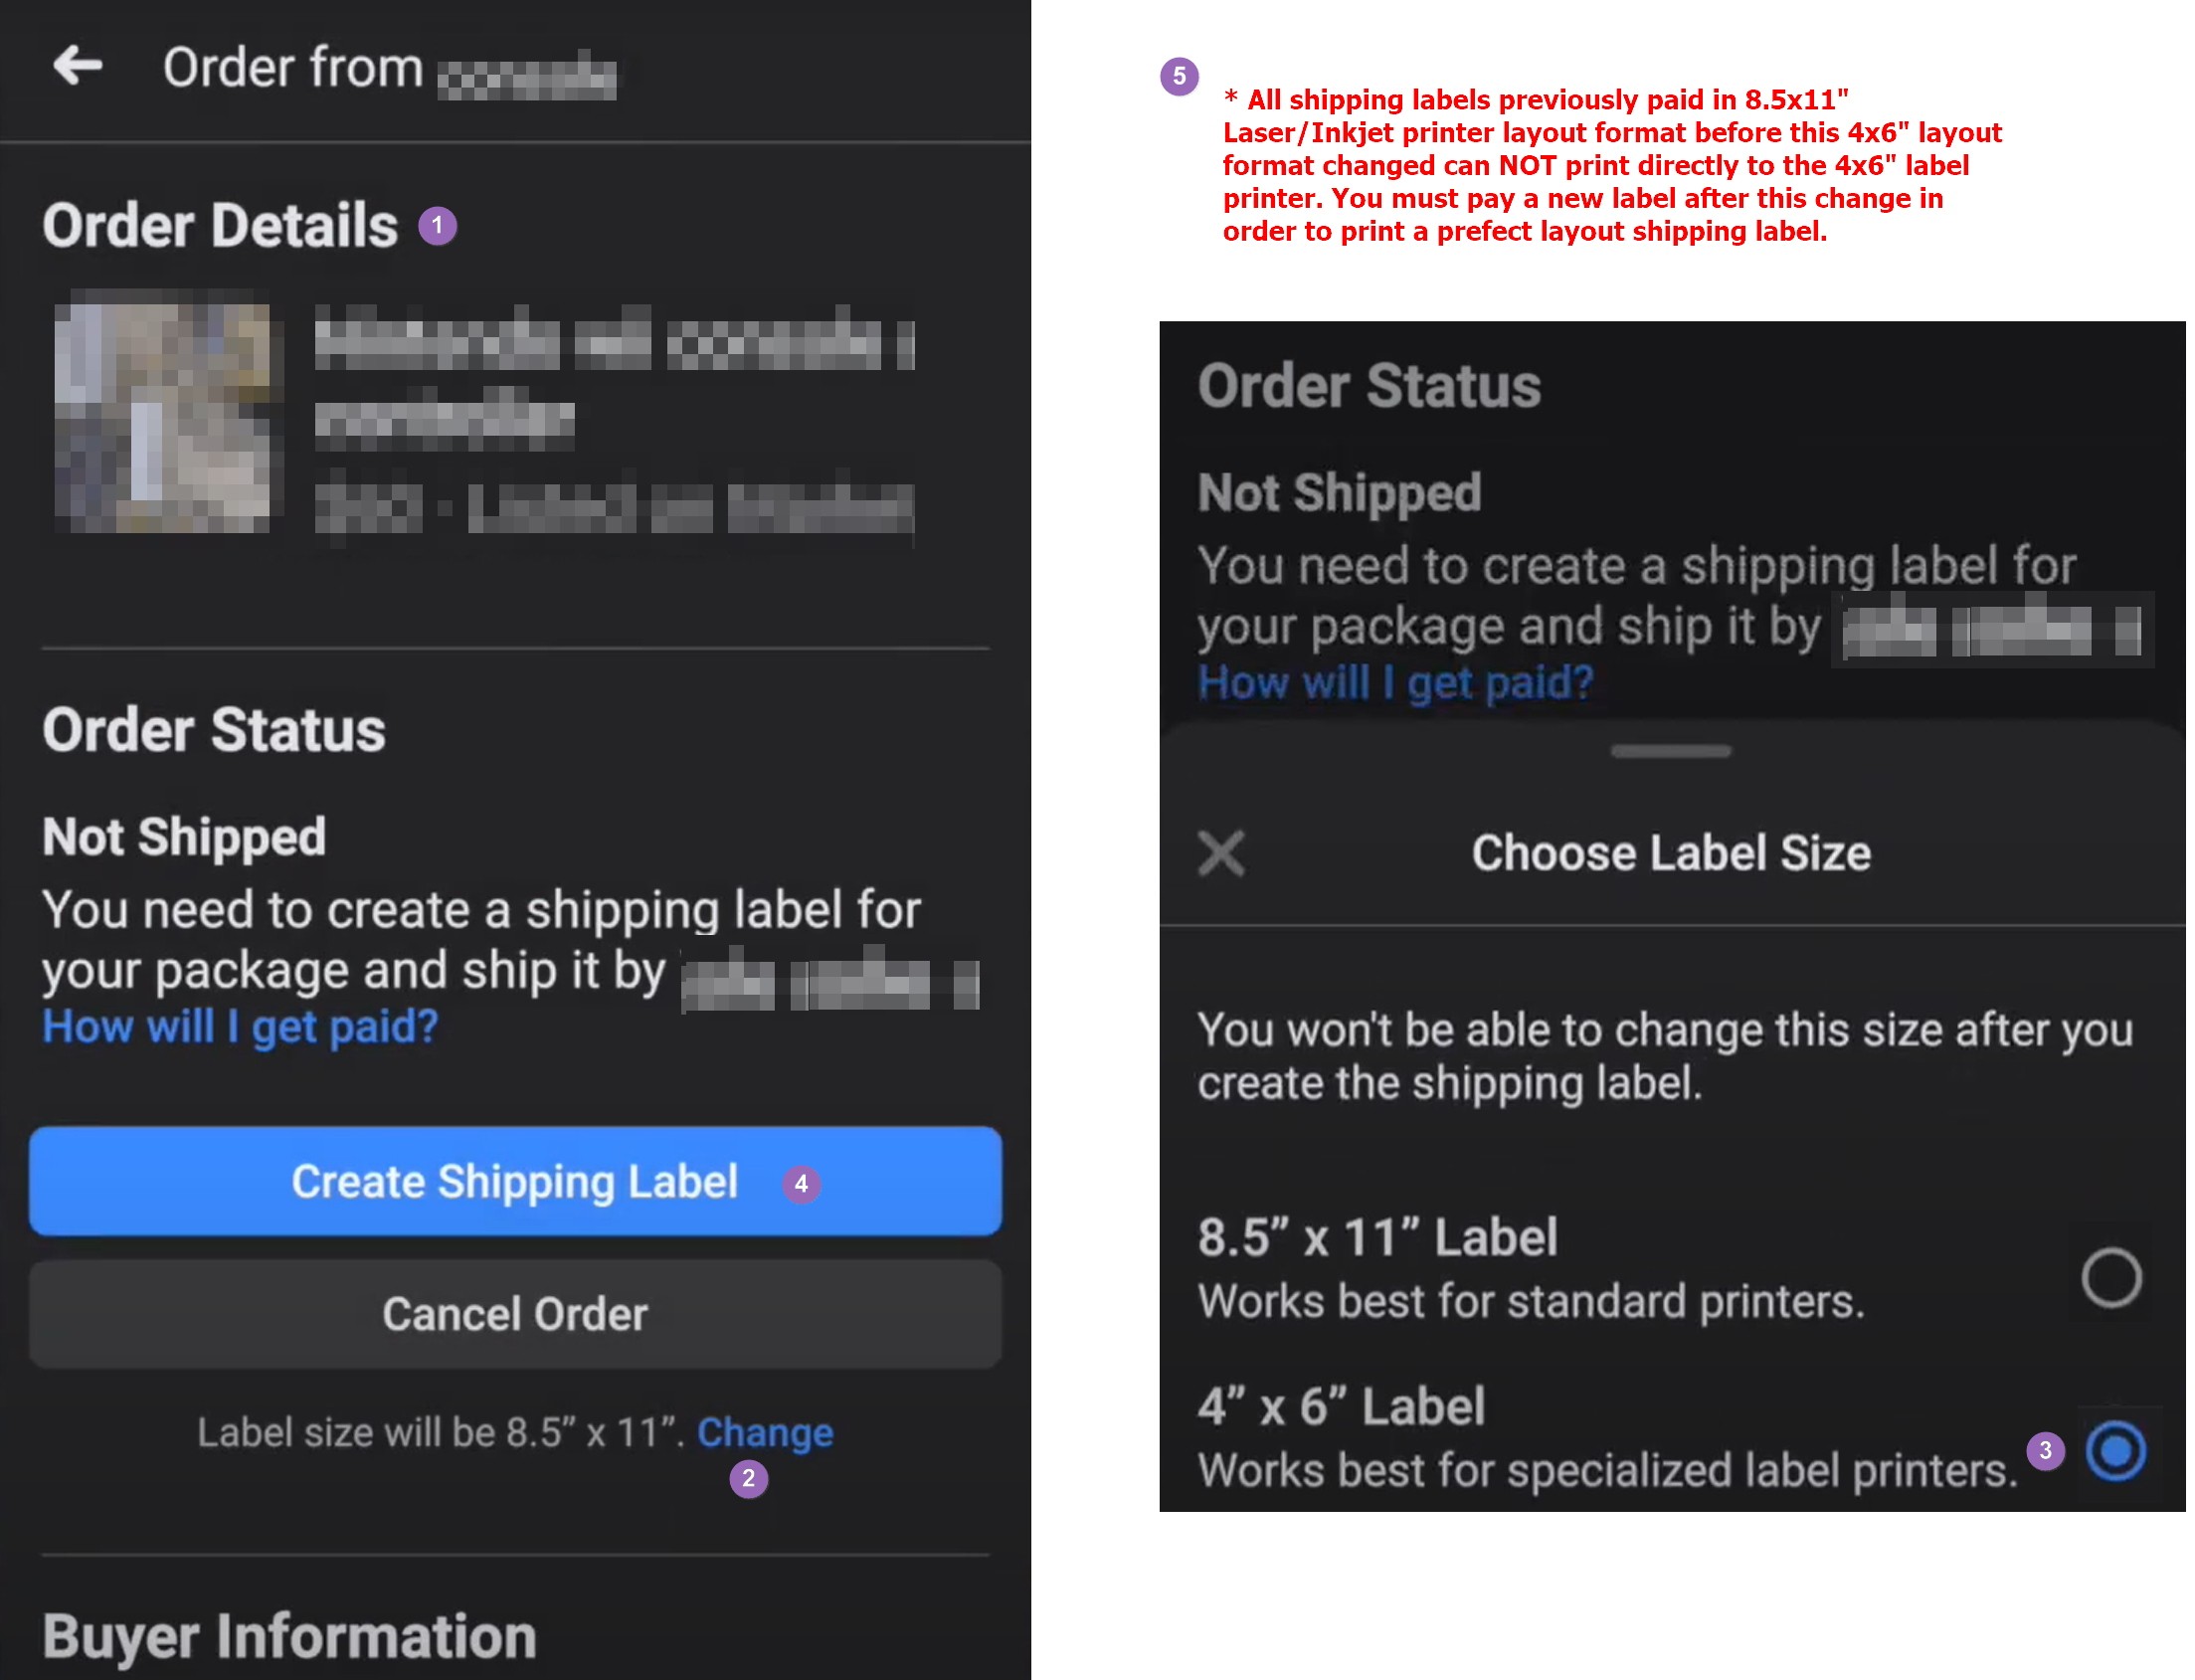
To setup eBay.com to print a 4x6 shipping label, please watch the video that meets your need, or you may follow the instructional image below:
Enable Endicia to create a 4x6" shipping label:
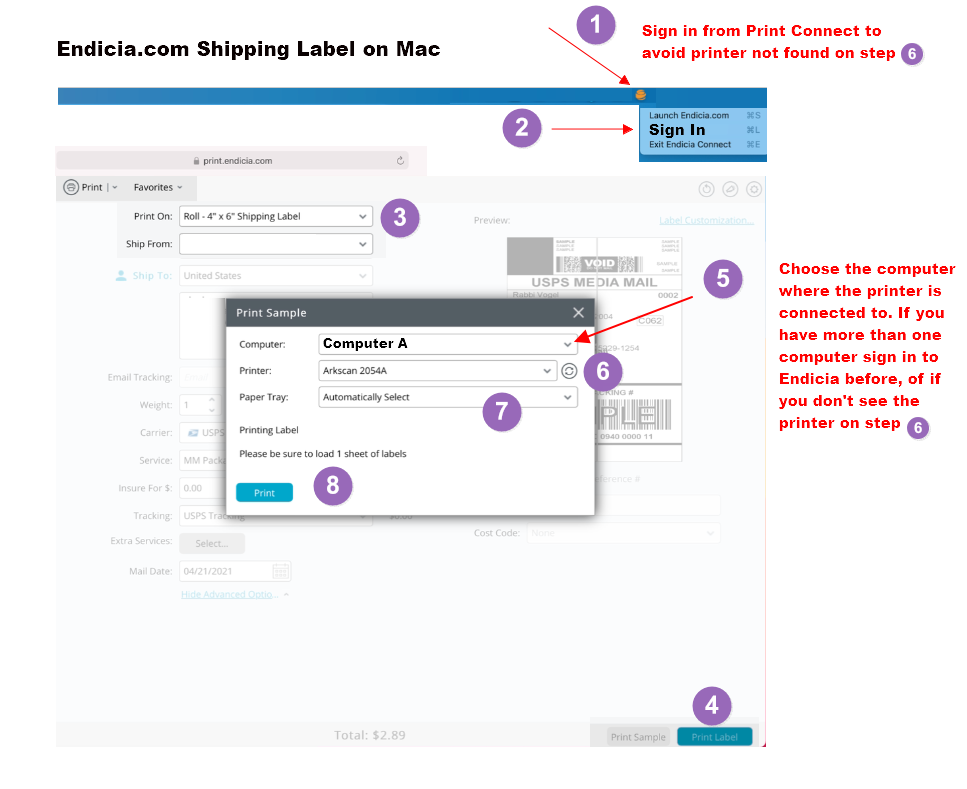
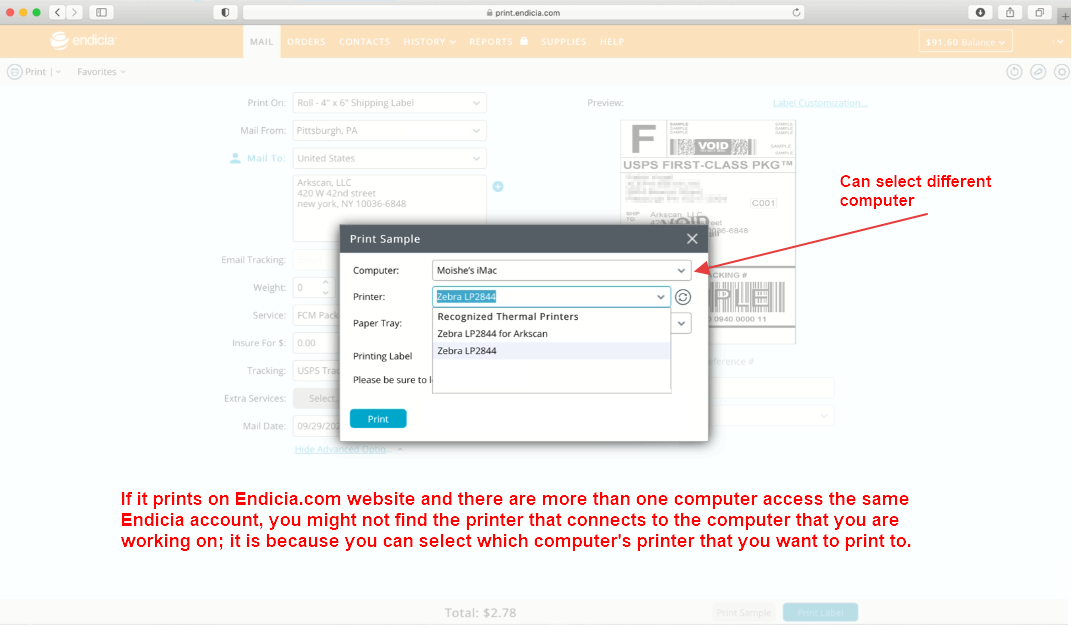
Please note that when printing from the Endicia.com website and there are more than one computer accessing the same Endicia account, you might not find the printer that connects to the computer that you are working on; it is because you can select which computer's printer that you want to print to.
More information available at this link: http://mac.endicia.com/extras/zebra/setup/
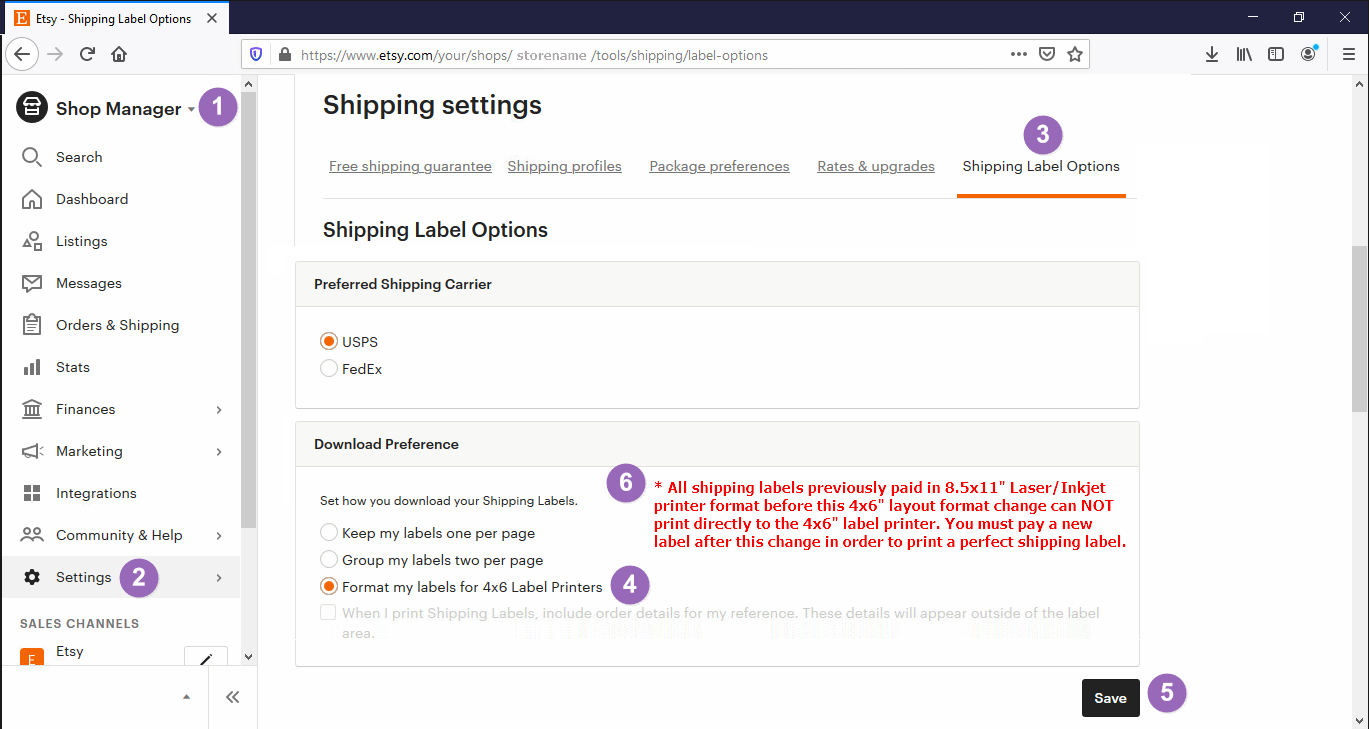
Enable Etsy to create a 4x6 shipping label:
To print a a 4x6 shipping label from the Etsy website, please see the instructional image below on what settings need to be changed in your Etsy account:
More information from etsy.com:
https://help.etsy.com/hc/en-us/articles/360001968348?segment=selling
Enable Facebook to create a 4x6 shipping label:
To print a a 4x6 shipping label from the Facebook website, please see the instructional image below on what settings need to be changed in your Facebook account:
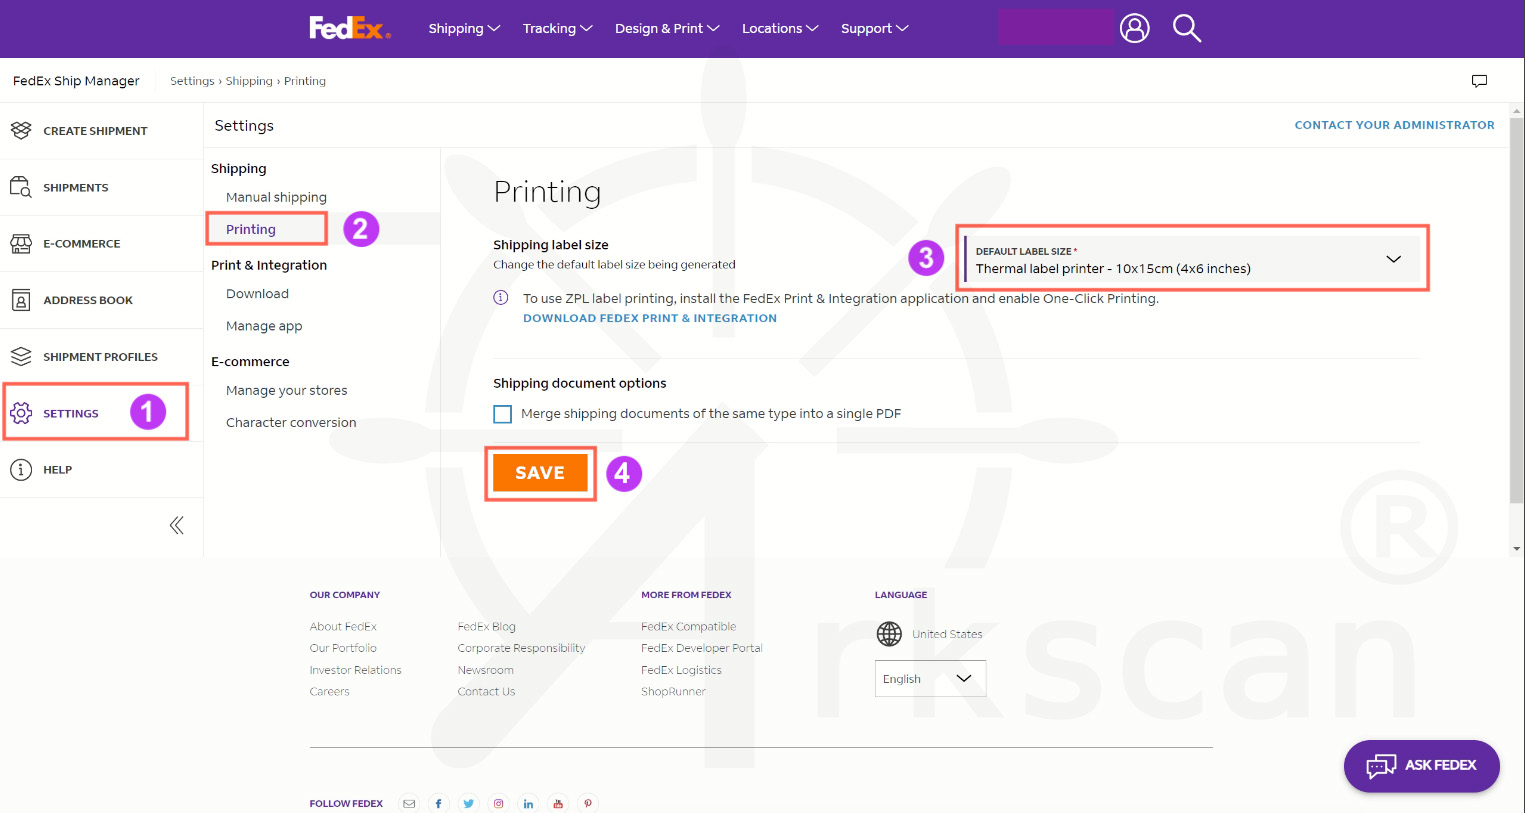
To print a 4x6 shipping label from the FedEx website, please see the instructional images below on what settings need to be changed in your FedEx account.
*Please note that FedEx.com has recently redesigned the layout of its website, follow the instructions that match how your account looks
New Version of FedEx.com:
Previous Version of FedEx.com: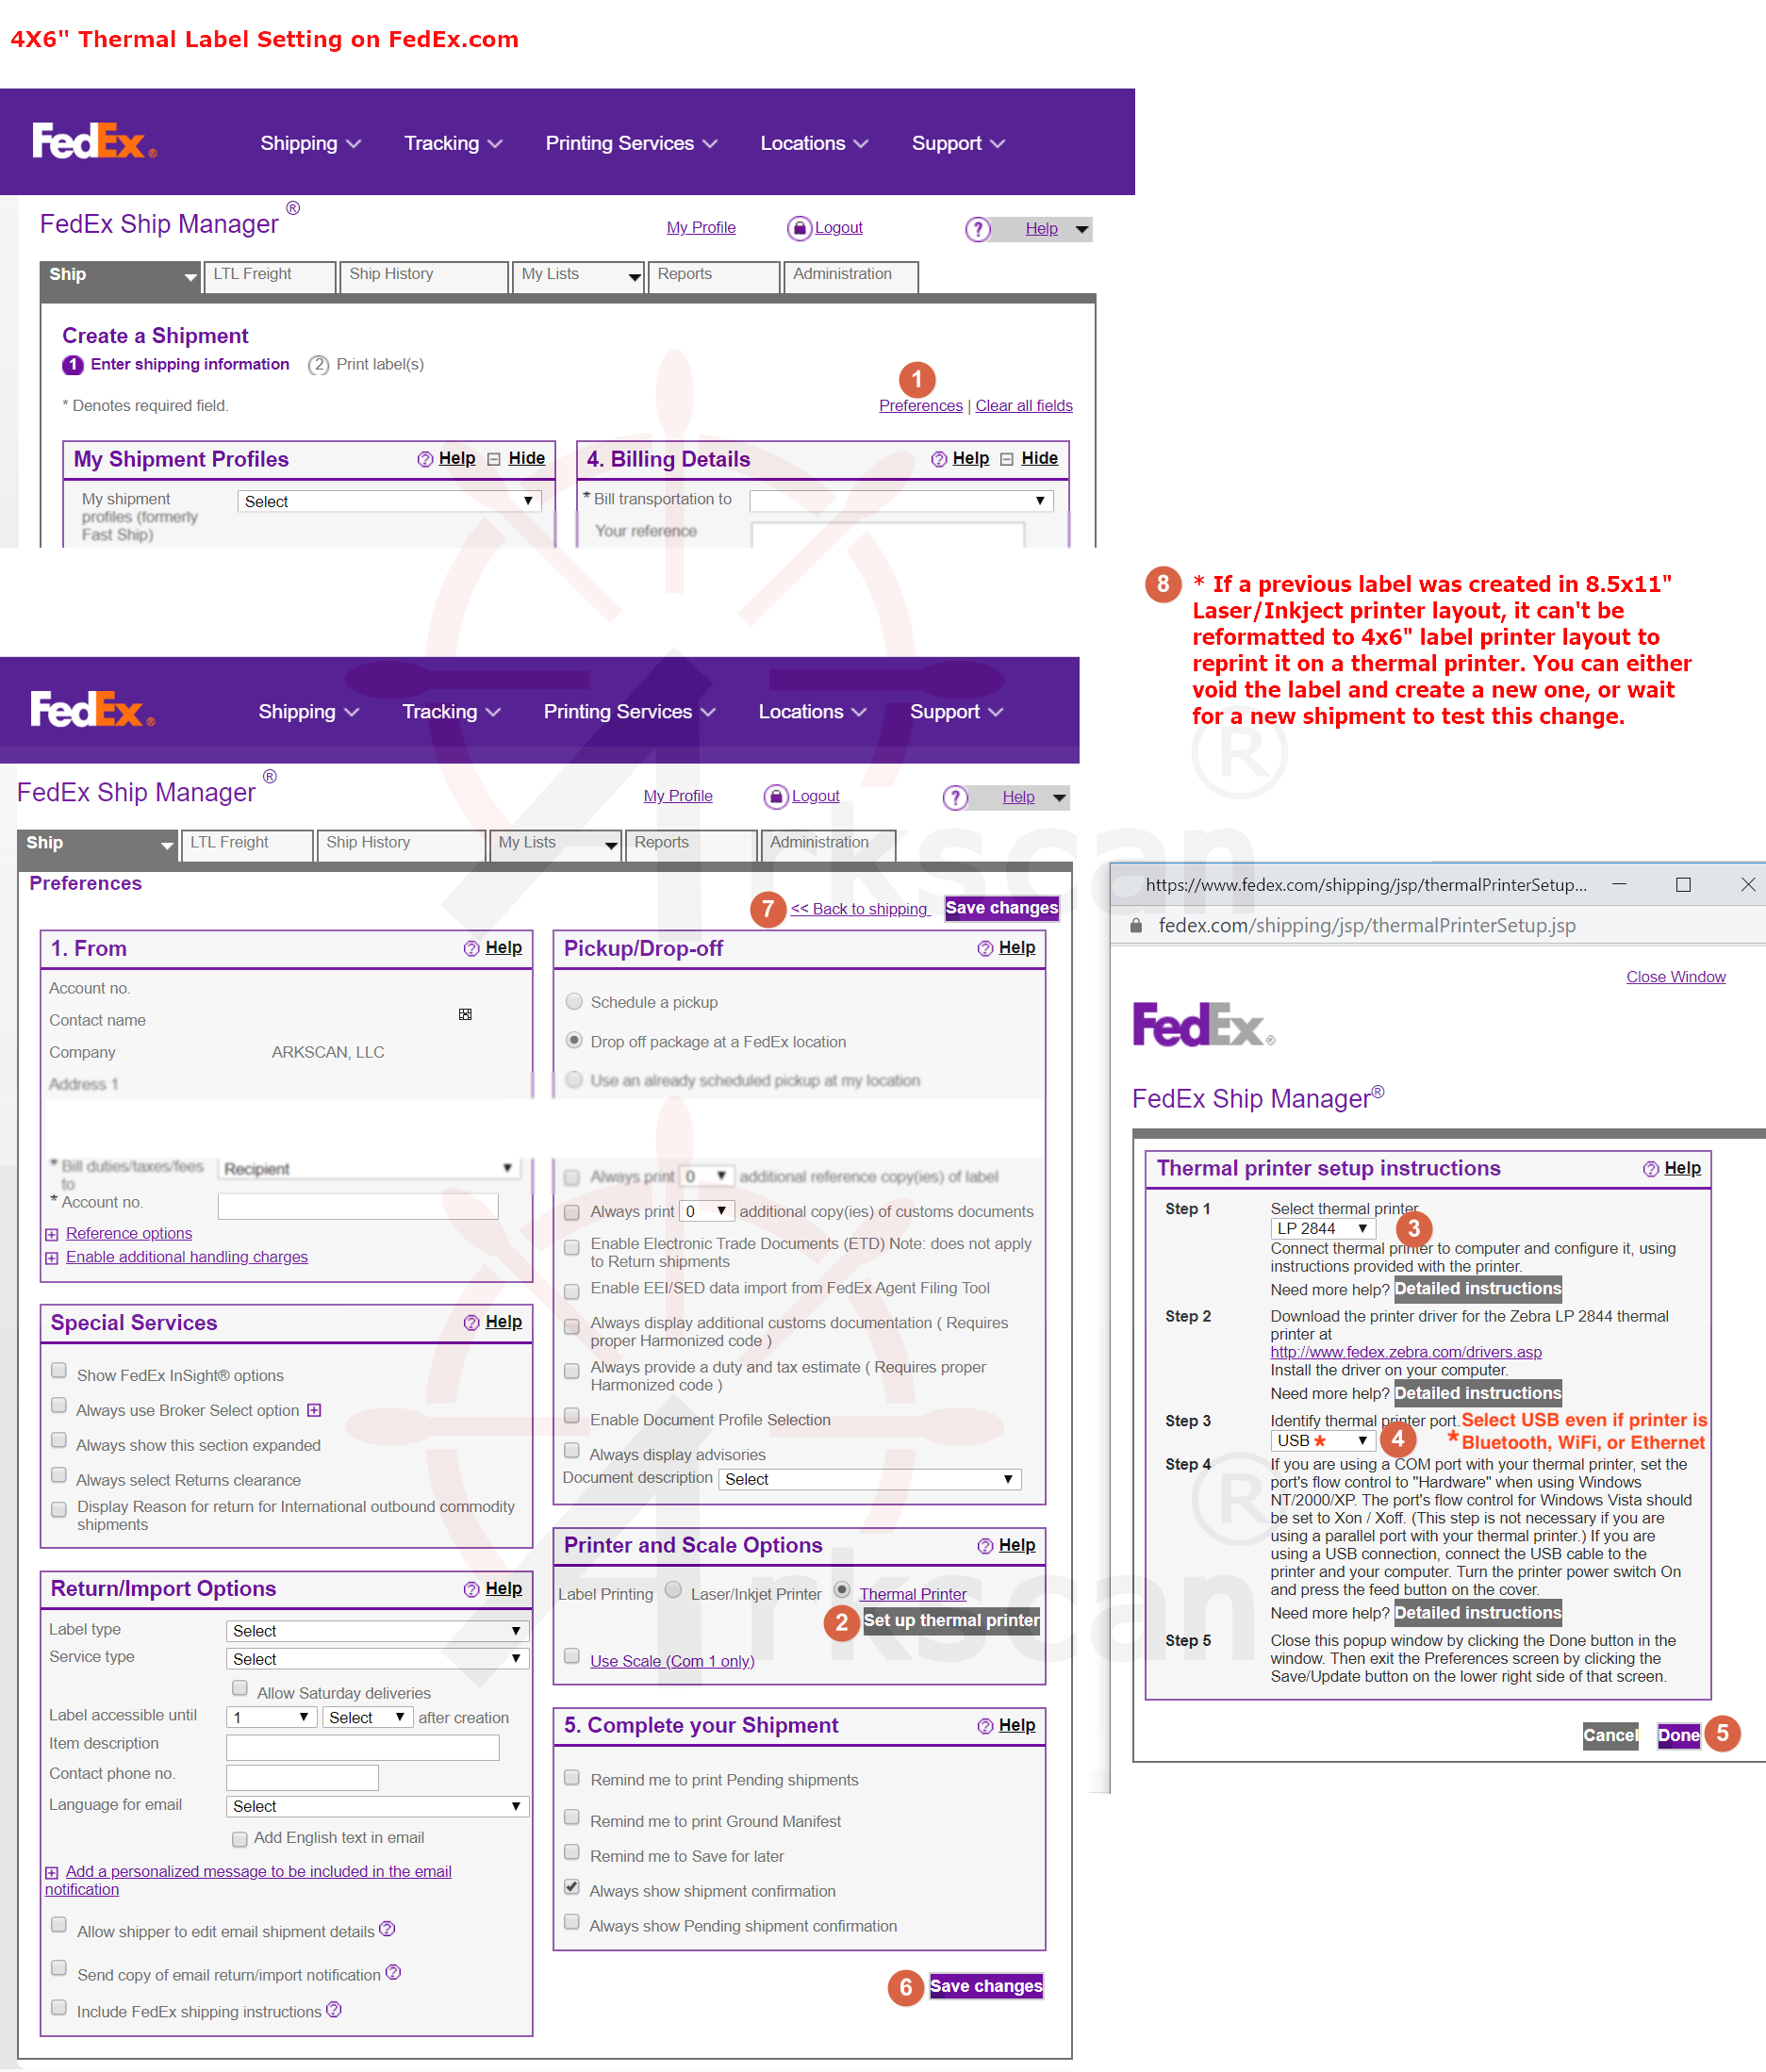
Please watch the video link below to learn how to set up your FedEx Ship Manager software to print with your Arkscan label printer:
PLEASE NOTE: FedEx Ship Manager requires the use of our Zebra Printer Driver to print properly
To print GoDaddy labels using ShipEngine, please follow the instructions below for either Windows or Mac.
As of September 10, 2024, the ShipEngine App that is connected to GoDaddy is currently not able to generate a 4x6 size label. We have reached out to ShipEngine/Godaddy about this issue.
Here is a workaround to print your shipping label:
1) On your Godaddy orders page - click on ship order.
2) It will prompt you to select package size and weight, please fill out the form.
3) On the next step, you will have the option to select which carrier you want to puchase labels.
4) After purchasing a label from the carrier, you can download the PDF (label).
5) The label size is by default 8.5x11 (if you print this directly it will look very small)
You will need to use Adobe Reader - it is free and can be downloaded at this link: get.adobe.com/reader
Please follow the video to resize and print your label:
To print Amazon FBA labels using InventoryLab, please follow the instructions below for either Windows or Mac:
Windows Users:
Please Note: The InventoryLab website REQUIRES the use of the Zebra print driver. You can find the Zebra driver at this link: www.arkscan.com/driver
After installing the Zebra driver, please make the following additions/changes within your InventoryLab account:

For more information, please see InventoryLabs setup instructions: https://support.inventorylab.com/hc/en-us/articles/1500000202702
Mac Users:
Please Note: The InventoryLab website REQUIRES that the Zebra LP2 driver be activated in Mac. Please see this instructional image on how to do that before proceeding: Activate Mac Zebra LP2 Driver
After activating the Zebra LP2 driver, please make the following additions/changes within your InventoryLab account:
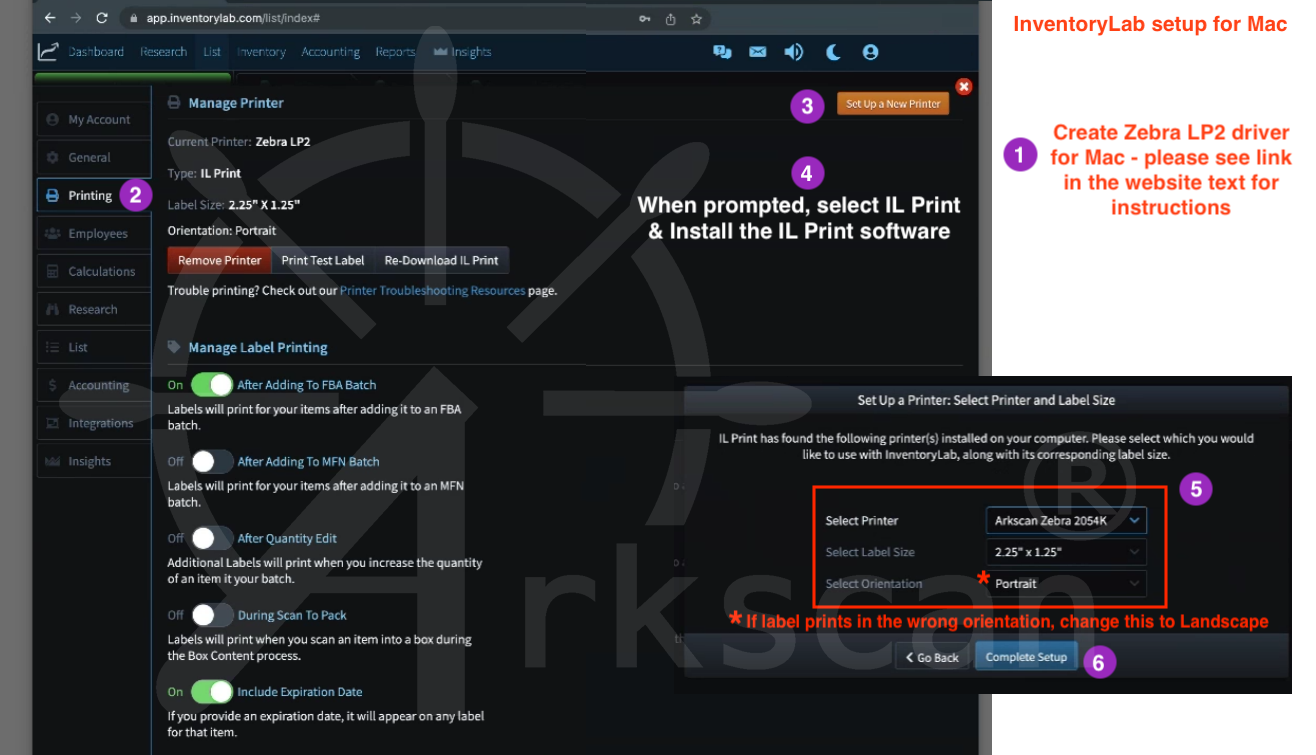
For more information, please see InventoryLabs setup instructions: https://support.inventorylab.com/hc/en-us/articles/1500000206201
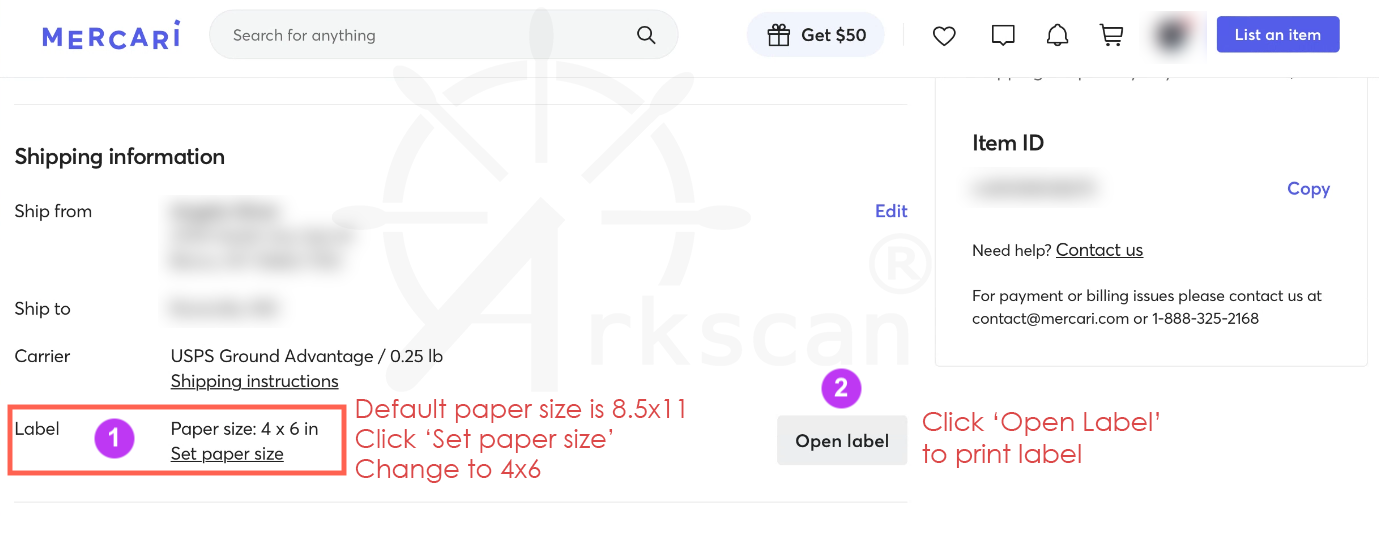
By default, Mercari is set to generate a shipping label for an 8.5x11" sheet of paper. When creating a new shipping label using Mecari, you will need to change the label settings within your Mercari account to a 4x6" paper size. Please see the image below on how to make this change:
For more information on how to make these changes, please see the instructions provided by Mercari:
https://www.mercari.com/us/help_center/article/600/
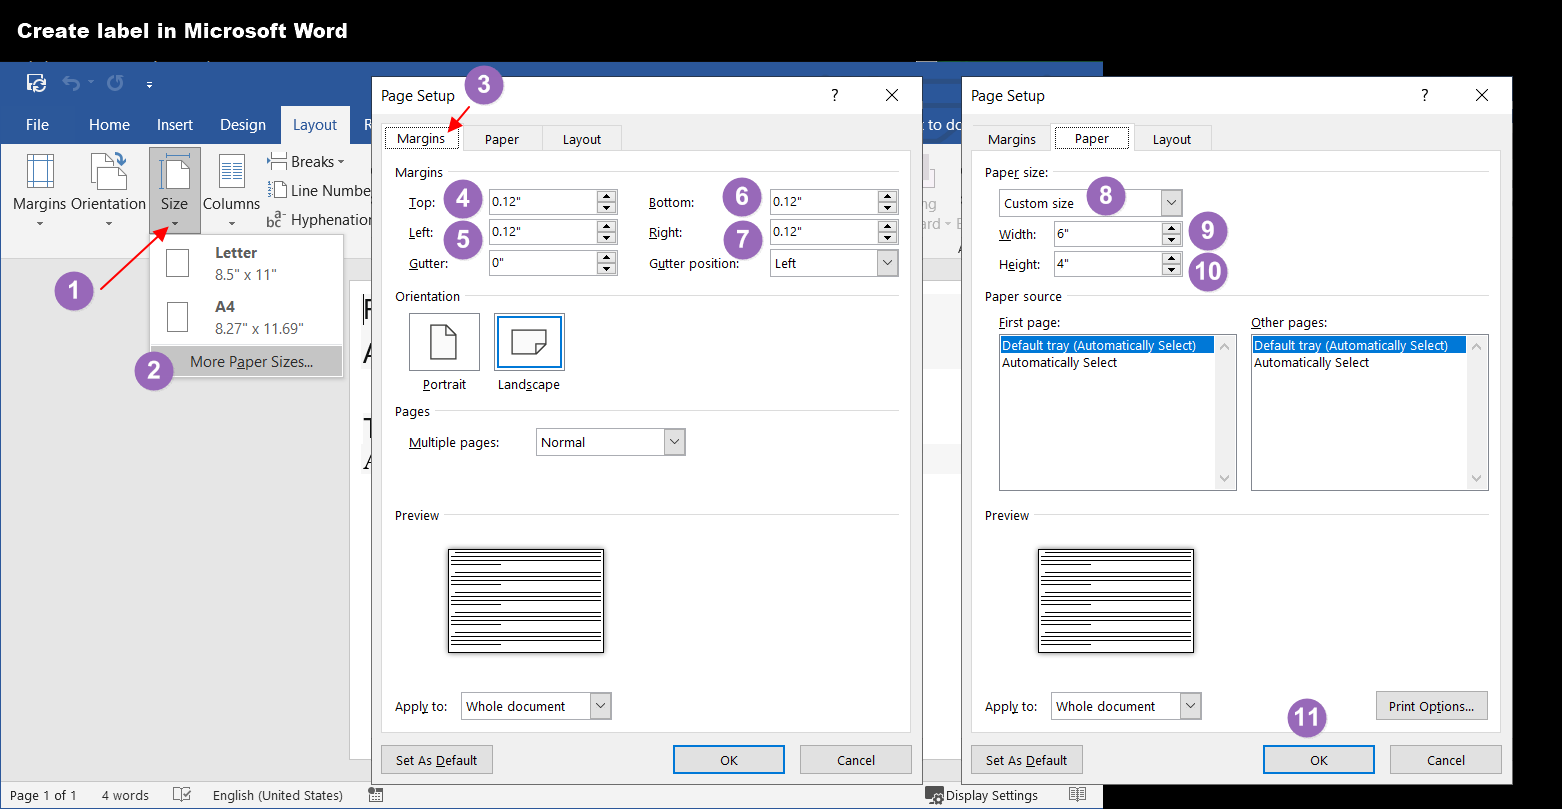
Microsoft Word can be a great tool for creating custom sized labels. Please follow the steps listed in the instructional image below on how to do this.
Please Note: Before getting started, you will need to create a custom size within the operating system for you label, so that it will be available as a paper size when you print. Please see the Mac or Windows video below for more information on how to do this:
Option # 3 - Microsoft Word:
NOTE:
-These instructions explain how to set up a 4"x6" paper size. If you are using a different label size on your printer, please note that in steps 9 and 10, you need to use the dimensions of the label you are using instead of the example numbers provided in the instructions.
-If your label is smaller, i.e. 2.25"x1.25", the margins will need to be smaller in steps 4-5, such as 0.05".
To print a 4x6 shipping label using NeoShip, please make the following changes to your NeoShip preferences :
Enable PayPal to create a 4x6 shipping label:
NOTE: This is an older method. If you do not see these options, please see the PayPal + Shipstation instructions below, in the next tab.
When you first create a PayPal Shipping account you are given a prompt to setup your preferences, please select the options in the image below:

To print a 4x6 shipping label from the PayPal Shipping website, please see the instructional image below on what settings need to be changed in your PayPal account:
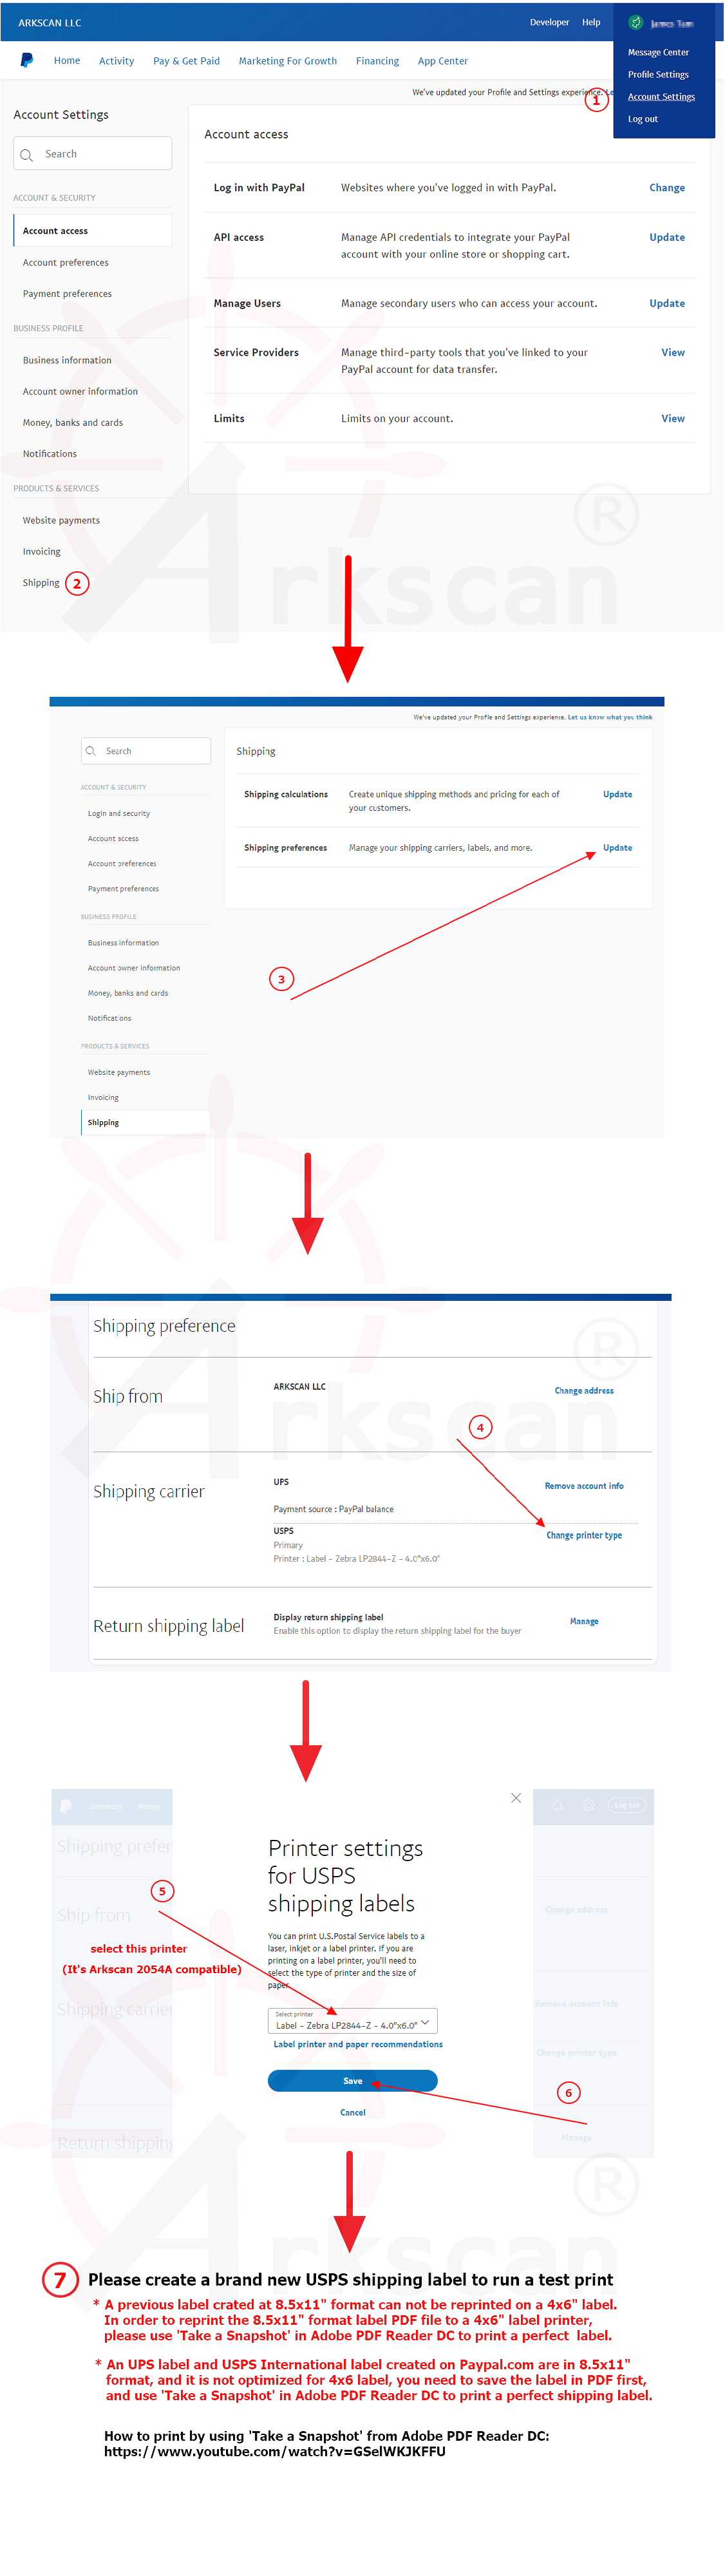
Enable PayPal to create a 4x6 shipping label:
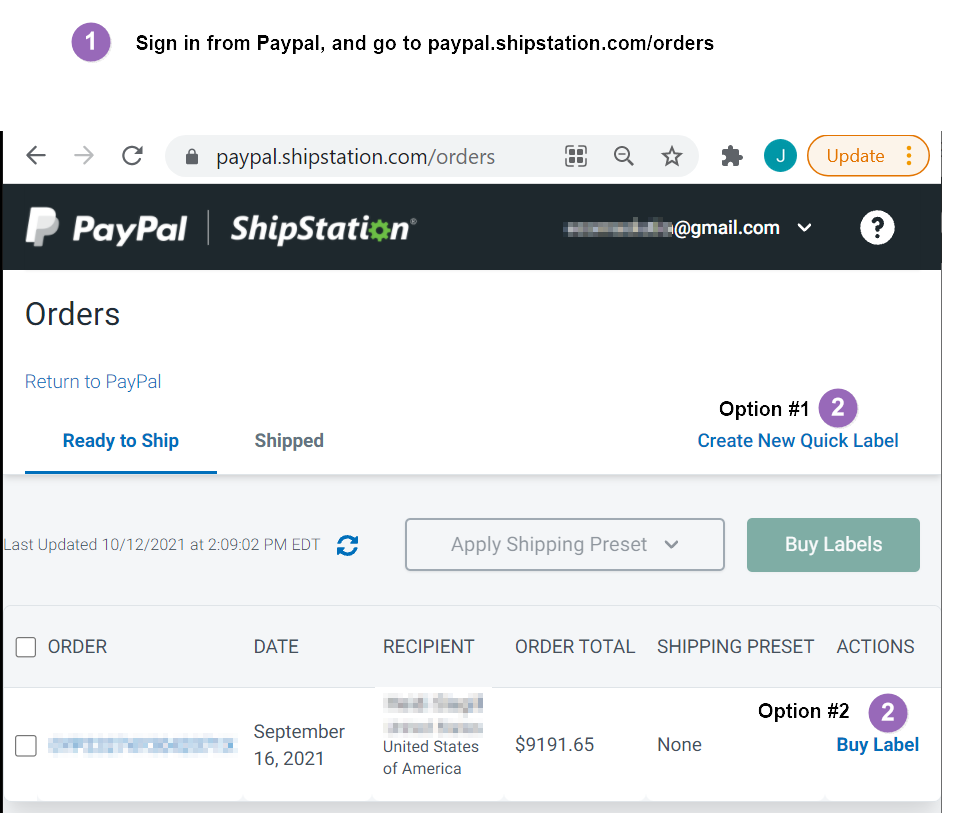
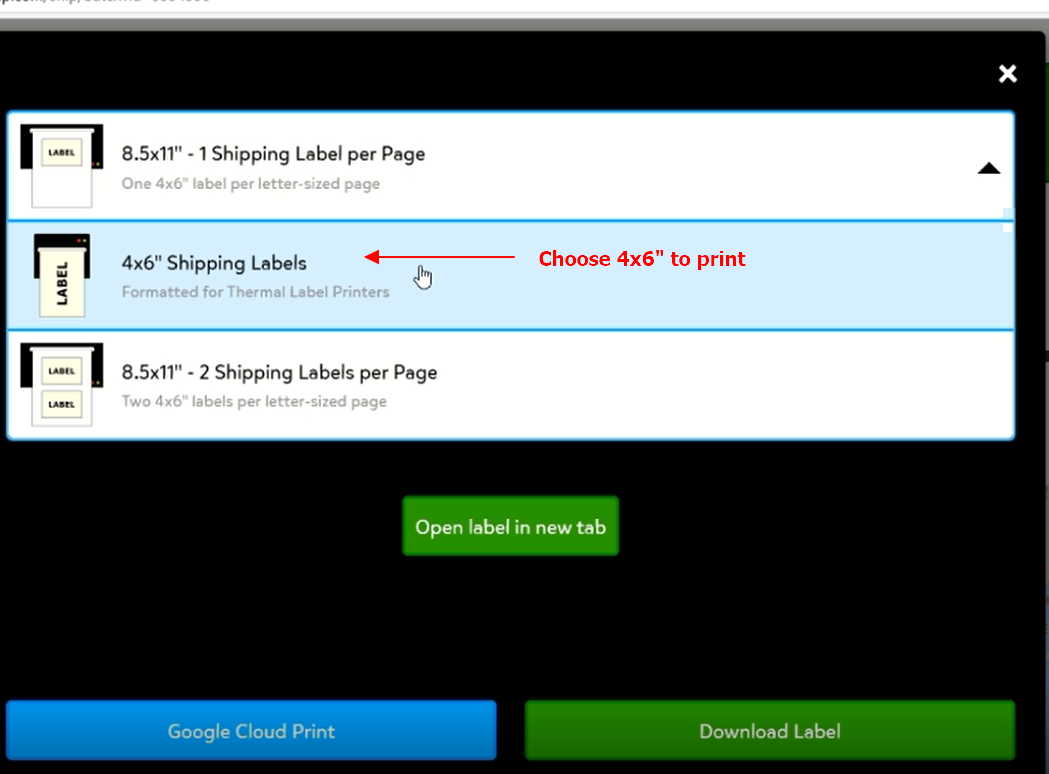
To print a 4x6 shipping label from PayPal + Shipstation, please look at the instructional images below for the settings that need to be change within your account:
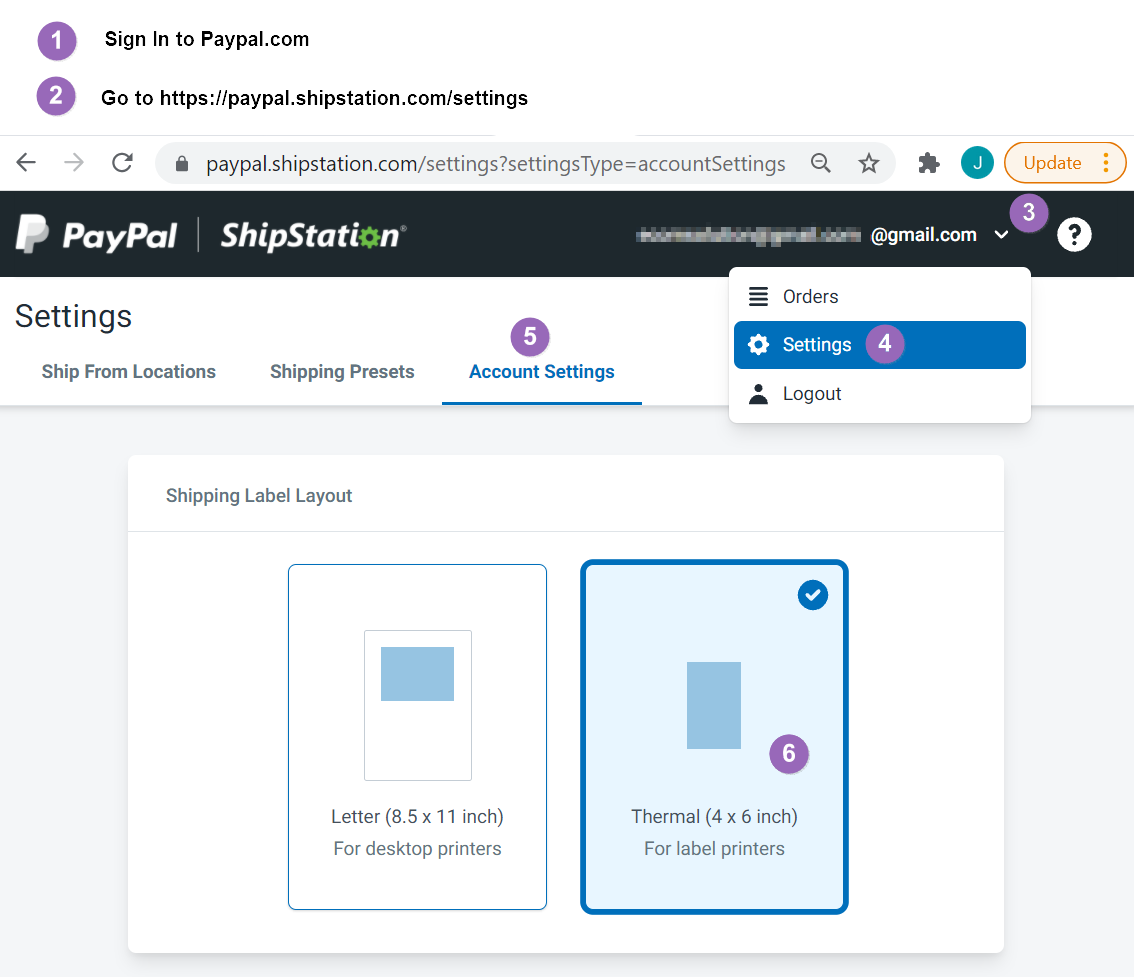
On PayPal + Shipstation there are two different options for purchasing your shipping label.
Option #1 : You can fill in the 'To' and 'From' address'
Option #2 : You can print a label without typing the shipping address. This is useful if your customer pays via PayPal since the customer will have already provided the ship-to address
If you need to crop a larger label down to a small size so that it will fit better, for example, if you need to crop an 8.5x11" shipping label to fit a 4x6" label, then please read the following.
- Save or download the PDF label to your computer
- Utilize Adobe Reader to crop the label to size and print to your label
- Adobe Reader is free and can be downloaded at this link: get.adobe.com/reader
Enable PirateShip to create a 4x6 shipping label:
To print a a 4x6 shipping label from the PirateShip website, please see the instructional image below on what settings need to be changed in your PirateShip account:
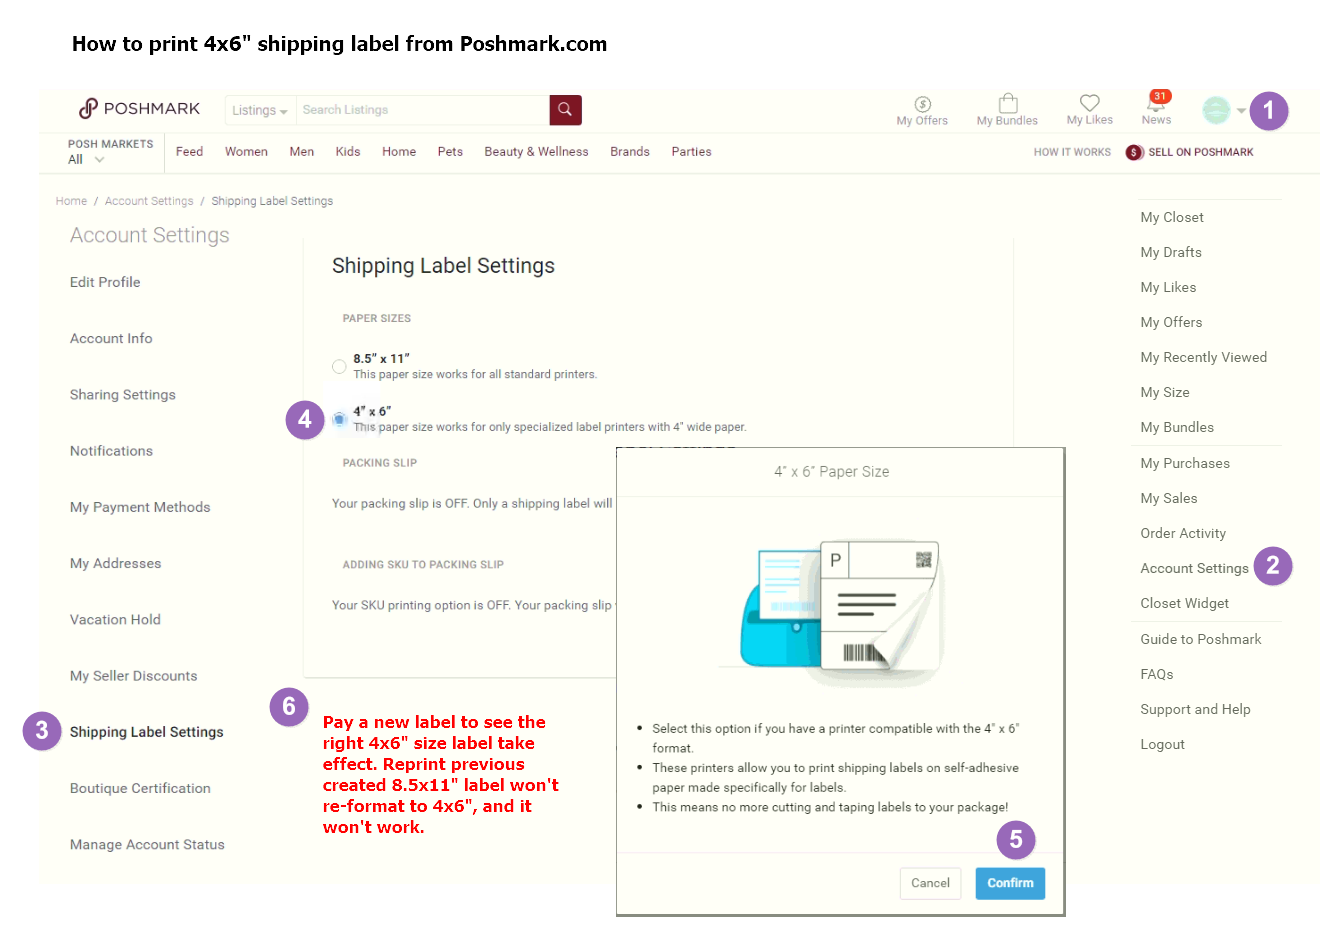
Enable Poshmark to create a 4x6 shipping label:
To print a a 4x6 shipping label from the Poshmark website, please see the instructional image below on what settings need to be changed in your Poshmark account:
In your account settings, look for printer or page layout settings. Change the page layout to a 4x6" shipping label. When printing choose 4x6 as your paper size, and for Scale choose either "Fit to Printable Area" or 100% (or until it fits the page). These settings vary by web browser and software.
In your account settings, look for printer or page layout settings. Change the page layout to a 4x6" shipping label. When printing choose 4x6 as your paper size, and for Scale choose either "Fit to Printable Area" or 100% (or until it fits the page). These settings vary by web browser and software.
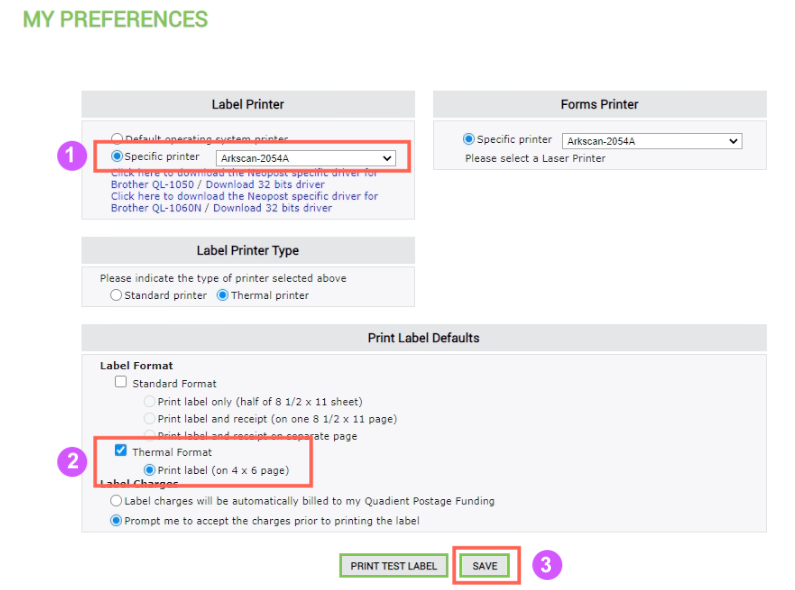
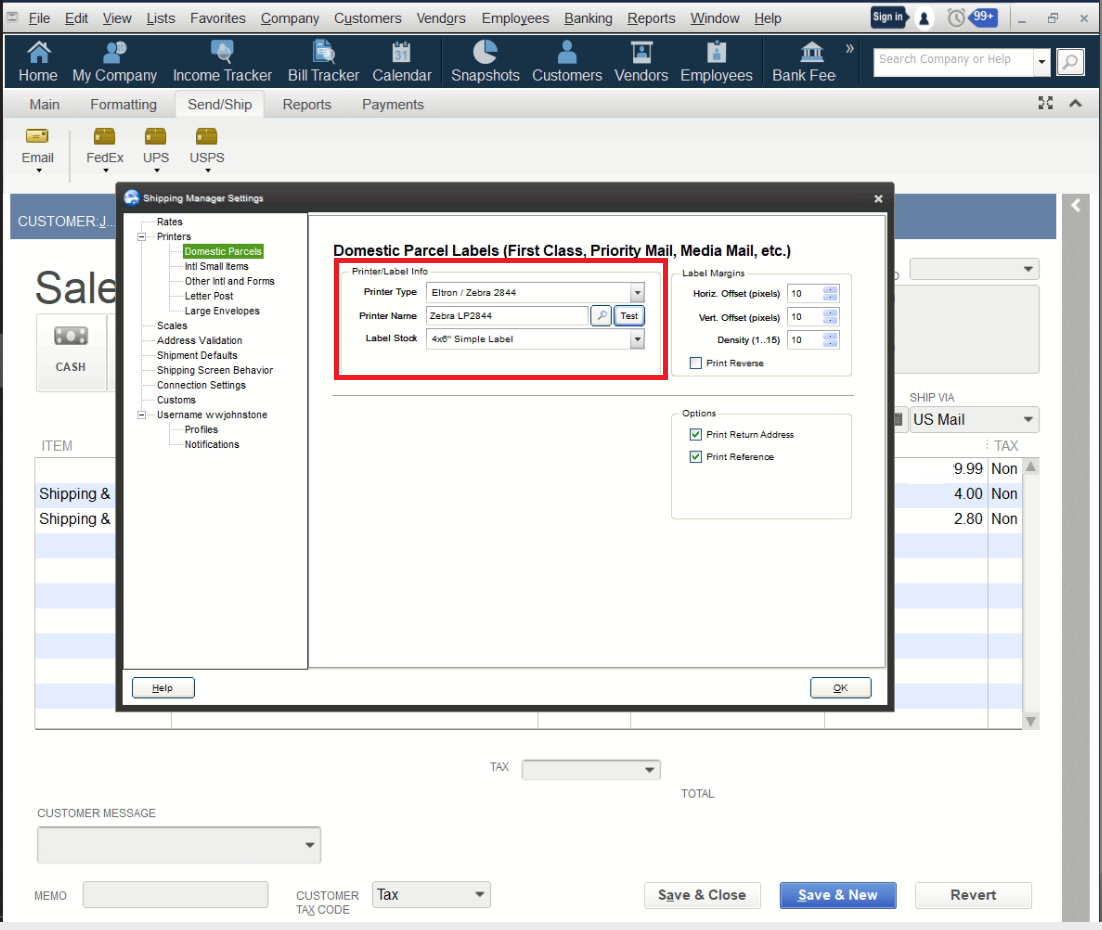
Enable Quickbook to create a 4x6 shipping label:
To print a a 4x6 shipping label from Quickook, please see the instructional image below on what settings need to be changed in the application:
Please Note: The Quickbook software REQUIRES the use of the Zebra print driver. You can find the Zebra driver at this link: www.arkscan.com/driver
Mac Users:
There are two different ways to use the QZTray software on a Mac. Please see below for more information on the method that best suits your needs.
Printing a PDF file: To print a standard PDF type of file using QZTray, you need to install the Arkscan Mac printer driver and the QZTray software. Once both are installed, no further specifications are needed. Simply send the print job straight to the printer through QZTray without a printer dialogue screen.
Printing a ZPL: To print a ZPL file using the QZTray software, it is required that you create a custom printer using the CUPS web interface within Mac. For more information on how to do this, please see the instructions provided by QZTray: https://qz.io/docs/setting-up-a-raw-printer-in-osx
QZTray provides a convenient tool that can be used to test the printer: https://demo.qz.io/
Windows Users:
No special changes or specifications need to be made to the QZTray software after it is installed. The default settings should suffice for most printing situations.
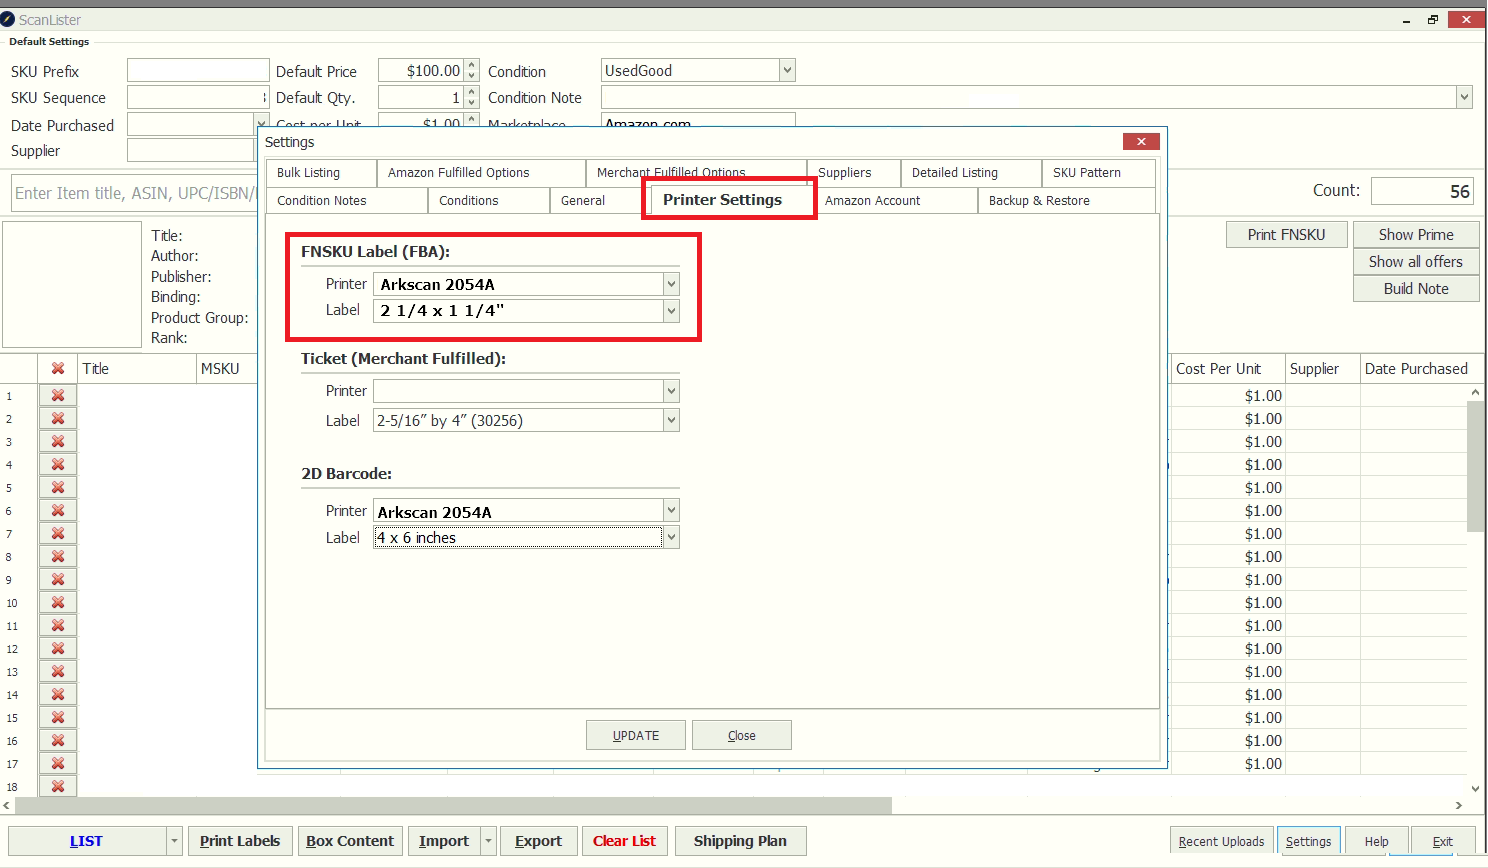
Enable ScanLister to create a 4x6 shipping label:
To print a a 4x6 shipping label from the ScanLister website, please see the instructional image below on what settings need to be changed in your ScanLister account:
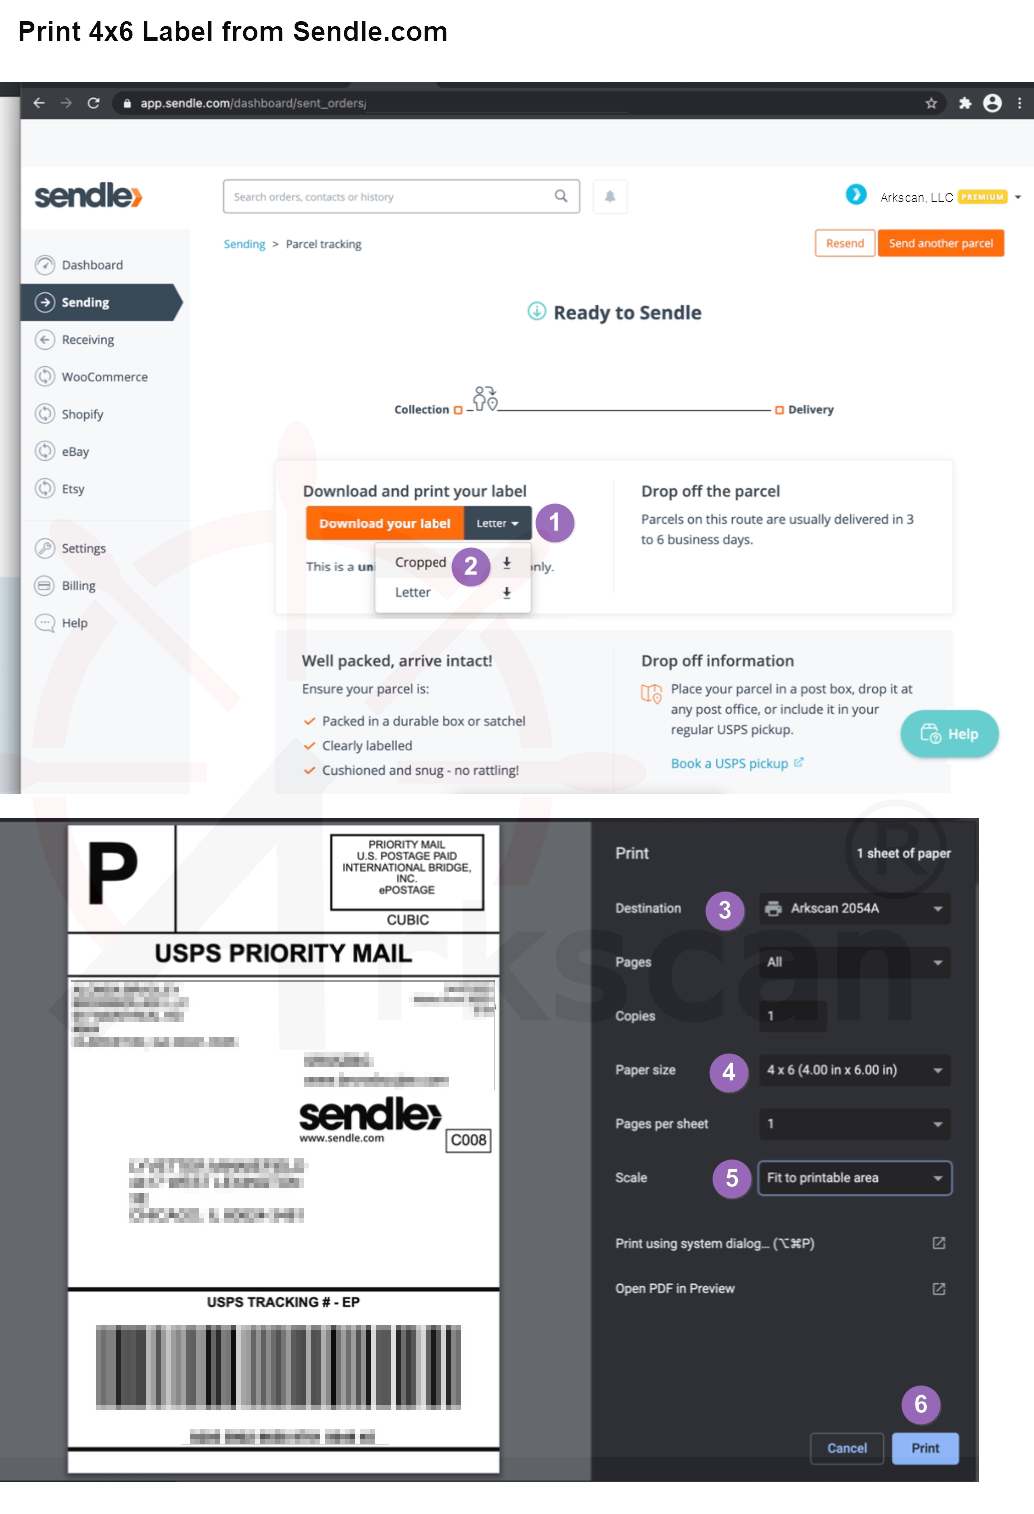
Enable Sendle to create a 4x6 shipping label:
To print a a 4x6 shipping label from the Sendler website, please see the instructional image below on what settings need to be changed in your Sendle account:
In your account settings, look for printer or page layout settings. Change the page layout to a 4x6" shipping label. When printing choose 4x6 as your paper size, and for Scale choose either "Fit to Printable Area" or 100% (or until it fits the page). These settings vary by web browser and software.
Enable ShippingEasy to create a 4x6 shipping label:
To print a a 4x6 shipping label from the ShippingEasy website, please see the instructional image below on what settings need to be changed in your ShippingEasy account:
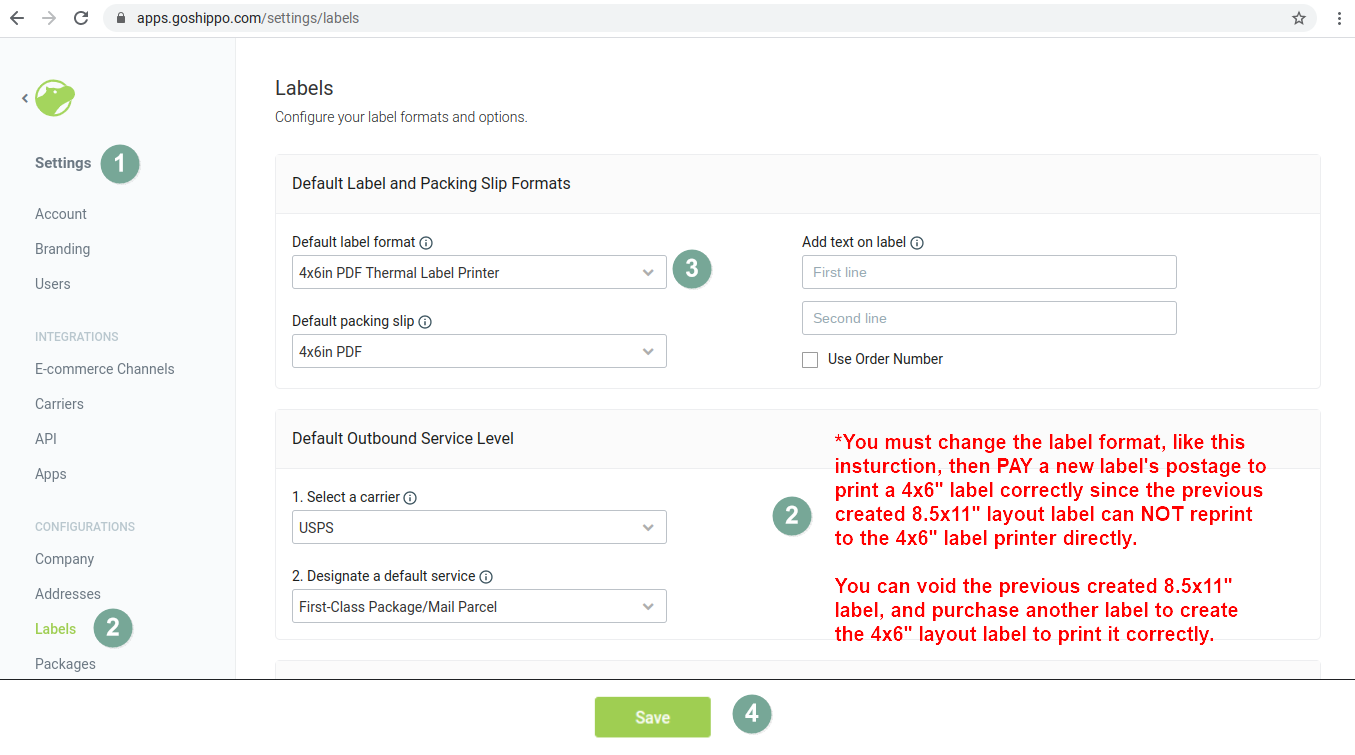
Enable Shippo to create a 4x6 shipping label:
To print a a 4x6 shipping label from the Shippo website, please see the instructional image below on what settings need to be changed in your Shippo account:
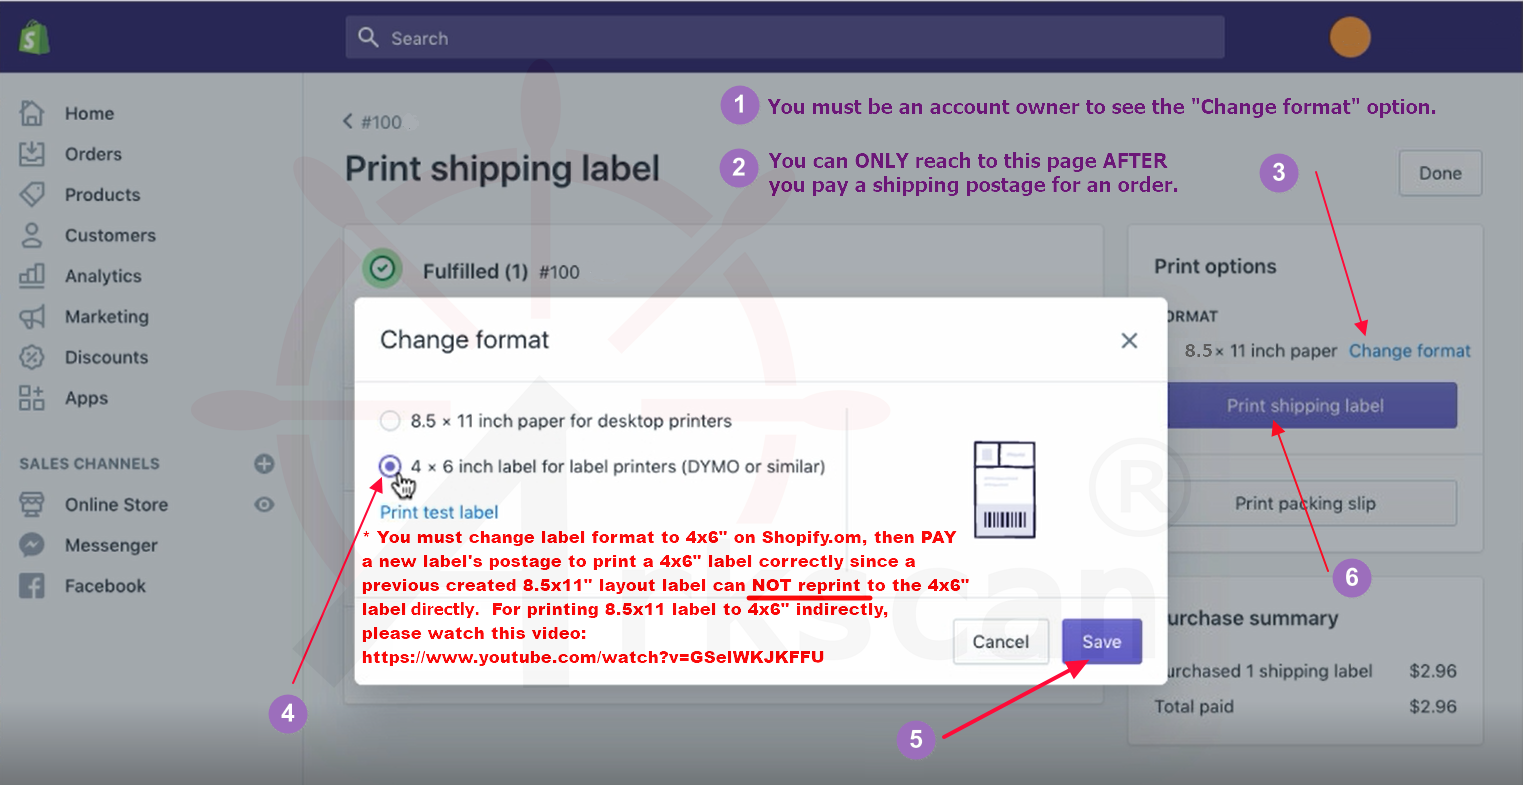
Enable Shopify to create a 4x6 shipping label:
To print a a 4x6 shipping label from the Shipstation website, please see the instructional image below on what settings need to be changed in your Shipstation account:

If you are using ShipStation Connect:
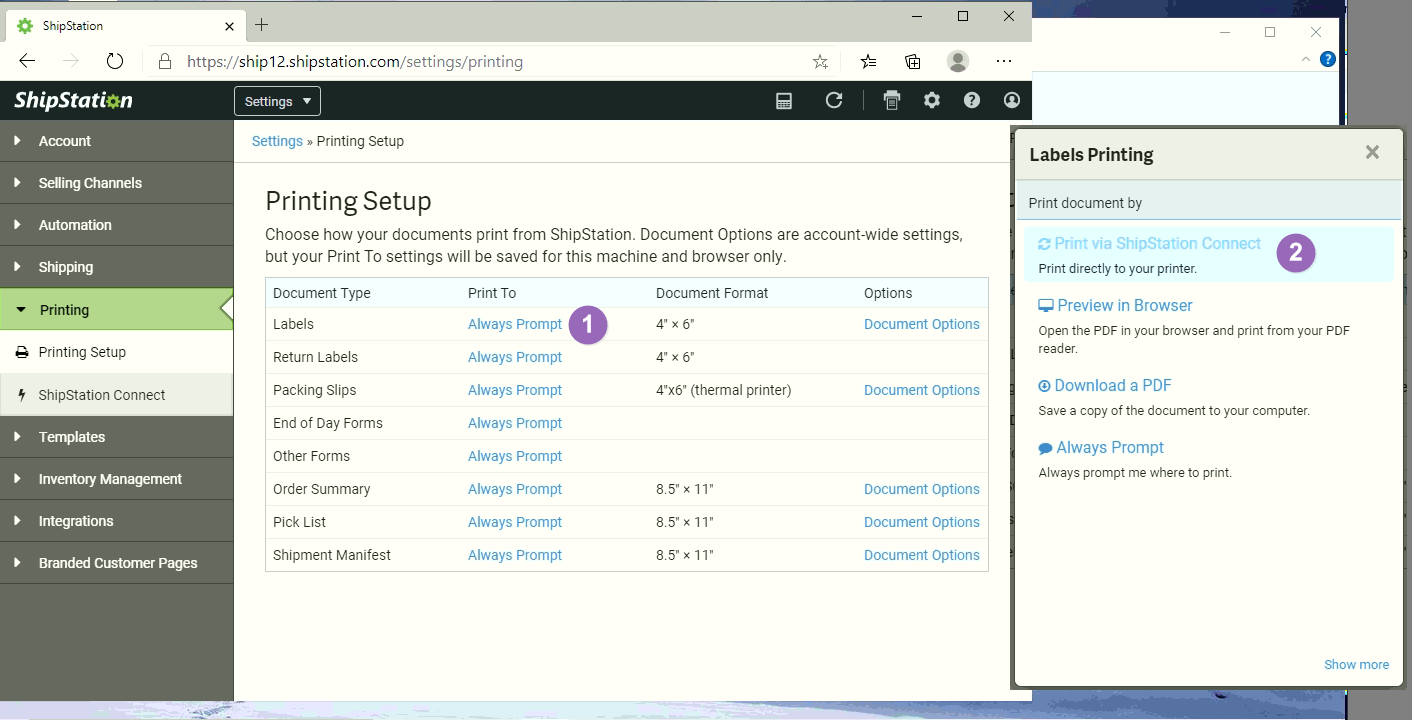
Please also see the Shipstation article: https://ss6.shipstation.com/#/settings/printing
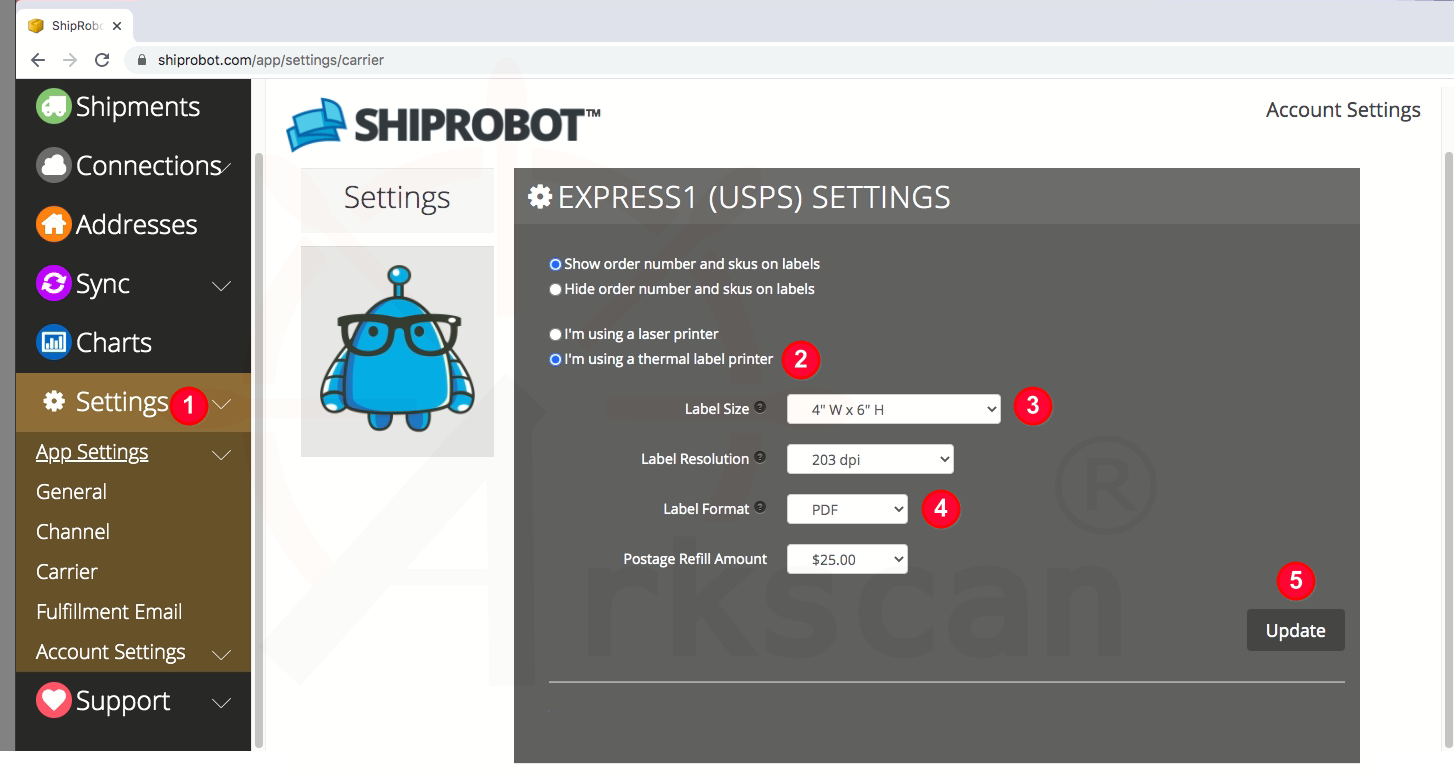
Enable ShipRobot to create a 4x6 shipping label:
To print a a 4x6 shipping label from the ShipRobot website, please see the instructional image below on what settings need to be changed in your ShipRobot account:
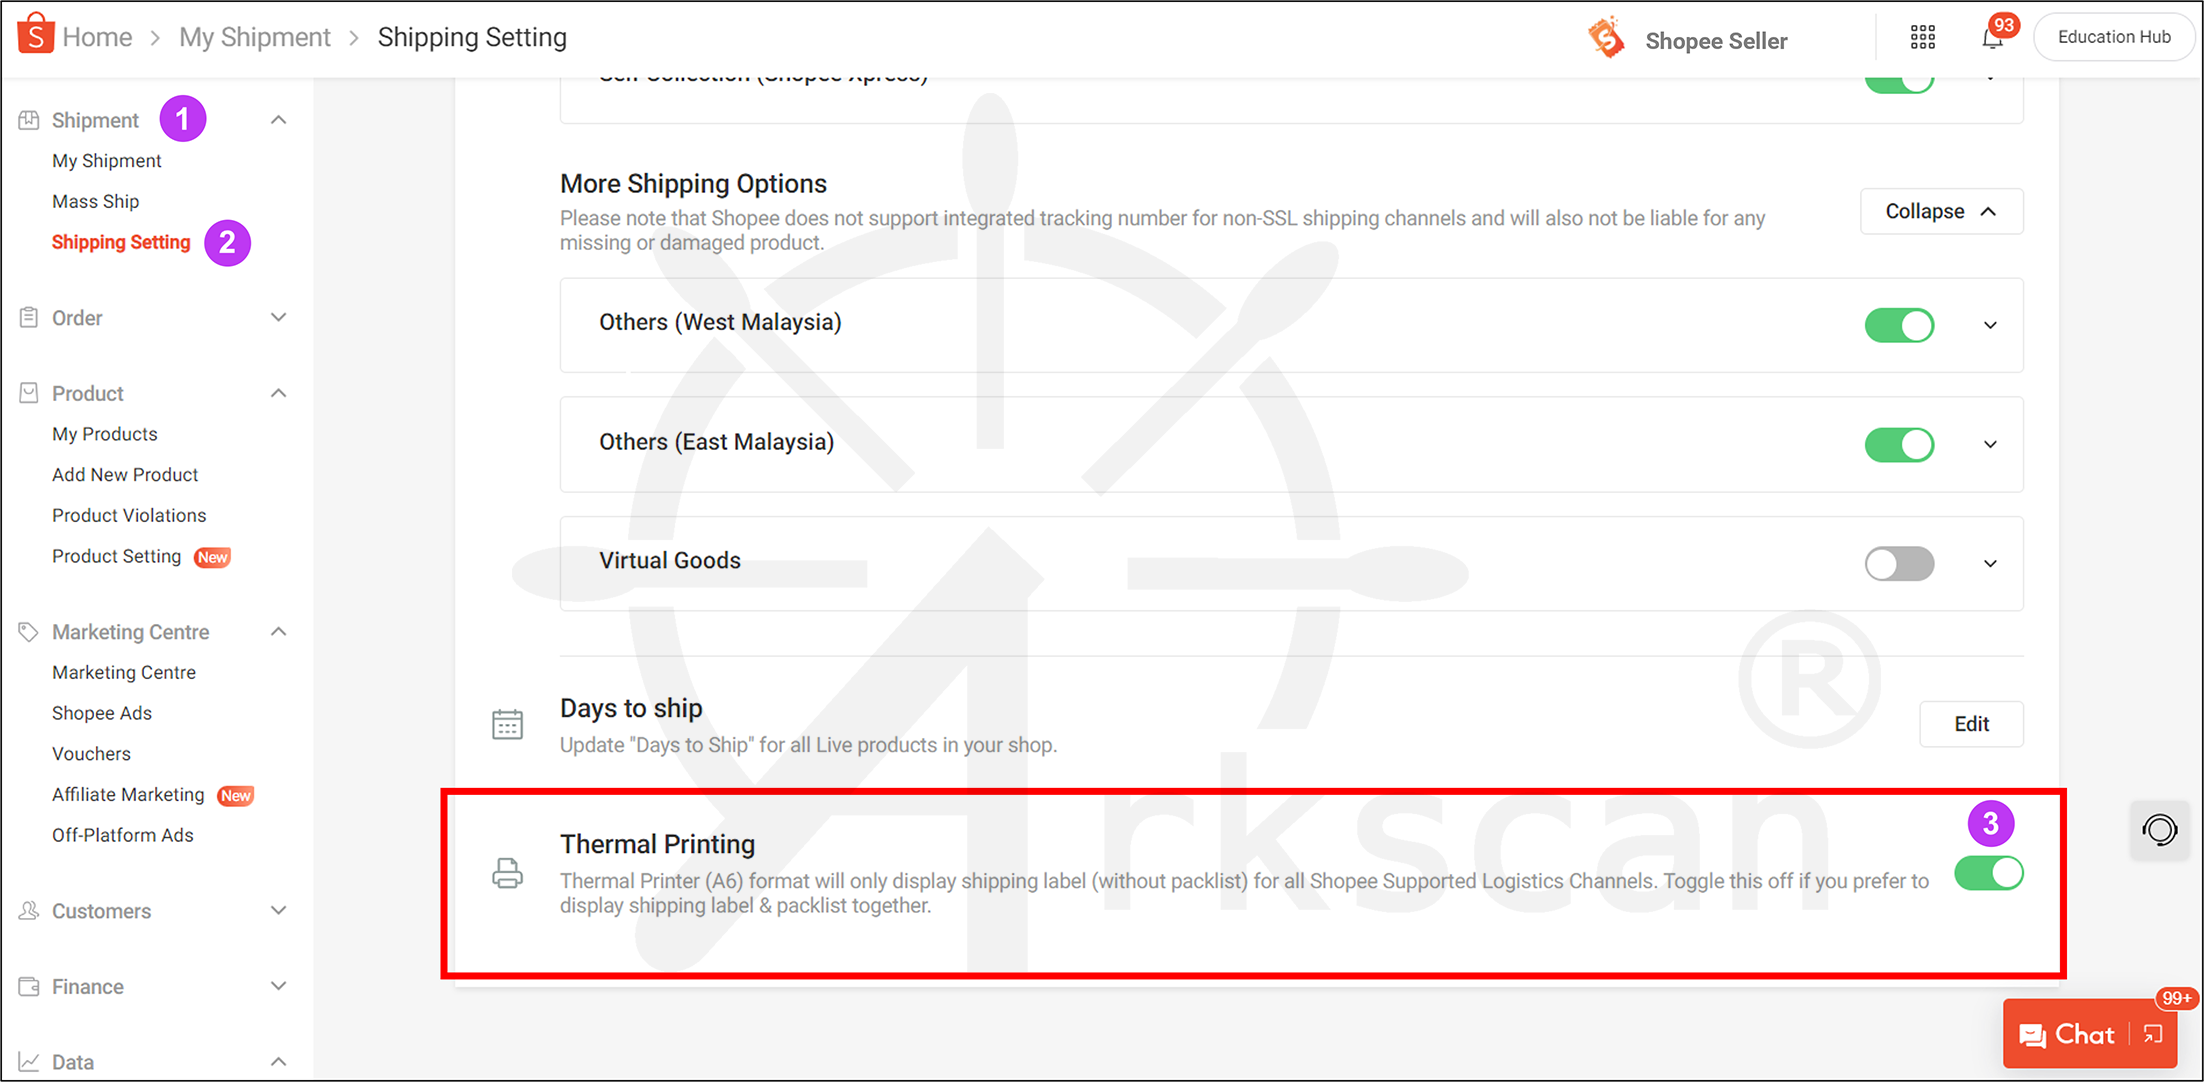
To print your 4x6" AWBs using a thermal printer, enable thermal printing in Seller Centre. Go to Shipment > Shipping Setting and enable the Thermal Printing toggle:
Enable Shopify to create a 4x6 shipping label:
To print a a 4x6 shipping label from the Shopify website, please see the instructional image below on what settings need to be changed in your Shopfiy account:
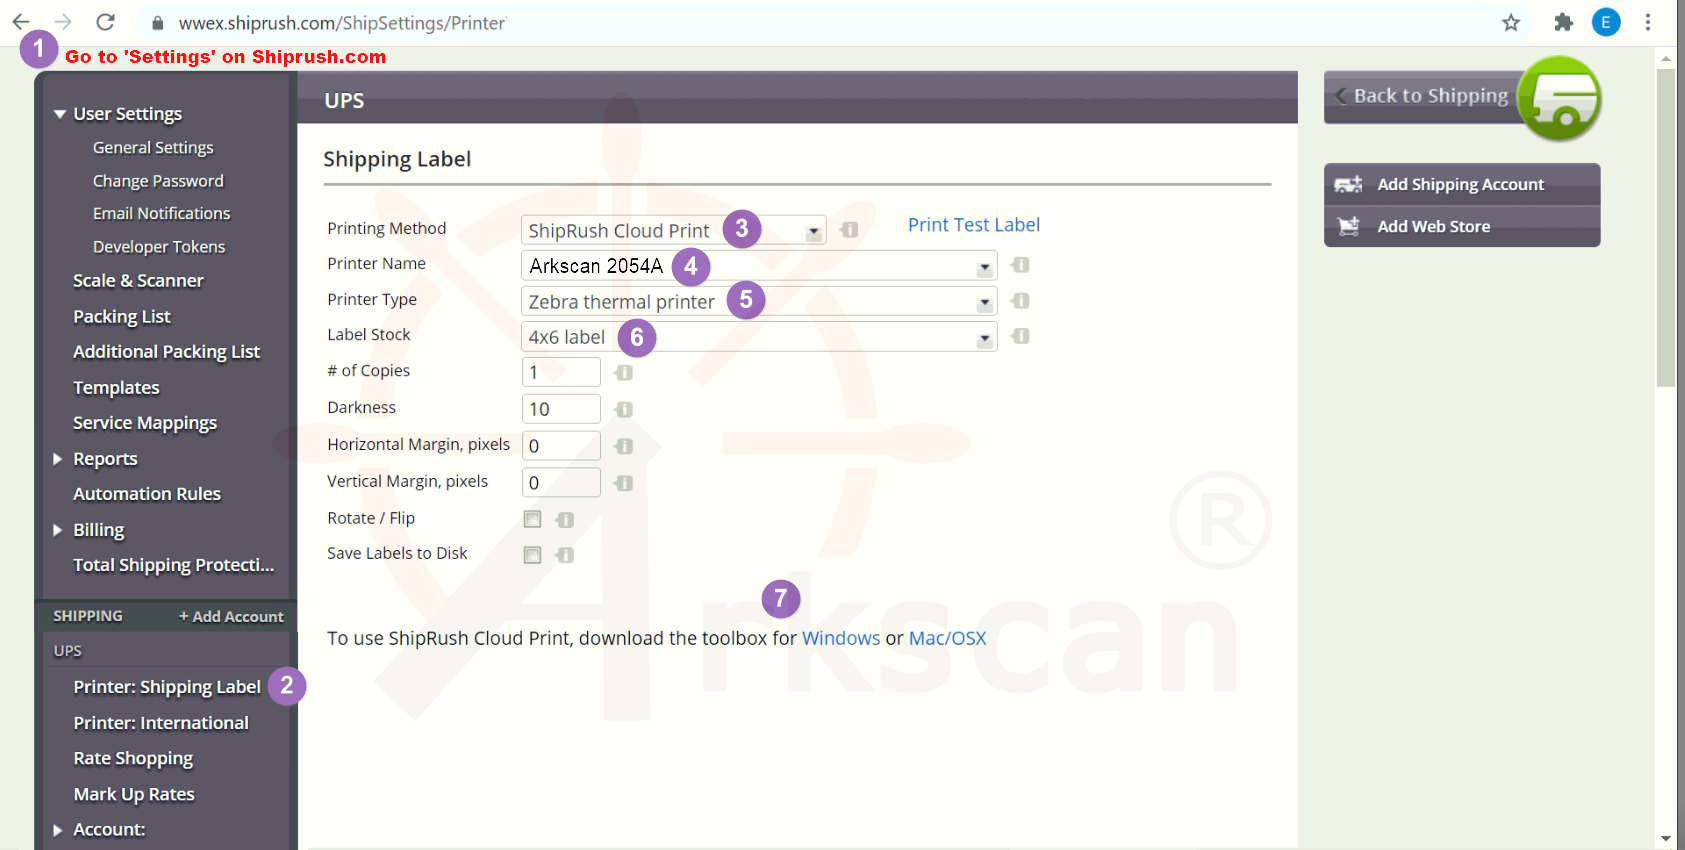
Enable Shiprushto create a 4x6 shipping label:
To print a a 4x6 shipping label from the Shopify website, please see the instructional image below on what settings need to be changed in your Shopfiy account:
In your account settings, look for printer or page layout settings. Change the page layout to a 4x6" shipping label. When printing choose 4x6 as your paper size, and for Scale choose either "Fit to Printable Area" or 100% (or until it fits the page). These settings vary by web browser and software.
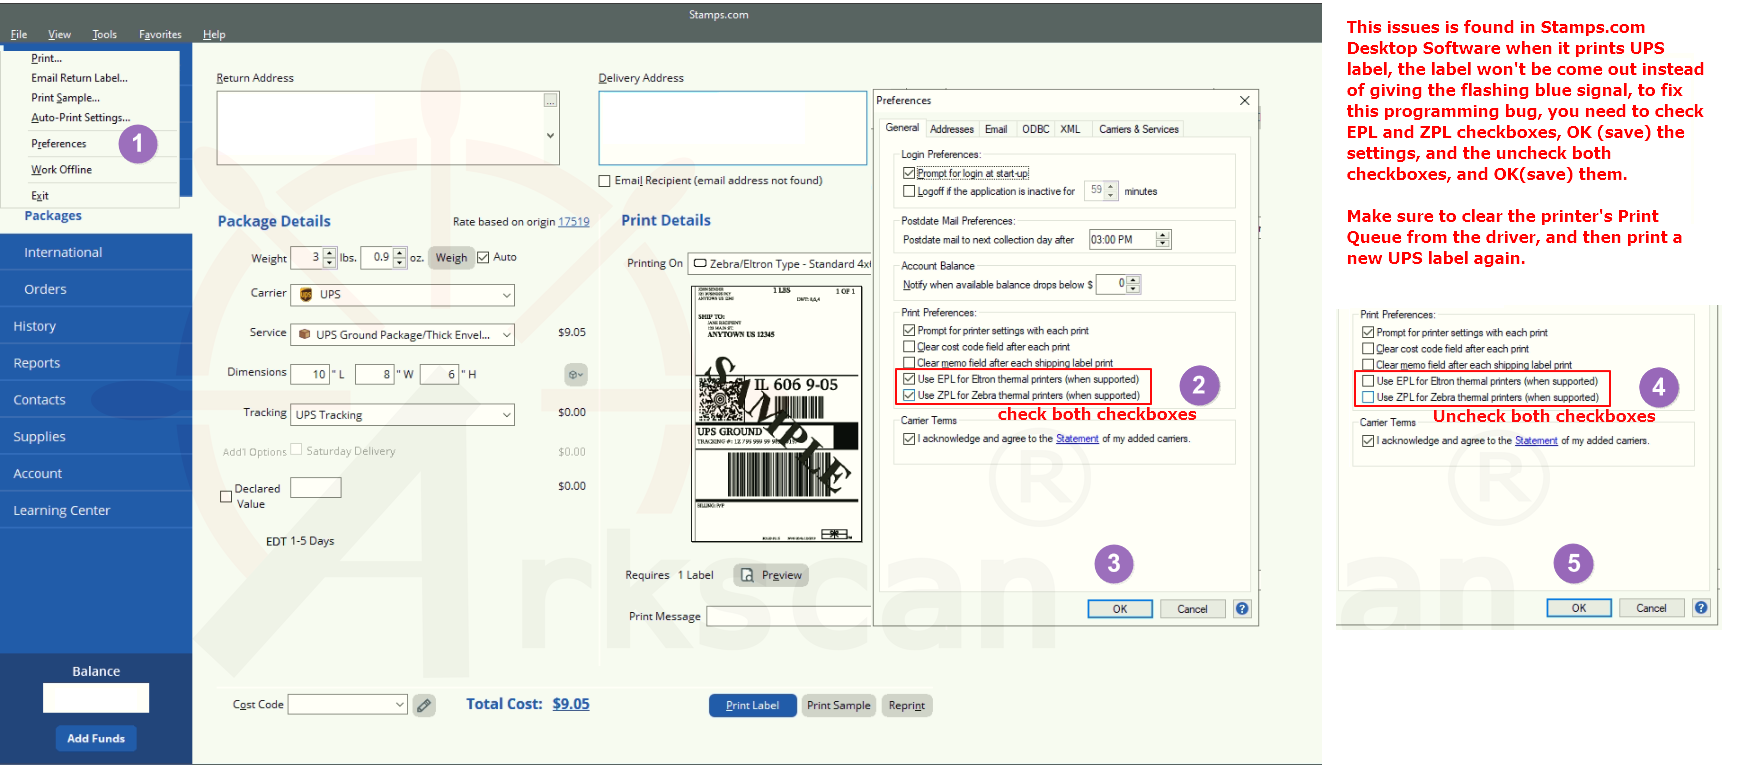
NOTE: These instructions are for the Stamps.com DESKTOP software. Please see the previous tab for the website instructions.
To print a a 4x6 shipping label from the Stamps.com desktop software, please see the instructional image below:
Please Note: The Stamps.com desktop software REQUIRES the use of the Zebra print driver. You can find the Zebra driver at this link: www.arkscan.com/driver
For International Shipping: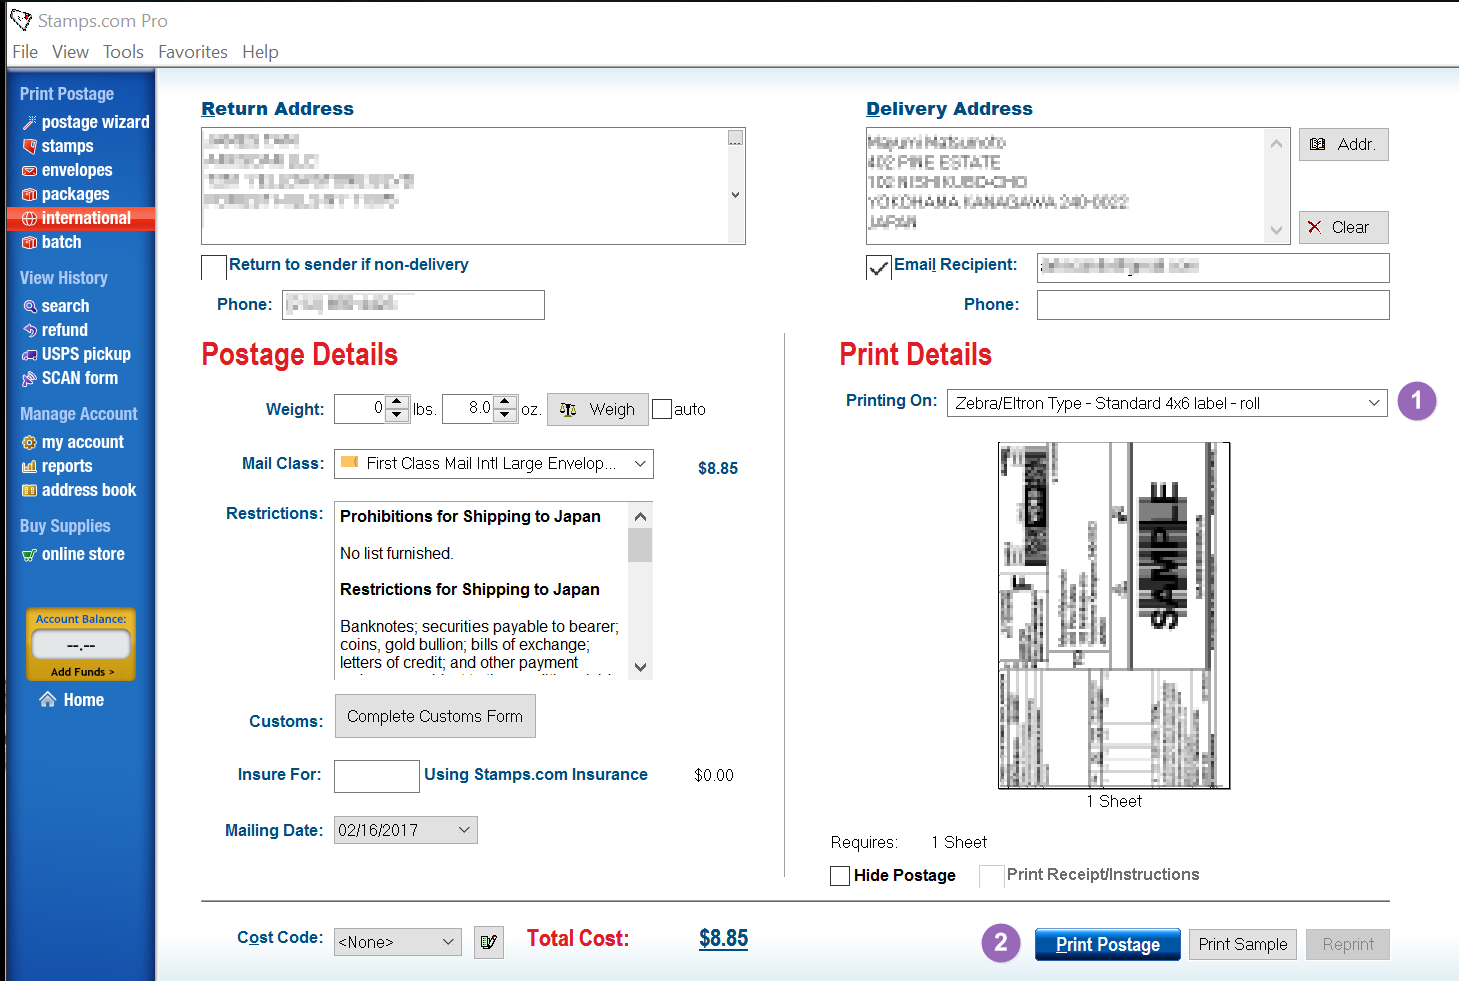
NOTE: These instructions are for the Stamps.com WEBSITE. Please see the next tab for the desktop software instructions.
To print a a 4x6 shipping label from the Stamps.com website, please see the instructional image below that matches your computers Operating System:
For Windows: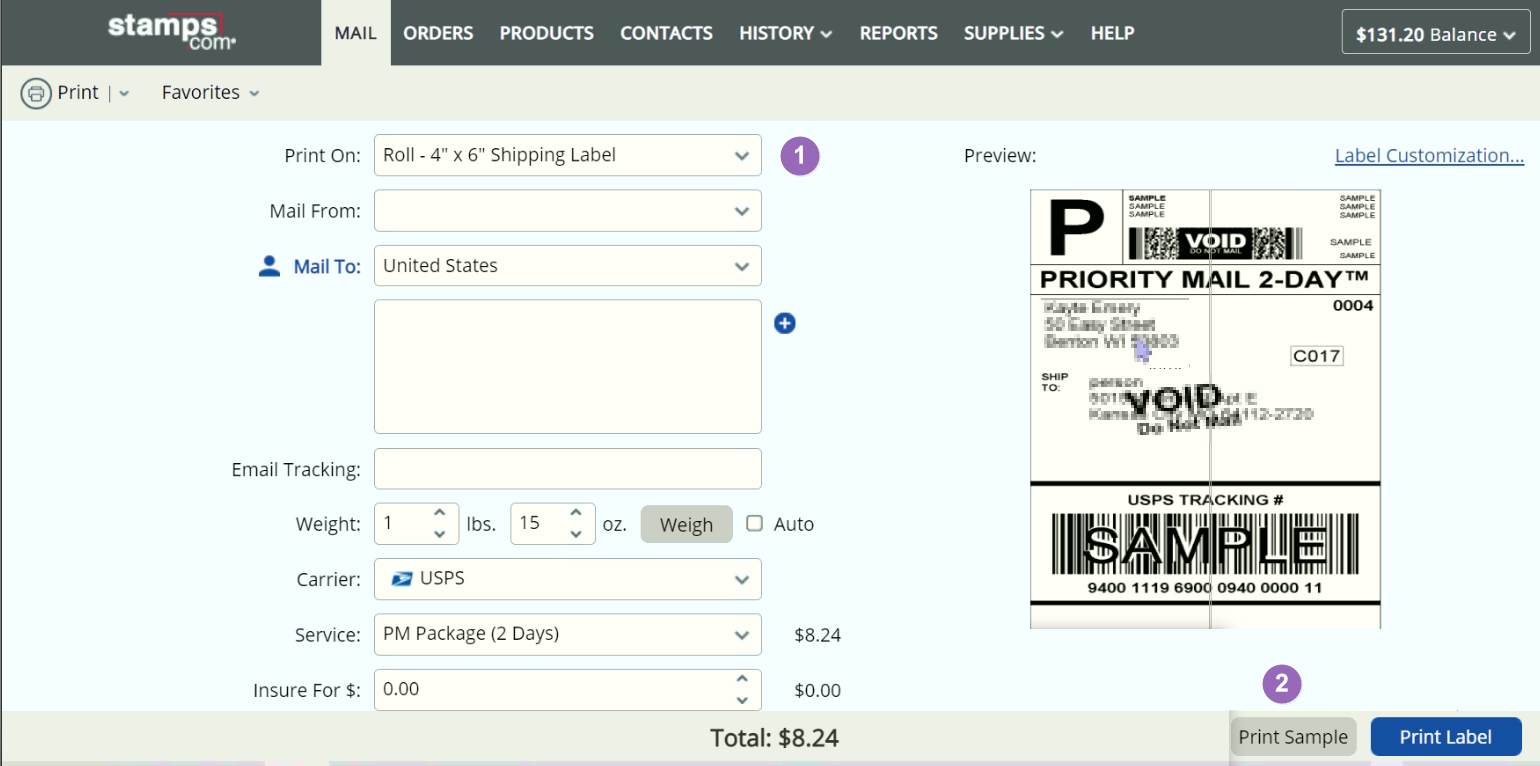
For Mac: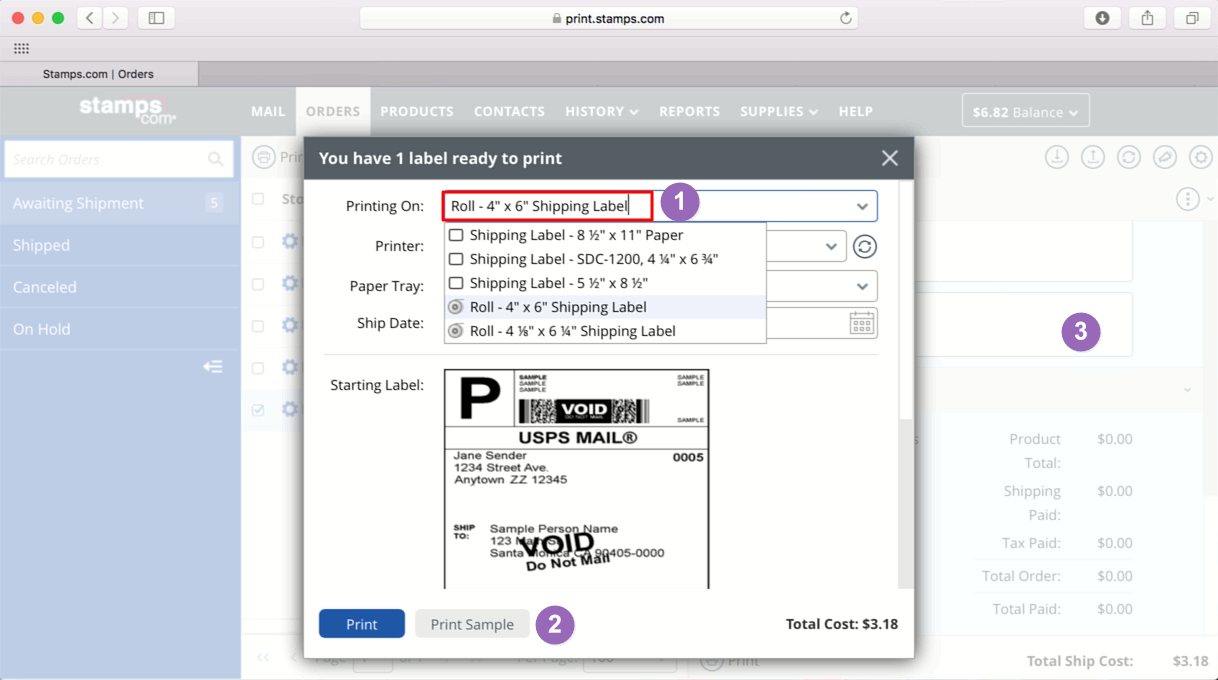
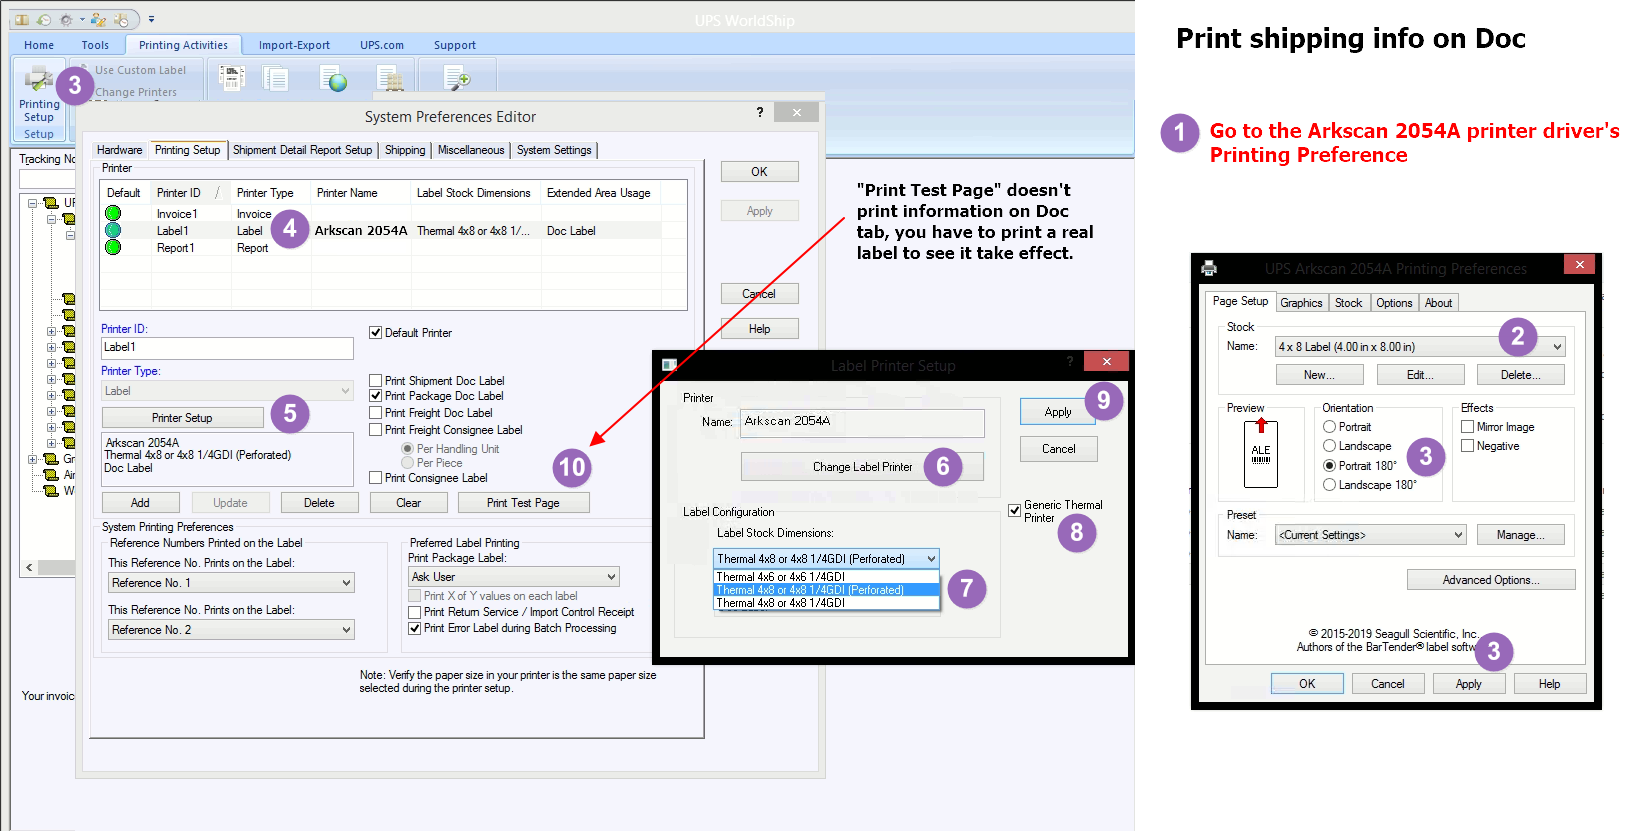
To create and print shipping labels using UPS WorldShip on a Windows computer, please watch the video or see the instructional image below for directions:
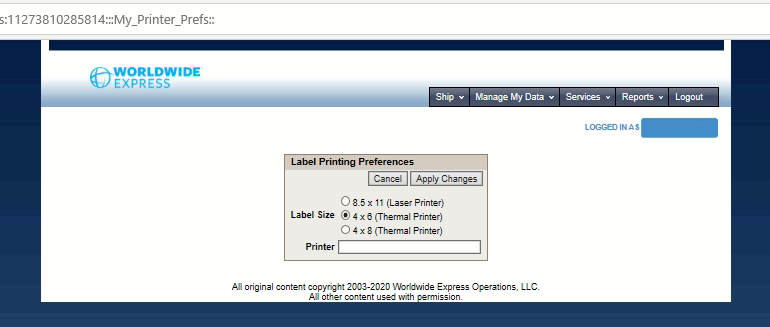
Print UPS shipping label on UPS.com website.
There are two options to print. Option#1 - You can print the shipping label by choosing the right layout format, it doesn't requires to install additional software. It works on Chrome & Microsoft Edge web browser, and it doesn't work on Safari or Firefox. Option #2 - You can print UPS label directly from UPS.com website with less steps than option #1, and it requires to install additional software to support that.
Option #1: Print shipping label by choosing the right layout format.
It works on Windows, Mac and Chromebook, and it needs to print from Chrome or Edge browser. You may follow the following video, or descriptive instruction below.
Instruction:
Make sure to uncheck both checkboxes when you print.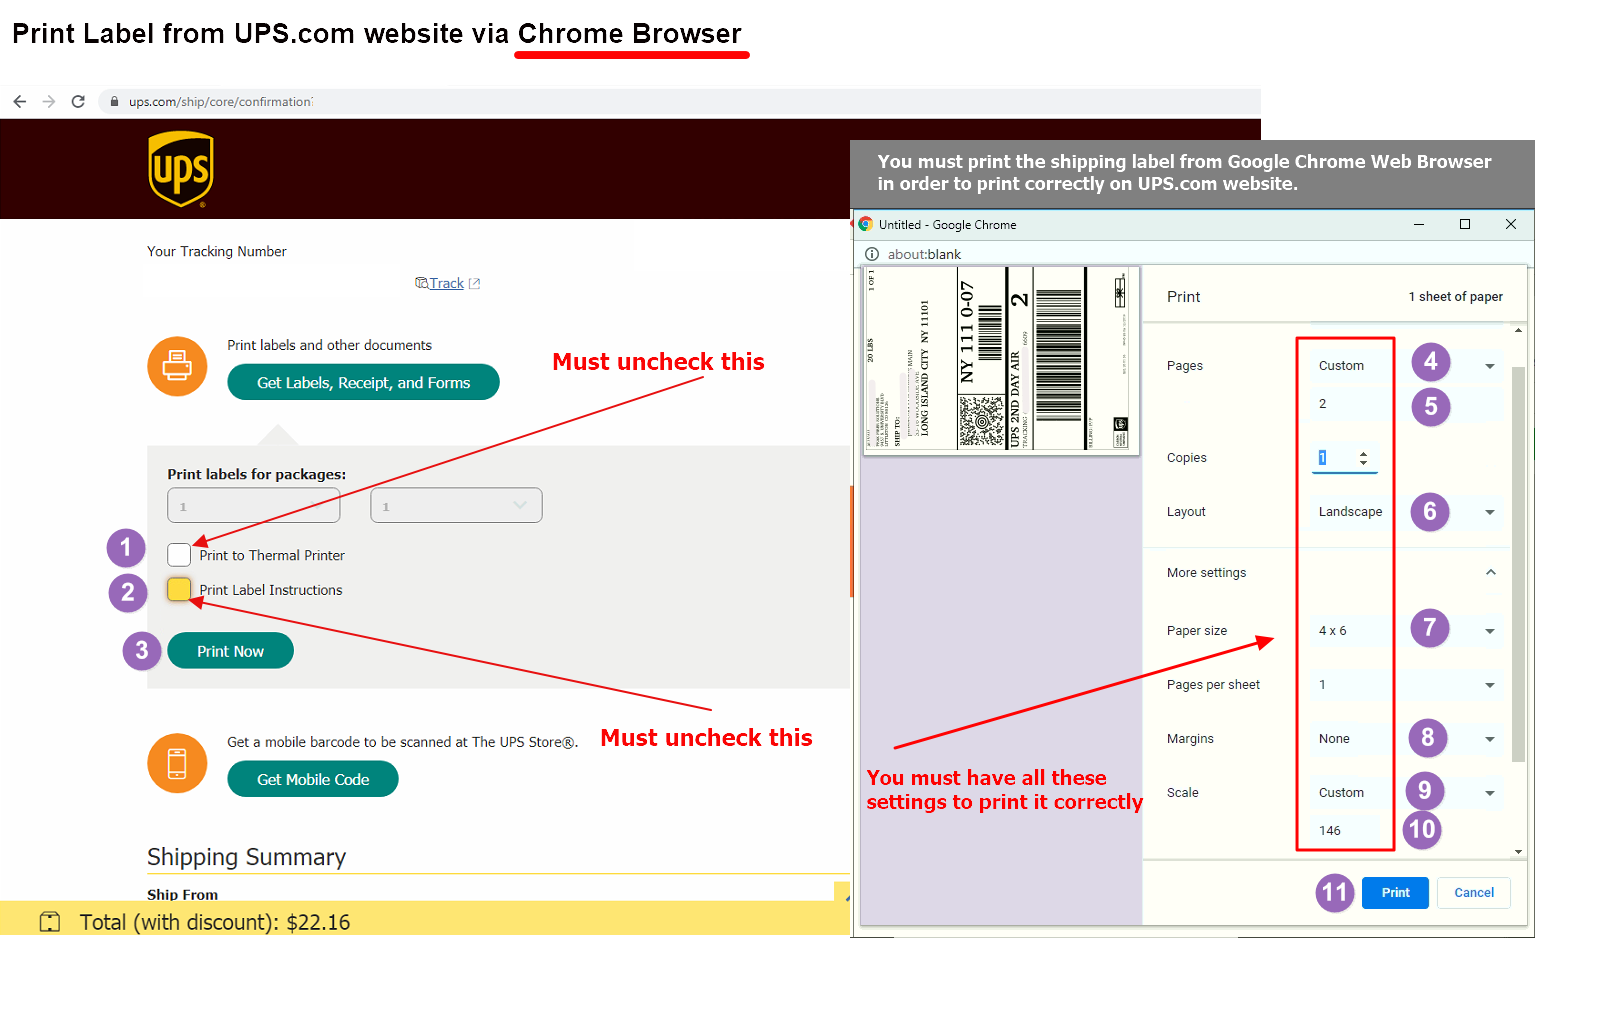
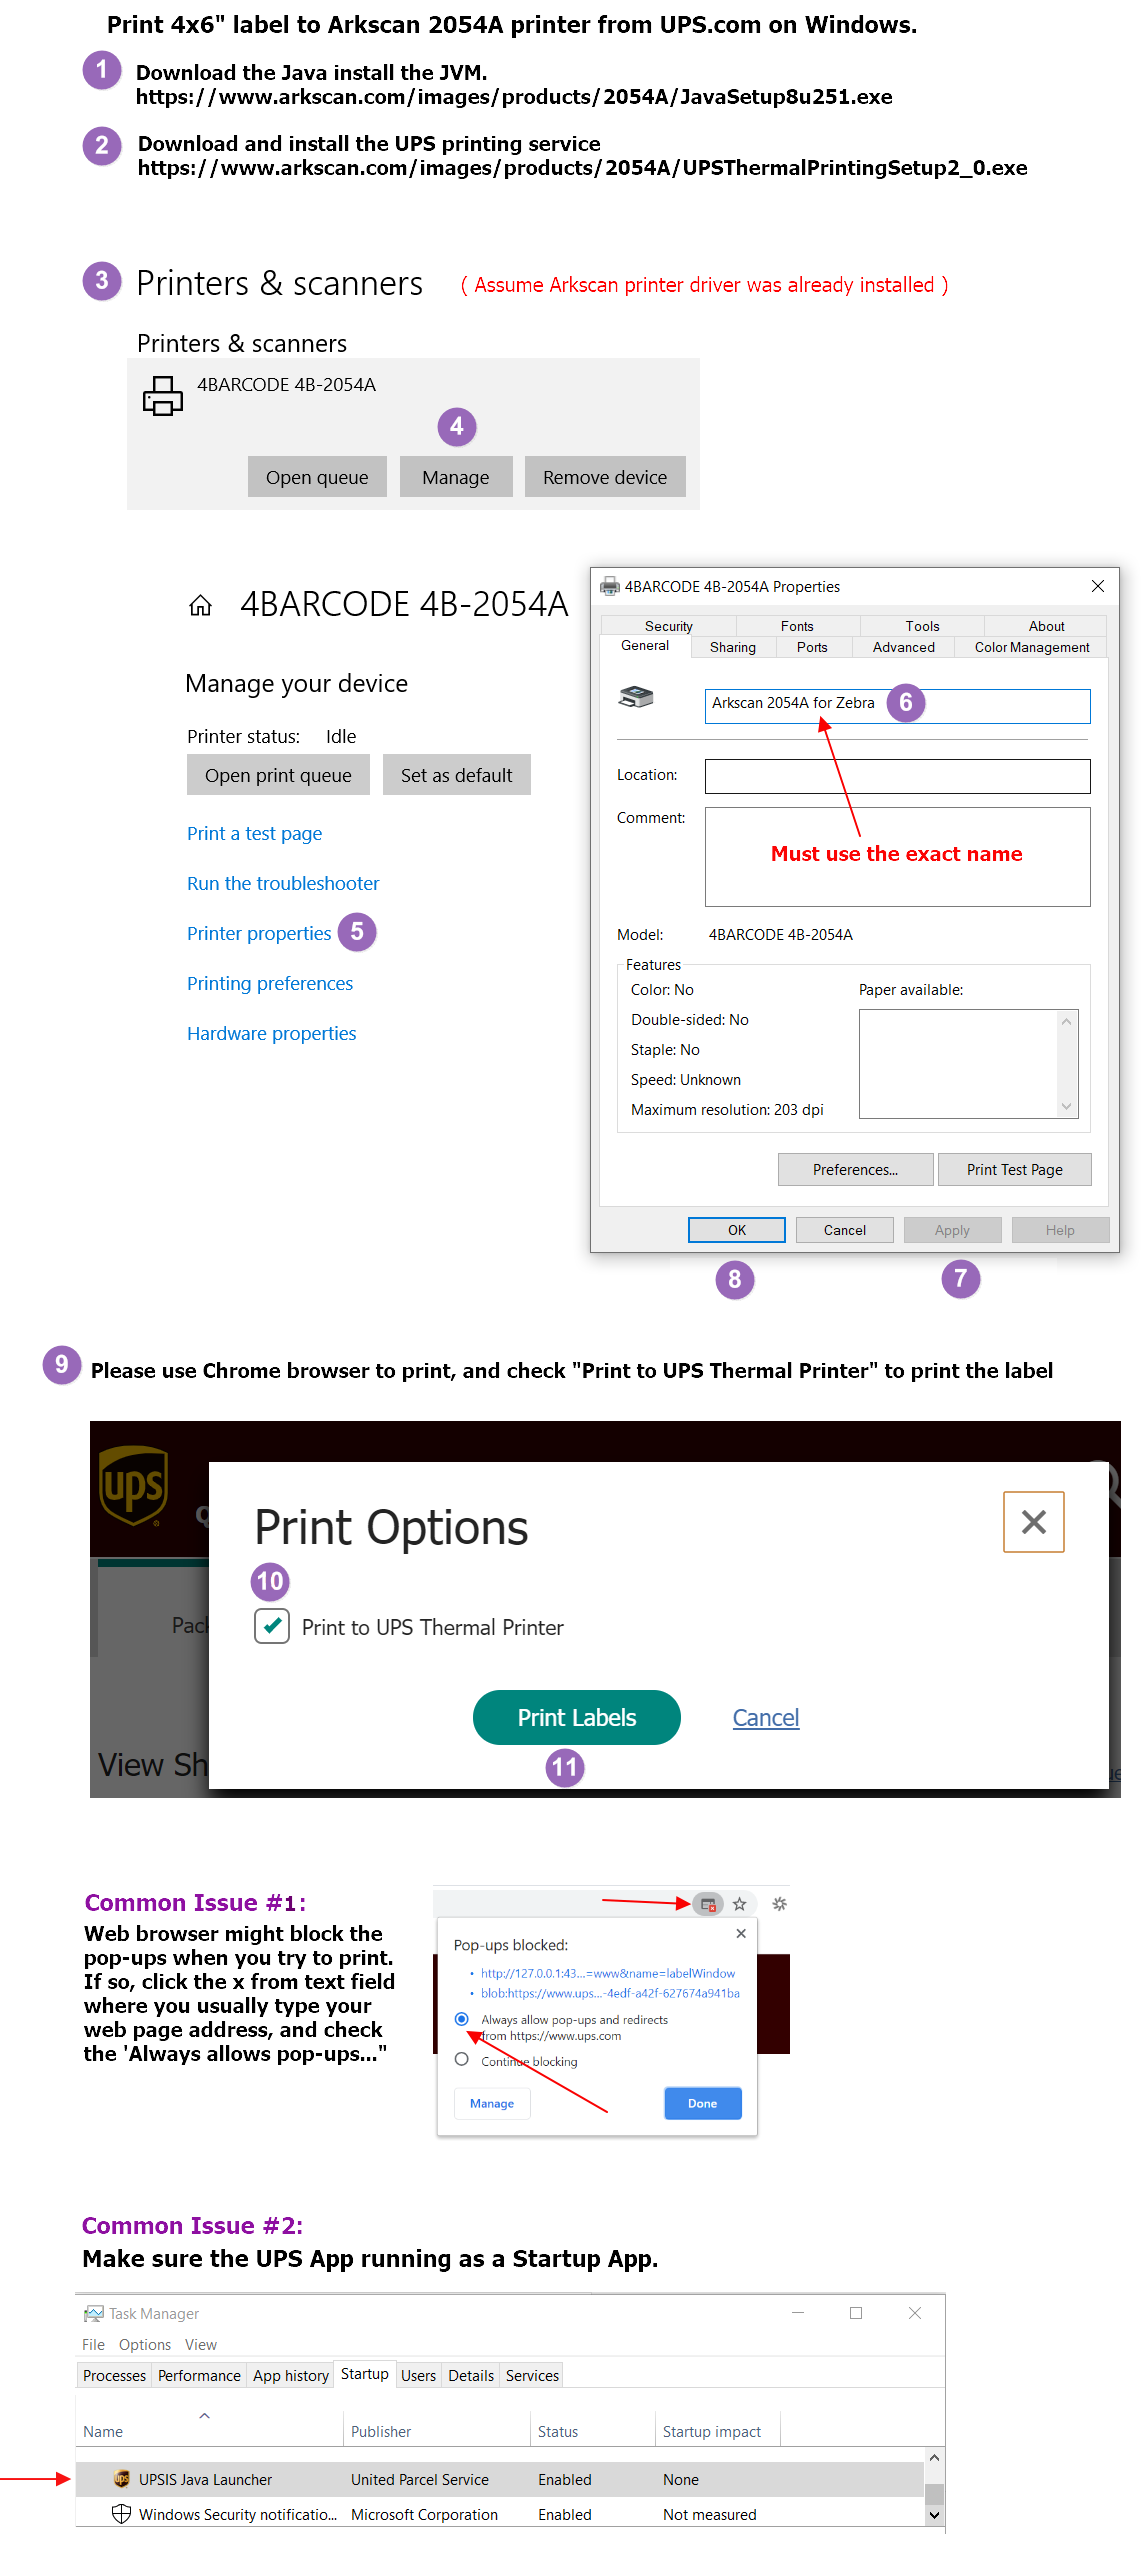
Option #2 : Print shipping label via UPS Printing Service for Windows only
You can print UPS label directly from UPS.com website with less steps than option #1, please follow these steps:
Step #1: Download and install these applications, in this order
https://www.arkscan.com/images/products/2054A/JavaSetup8u251.exe
https://www.arkscan.com/images/products/2054A/UPSThermalPrintingSetup2_0.exe
Step #2: Follow the instructions in the image below, or watch our video on how to do this process:
USPS does not offer the option to generate a 4x6 shipping label. Their site will only generate a label for an 8.5x11 sheet of paper. This will still work with your label printer but will require a few extra steps to make it print correctly:
Windows & Mac users:
- Save or download the 8.5x11 PDF to your computer
- Utilize Adobe Reader to crop the label to size and print to your 4x6 label
- Adobe Reader is free and can be downloaded at this link: get.adobe.com/reader
Please watch the following video for instructions on how to crop your label with Adobe Reader:
Chromebook users: Visit EasePDF.com to use their free online PDF Cropping Tool. Upload your saved PDF to their website, crop it to the proper size, and then print.
Alternatively, you can print USPS & UPS shipping as 4x6 labels by getting a free account with http://www.pirateship.com/
Be default Whatnot is set to generate a label for an 8.5x11 sheet of paper, you will need to change your account settings to generate a 4x6 label instead. Below is the information provided from their website:
"Ensure your shipping label settings are correct. You can update your printer settings from within your seller dashboard! Simply choose a show on the left hand side, and select "update label format" from the Edit Seller Settings menu. You can choose between 8.5x11 paper (default) or 4x6 label (thermal). If you have problems with making this change in your account, please contact -
If you need further help printing or setting up your printer, then please contact Arkscan technical support using the Contact Us button below.
For instructions on setting up the Wix integrated store for shipping labels, please see their support page:
https://support.wix.com/en/article/wix-stores-printing-shipping-labels-with-wix-shipping
To set up your Wix account to use a third-party shipping platform, please see this support page:
https://support.wix.com/en/article/wix-stores-about-shipping-labels
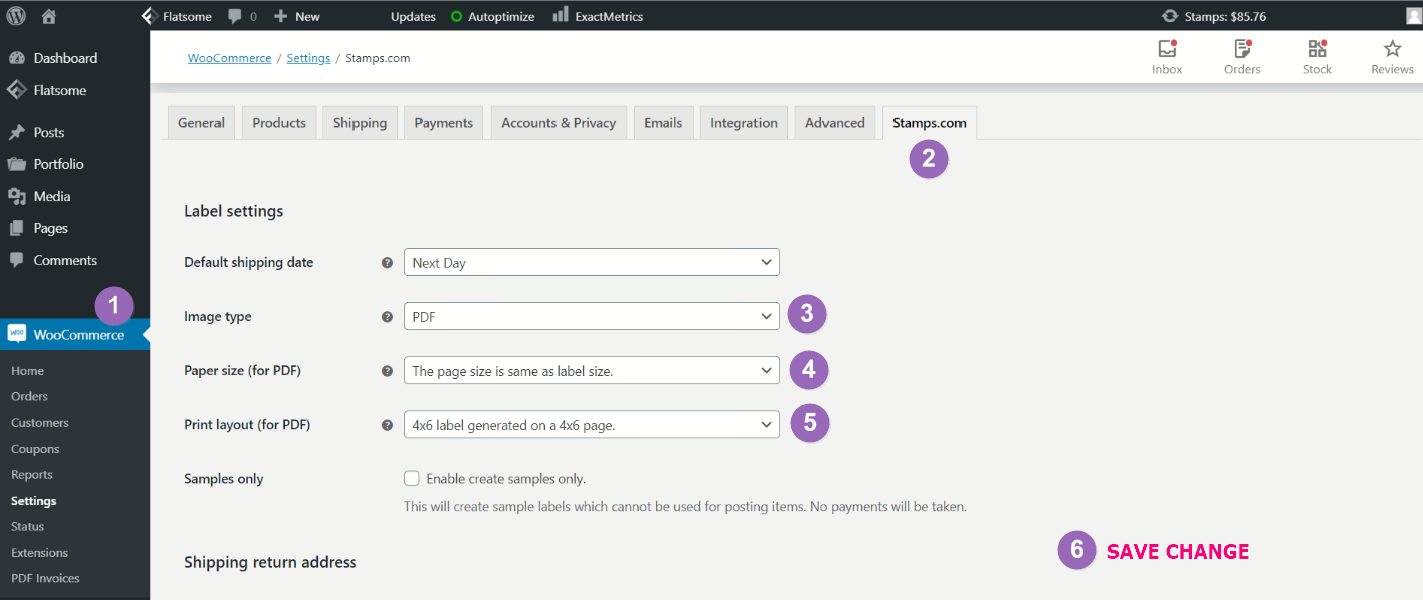
Enable WooCommerce to create a 4x6 shipping label:
To print a a 4x6 shipping label from your WooCommerce website, please see the instructional image below on what settings need to be changed:
Enable XPS ship to create a 4x6 shipping label:
Set the label printing layout to 4x6" on XPS website so that you can print the label directly to the label printer, otherwise the 8.5x11 printing layout is generated for regular printer.
Mac Users:
To print a downloaded .zpl file using your Mac computer, please follow these steps:
The ZPL file is printed by using a command line in the Terminal. We will go through the steps to modify the command to work on your computer. The foundation of the command is the following:
lpr -P (printer name) -o raw
The area in parenthesis will be the portion of the command we update.
1. Obtain the printer name portion of the command:
- Open the Terminal
- Type the following command: lpstat -v
⏎ Enter on keyboard
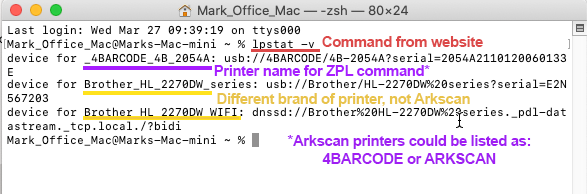
This command will list all of the printers connected to the computer. In this scenario, the Arkscan printer is named _4BARCODE_4B_2054A . It could also be named Arkscan-2054A, for example.
2. Update the command printer name:
- Using the information above, the printer name portion of the command can now be updated as follows (please copy the printer name exactly as shown in your Terminal):
lpr -P _4BARCODE_4B_2054A -o raw
3. Printing with the command:
- Copy and paste (right-click > Paste) or write the command into the Terminal
NOTE: Please make sure there is space after the word 'raw' in the Terminal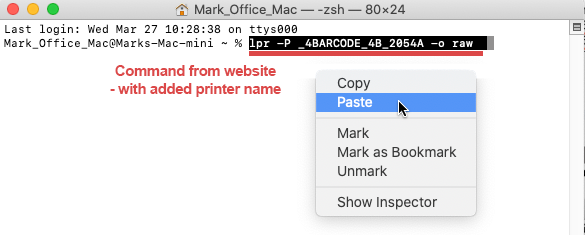
- With the command in the Terminal, drag and drop your .zpl file into the Terminal
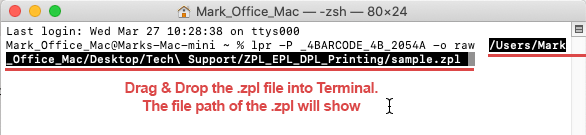
- After you drag & drop the .zpl file into the Terminal
⏎ Enter on keyboard
-The printer should now print the ZPL label
Demonstration of Drag & Drop:
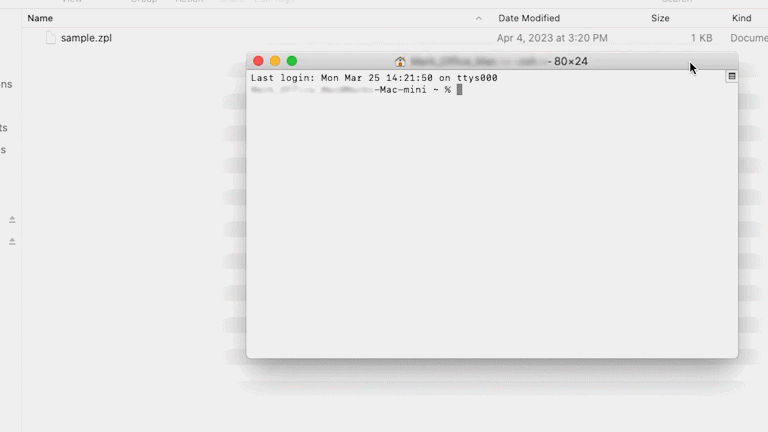
If you do not have a ZPL file and need one to follow these steps, please download our sample 4"x6" ZPL file.
Sample .ZPL file: Right Click > Save Link As... to download file
(NOTE: To download the sample.zpl to your computer, please Right Click on the link > Select 'Save Link As...' regular clicking in the link will not download the file)
Windows Users:
To setup your Windows computer to print a .ZPL file, or to automatically print a .ZPL file when downloaded using a web browser, such as Chrome, please use these files:
ZPL Label Script: Click here to download
Sample 4"x6" Label .ZPL file: Right Click > Save Link As... to download file
(NOTE: To download the sample.zpl to your computer, please Right Click on the link > Select 'Save Link As...' regular clicking in the link will not download the file)
For instructions on how to use these files, please watch our video instructions by clicking button below
PROMOTIONS
(For New Customers)


